It’s impossible to deny – OTT is synonymous with modern electronic music.
Yet, you may have wondered how it actually works? And why it sounds so good?
For these reasons, you might not be getting the most out of this simple but important tool.
So, let’s dive into our ultimate OTT tutorial to help demystify it – we’ve got a video and text version for whatever suits you!
Note: want 10 free OTT preset variations for Ableton? Get the free pack below!
The Multiband Dynamics Audio Effect
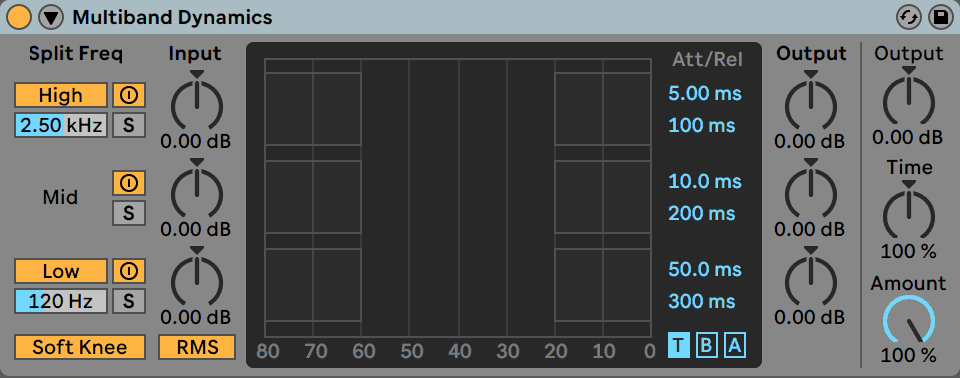
Multiband Dynamics is the audio effect in Ableton Live that the OTT preset belongs to. This thing is a lot more capable than a standard multiband compressor. It’s an extremely powerful plugin that can sculpt the audio spectrum in a compact, simple interface. Think EQ and compression rolled into one, with some extra bells and whistles.
Essentially, this effect splits the incoming audio into 3 bands: High, Mid and Low. It then applies compression to each of these bands separately, which means you can control the sound a lot more than standard compression allows. If you only want two bands, you can turn off either the Low or High bands by simply clicking on the title. If that’s not enough control, you can also specify the crossover frequencies between the 3 bands to suit the signal you’re working with.
You can bypass certain bands too if you don’t want to process the whole spectrum. Just click the on/off switch next to the name, and a dry signal will pass through. They’ve also included a solo band, which is great if you want to zero in on a specific range of frequencies. To the right of that switch, you’ve got your input gains for each band, allowing you to drive your sounds into the compressor. Dialling this in right can help get a nice pumping effect.
On the bottom left, you’ve got two less obvious controls – Soft Knee and RMS/Peak. Soft Knee applies the compression gradually as it comes close to the threshold, at the expense of earlier compression. This ensures the sound isn’t smashed as soon as it crosses the defined limit. The RMS/Peak button switches between a slower RMS compression, and a quicker peak compression. Think of it like that fat kid in gym class vs the athlete who moves quick.

The central display with the three bands is the cornerstone of this effect. Here is where the ratios, thresholds, attacks and releases are set for each one. You’ll also see that there are two blocks on either side of the display. The one on the left applies below dynamics control, and the right block controls the above dynamics control. You can drag the side of each block to change the threshold, and drag up or down to adjust the ratio. If the block is red, it means the ratio is set to decrease the volume, and if it is blue, it’s increasing it.
This means you can use 4 types of dynamics control:
- Downward Compression – above band is red – makes loud sounds quieter (this is typical compression)
- Upward Expansion – above band is blue – makes loud sounds louder
- Upward Compression – below band is blue – makes quiet sounds louder
- Downward Expansion – below band is red – makes quiet sounds quieter (this is a typical gate)
After compression or expansion, the output gain allows you to adjust the volume for each band depending on the resulting levels, which is good if you want to keep the perceived loudness the same after processing. It can also be used to colour the sound, kind of like an EQ, after dynamics control has been used.
On the far right, we have a general output gain, a time knob to scale the attack and release for each band, and the amount knob, which acts as a standard dry/wet effect.
OTT: Native or Plugin?
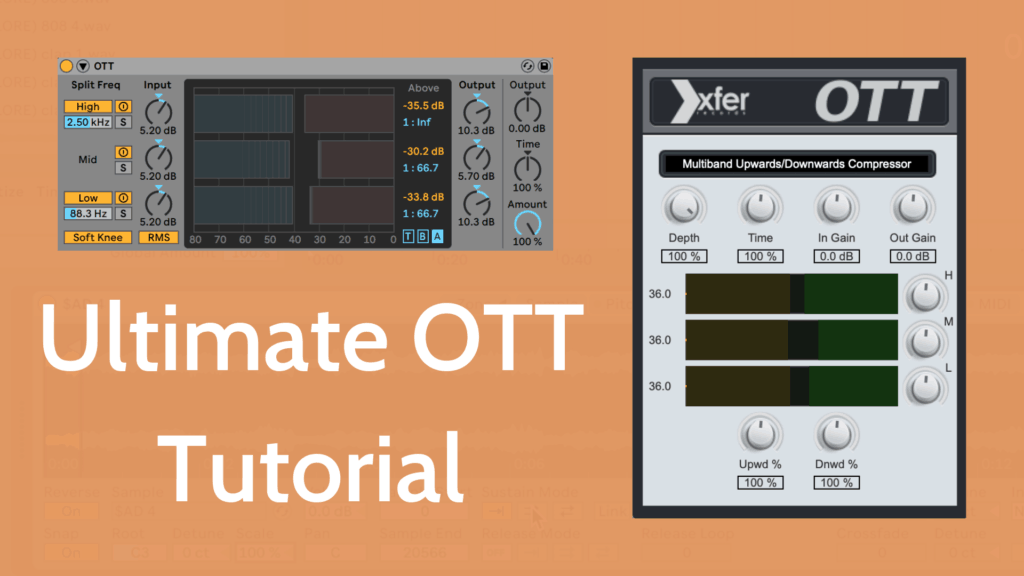
Now that we’ve covered the fundamentals of multiband dynamics, let’s look at the reason we’re all here – the OTT preset. But beyond the Ableton OTT version, there is also a plugin made by Xfer which emulates it. Good news for non-Ableton Live users. Let’s see how they differ.
Native
Don’t know what it sounds like? Here it is on some drums at 100%.
Pretty slammed, right? There’s a lot going on here which we’ll now unpack.
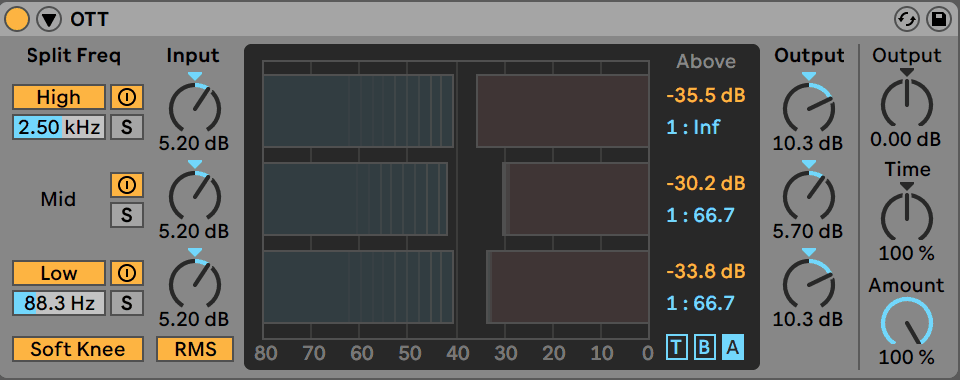
If you compare the OTT preset to the default settings, you’ll notice quite a few changes. Firstly, the Low-Mid crossover is set at 88.3Hz instead of 250Hz, allowing the low band to just work on the subrange. Secondly, the input gains are giving an extra 5.2dB per band, pushing the signals into the compressors.
If you look at the bottom right, we’ve got a soft knee and RMS-style compression, meaning we’ve got a smoother compression algorithm. This makes sense given the amount of intense processing that we’re about to get into.
The real magic happens when we look at the band settings. The highs are being limited at an Infinity:1 ratio, with the other two bands not too far behind at 66.7:1. If we take the gain into account, this means the sound is already going to get quite squashed, especially the high end.
Looking at the thresholds, the highs are set earliest, followed by the lows and lastly the mids, having a bit more room to maintain a somewhat natural mid presence. But generally speaking, they are all very intense thresholds, meaning you can be sure the sound is going to get compressed.
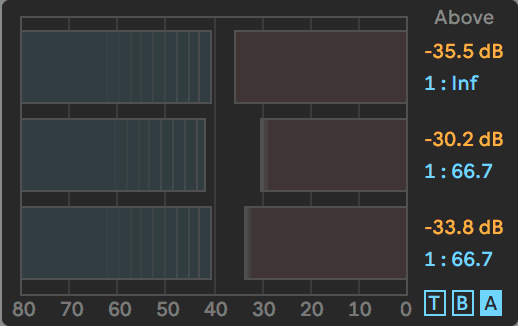
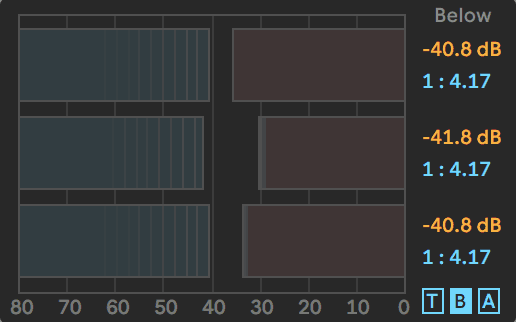
If that’s not enough, each band is getting a second dose of upward compression, each at around a ratio of 4:1. While this is a bit more relaxed, it’s still enough to keep the dynamics in the tight black spaces between the thresholds. Once again, the mids get a bit more space in comparison to the lows and especially the highs.
Looking at the timing, we’ve got fairly fast compressor times, especially the highs at a 13.5ms attack and a 132ms release.
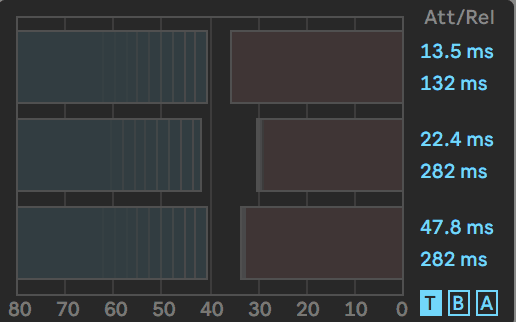
To top it all off, we’ve got the low and high bands having 10.3dB of output gain each, meaning that the sound is going to be hyped in those areas, and 5.7dB for the mid-band, once again being a bit more modest to preserve any sort of musical quality.
Plugin
What about if you’re not an Ableton Live user? How do you get the same effect in another DAW like FL Studio or Logic Pro?
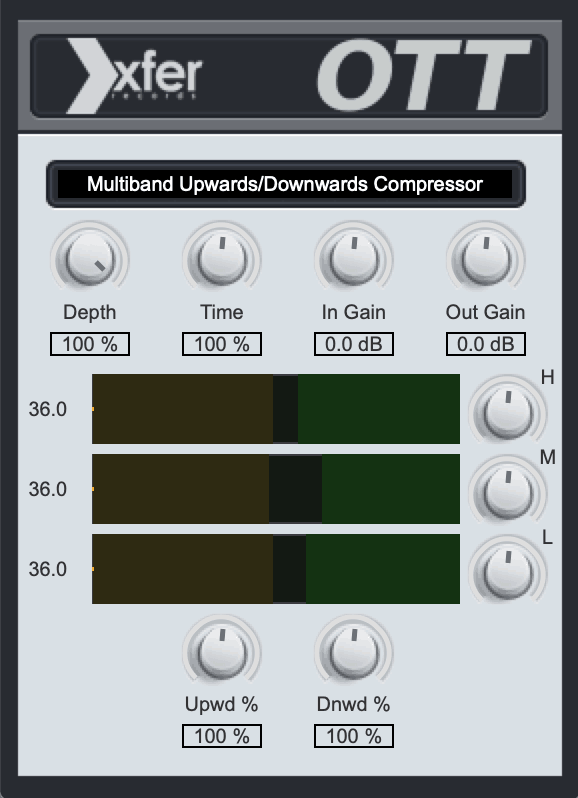
Thankfully, Steve Duda at Xfer Records has created a faithful emulation of the preset, allowing you to squash sounds across all software. It’s available here in both VST and AU formats.
The only caveat here is that the controls are a little different and limited.
You have your depth knob (amount), time knob and general output gain knob, at the top of the display, with the addition of an overall input gain knob, something the Ableton Live preset doesn’t come with.
The main display looks very similar to the original OTT, but you can only customise both the above and below thresholds at once. This is achieved simply by clicking and dragging in the middle. You can do this for all 3 bands still, which is a plus.
On the right of this, you have output gain for each band, allowing you to colour the sound however you wish.
In terms of ratios, you can change the overall upward and downward compression by adjusting the scale knobs at the bottom. Once again, this doesn’t work on a per-band basis but allows you to change the overall effect for each band.
Putting it to the Test
Knowing how OTT works is only half the story – you need to know how to use it in the context of music.
General
The most important thing is to use the Amount knob in order to blend the dry signal with the processed one. Because OTT is such an intense sound, it often sounds best when blended in. It’s something we rely on heaps when processing sounds in EDM Foundations. That being said, certain sounds can sound cool with it on 100%, especially in the context of creative sound design.
Drums

OTT and drums is truly a match made in heaven. Using it on a drum break or loop can help to add character to the previously quiet nuances in the groove, adding a new-found texture to your percussion.
One of my favourite tips for using OTT on drums is that you can boost the input and output gain of the low band, which gives it a heavy but controlled low end. Blend the amount back and you can keep the natural sound of a drum loop or individual one shot.
You heard the drum example earlier? Let’s dial it back a bit to 30% and hear it applied more subtly.
Leads, Instruments & Basses

It’s important to use OTT on leads and basses as to highlight the movement in them, meaning it might require you to revisit the initial synth patch if your sound is boring. Introducing filter sweeps, volume or pitch changes or any sort of tonal/textural variation in the sound will be amplified when you throw on OTT. This gives it an almost claustrophobic quality to the resulting sound.
If you’re using a sample for a lead or bass, the chances are there will already be some interesting natural movement to the sound. But if you’re relying on digital waveforms from a synth like Serum or Massive, you might want to add in a little something before you brutalize it. Of course, you might be going for a static sound, so this only applies when trying to add interest.
Here’s a guitar sample with OTT dialed in at 39%. I’m using a variation of the preset included in our free pack called ‘Lofi Crisp Highs Squash’.
FX/Foley

Foley is an exception to the rule of ‘always use the amount knob’. This is generally, because organic foley has a lot of variation in dynamics that can be controlled. On top of that, these sounds are usually blended in with other main layers, so compressing it heavily isn’t as much of an issue.
The birds foley sample below sounds quite nice once the OTT is applied, with 100% of the Amount cranked.
Master
OTT on the master is a great ‘hack’ that can be used to glue your mix together, especially when you like the bright, pumping effect is has on any sound. Be sparing here though, as overdoing it could ruin your track. The rule of thumb I generally use is no more than 20%, and usually sticking to ~10% of the amount.
Here’s a track I’m working on that uses OTT at 16% on the master.
Your Turn?
Knowing how to use OTT is only half the story – now you need to go and put this knowledge to the test.
Ok, need some motivation to go open up your DAW? Here’s a free pack of 10 OTT preset variations for you to play around with.
Let us know any cool things you come up with by emailing me at [email protected].

