BLACK FRIDAY 2022
OUR BIGGEST SALE OF THE YEAR. Up to 80% off all courses and products.
Days
Hours
Minutes
Seconds


Before we dive into the complexities and technicalities of how a compressor works, it’s important that you understand it from an overall perspective.
Otherwise, you’ll make the same mistake I did: endlessly tweaking a compressor, hoping it would fix my crappy songs.
First of all, it’s important to understand that like any audio effect, compression is simply a tool.
In fact, it’s an important tool that I would place in the top 4 most crucial for mixing:
It’s a tool that can be used well, or poorly.
Unfortunately, compression often ends up becoming praised as the holy grail of a fat, full and loud mix.
While it can contribute, many producers overlook many other factors involved with mixing and production as a whole, like:
Compression is just volume changing over time, really fast.
Read that again.
It’s just volume automation.
How? It reacts to the incoming audio and turns it down when it gets too loud, and turns back up when it’s quiet again.
Pretty simple right?
This reduces what is known as the dynamic range of a sound.
The dynamic range is simply the difference between the quiet and loud parts of a sound. Compression reduces this, making it more even over time.
But why would you want to do something like that?
Some audio material tends to be very dynamic, meaning there is a large gap between the quiet parts and the loud parts of the sound.
This can be good, but it means that certain elements in a track might not poke out the whole time, burying them in the mix.
Maybe a snare punches through too loud and the rest gets buried right after. Perhaps certain guitar strums don’t quite cut through. Maybe your voice sounds muffled in parts, but clear in others.
The process of evening out instruments and sounds is very important for recorded music, as listeners want a consistent listening experience.
This is especially important in 2020, where music can be listened to in all sorts of environments – at home chilling, when walking to work, in the car, with your friends at the park, in the club etc.
Some of these environments may have different sounds going on, so the music needs to poke through in order to keep up.
Most of the time, compression can help us achieve this effect.
So let’s take a look at the basics so we can start to use this great tool.
To understand how a compressor works, you have to know each of the main controls:
Some compressors will deviate from these, some may actually exclude these completely. But we’ll start with these basic controls and then dive into less common features.
The threshold is the ‘when’ of the compressor.
It says ‘it’s too loud now, time to turn it down!’

This control is measured in dBFS, with 0dB being the loudest and -∞dB being silence.
Where you should set the threshold is very dependant on the incoming signal, and it can help to have some sort of visual on the signal to see where it’s peaking at.
The ratio is the ‘how much’ of a compressor.
It determines when compression is engaged, how much the signal is turned down by.
This is measured as a ratio of dB from input to output.

For example, a ratio of 2:1 will turn a signal that is 1dB over the threshold down by 0.5dB.
Because for every 2dB that crosses the threshold on the input, it will output only 1dB over the threshold.
But a ratio of 4:1 will turn that signal down by 0.75dB, leaving only 0.25dB over the threshold left.
Because for every 4dB that crosses the threshold on the input, it will output only 1dB over the threshold.
This can be a confusing concept, but higher ratios = more compression.
Ratios of around 2:1 and 3:1 are great for general dynamic control, and upwards of 4:1 are closer to limiting and squashing type effects.
Ratio and Threshold are the two key players in compression, and how they are set in relation to eachother can make or break the type of sound you are trying to achieve.
Most people take one of two approaches when setting ratio and threshold. High ratio and low threshold, or low ratio and high threshold. The first generally applies less-frequent compression, but it’s heavy once it engages.
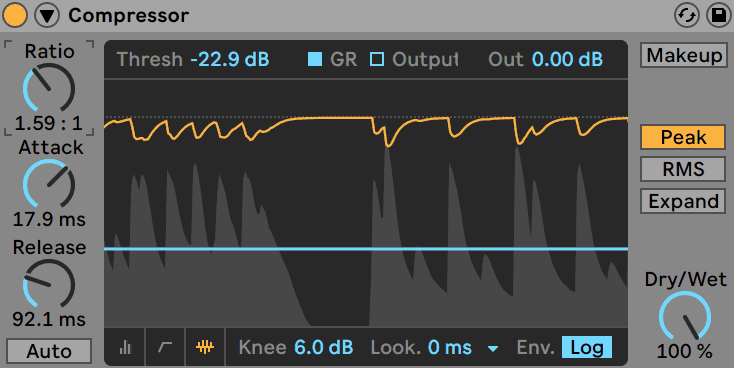
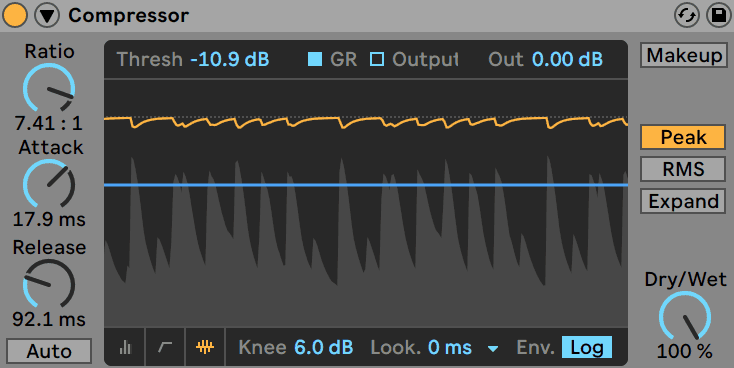
The latter applies a subtle amount of compression more consistently.
Either method can be fine, and you don’t have to always adhere to either rule (low ratio and threshold can be fine for very subtle control). It ultimately depends on the type of sound you are going for, although many would argue that brutal compression sounds unnatural, even when infrequent.
Both attack and release determine the speed at which the compressor works. At 0ms, both controls work instantly, but this doesn’t sound very musical and often introduces distortion.
Specifically, the attack determines how long the compressor takes to engage.
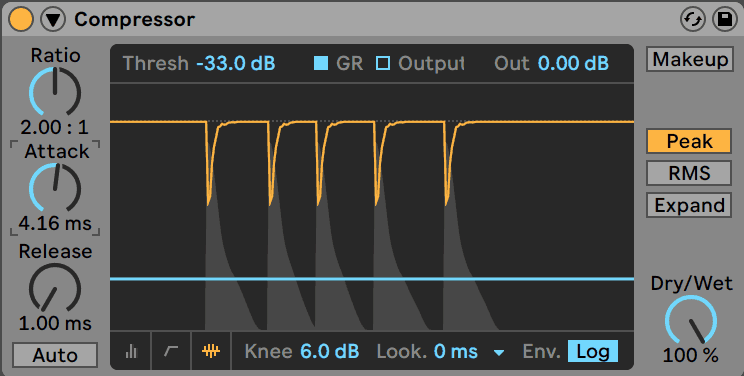
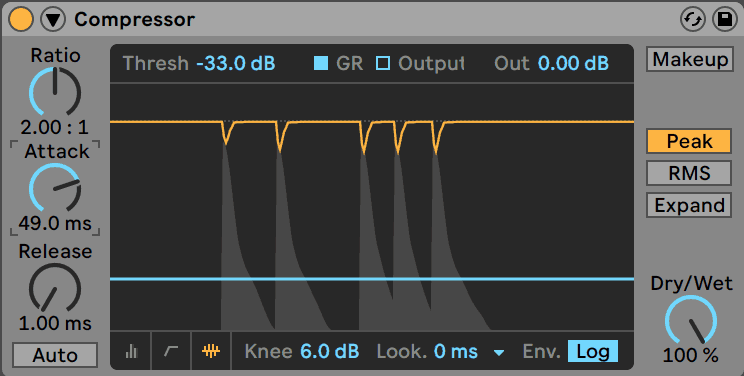
A fast attack makes a sound squashed and controlled (great for audio spikes or overly-dynamic sounds), whereas a slow attack gives the start of a sound time to breathe (great for percussion).
Listen to the snare below. The first has a short attack, the second has a longer attack, as pictured above.
Note that both attack and release are gradual controls. An attack time of 50ms means that it will fade in the compression over that 50ms, not immediately after 50ms has passed.
In conjunction with the Attack, the Release determines how long the compressor takes to disengage, once the audio has passed back below the threshold.
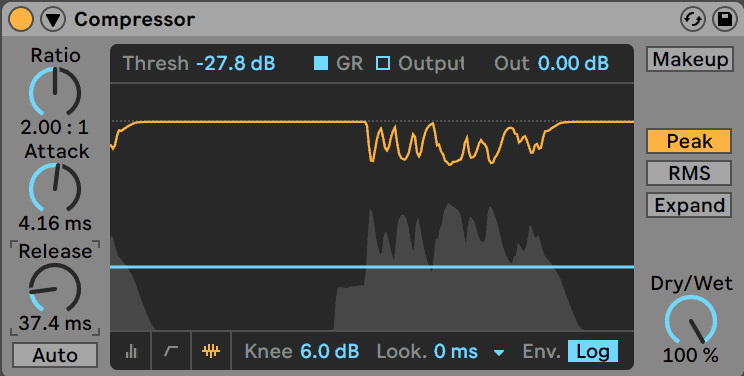
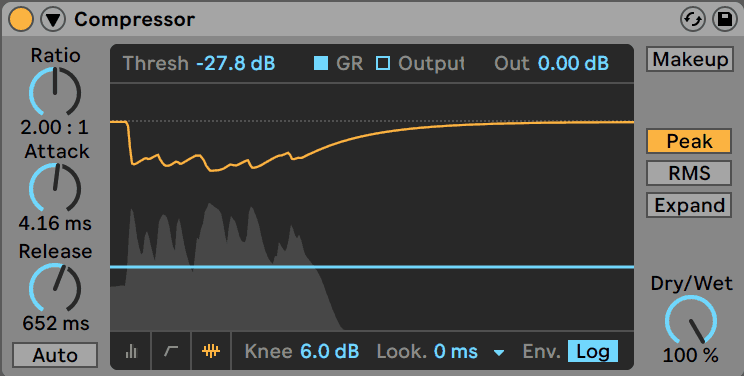
Like with attack, a fast release can sound squashed and gives a pumping effect to compression (which can be desired).
However, a slow release can sound smoother and slower, which is great for more subtle applications.
Listen to the two examples of short and long release on this vocal sample. The first sounds very pumping, whereas the second sounds smoother but more compressed.
Like with the attack, the release will fade back to normal over the set time. It doesn’t wait for say 200ms and then suddenly stop compressing. This is how a compressor maintains a transparent and natural sound.
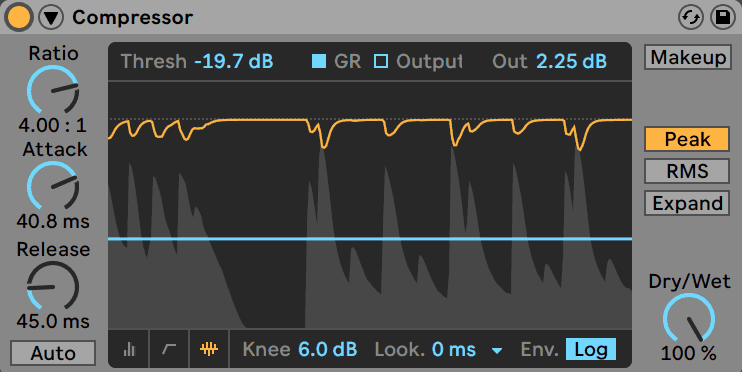
Not so much as a control, but gain reduction is an important measurement to keep an eye on.
Why? It measures how much compression is taking place at any given moment.

Crank up the ratio or threshold and you’ll see the gain reduction meter increase as a result, so it’s great to use in conjunction with those controls.
The last of the basic controls is makeup gain.
This determines how much the signal will be brought up in volume after compression has been applied.

A good practice here is to match the new peak level to the old peak level. Even though they have the same theoretical ‘max’ loudness peak, one sounds fuller and louder.
Recommended: Mixing For Producers
So we’ve covered the main controls of a compressor, and you’ll find those on 99% of plugins. But each compressor starts to include a variety of the features below, so let’s see what else can crop up.
Moving onto more advanced controls, we have the knee.
Knee, measured in dB, can be powerful if used correctly, even if it’s a subtle effect.
It works by ‘blurring’ the threshold. Instead of engaging at a very specific point, the ratio creeps up from 1:1 (no compression) to the actually defined ratio over a set amount of dB.
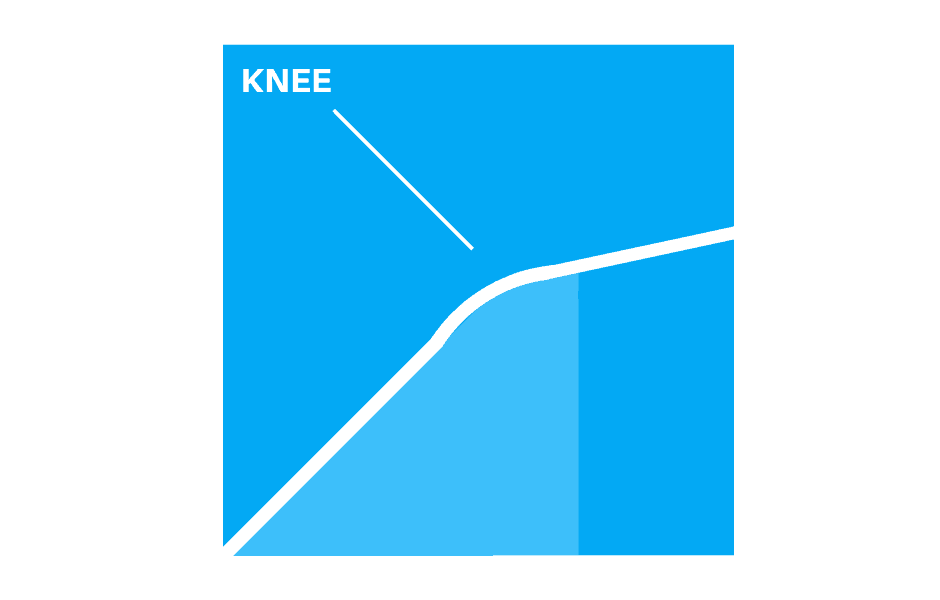
Say your threshold is -18dB and your ratio is 4:1. As the audio approaches -18dB, with a knee of 3dB the compressor will actually start engaging 1.5dB earlier (knee blurs both ways, 1.5dB before the threshold and 1.5dB after).
So as your audio hits -19.5dB, you’ll start to hear more subtle compression, and as it moves to -16.5dB, the full ratio will be engaged.
In addition to the makeup gain control, some compressor will include an input gain knob.

This allows you to drive the signal into the compressor, creating a greater sense of compression.
It also helps if the signal you’re working with is too loud or quiet, as you can set it to an ideal volume to work with.
Compressors, although they are useful tools, are unfortunately quite dumb, and are reactive as the audio comes in.
Sometimes, this means the compression doesn’t engage fast enough and clicks and pops still get through when large dynamic changes occur.
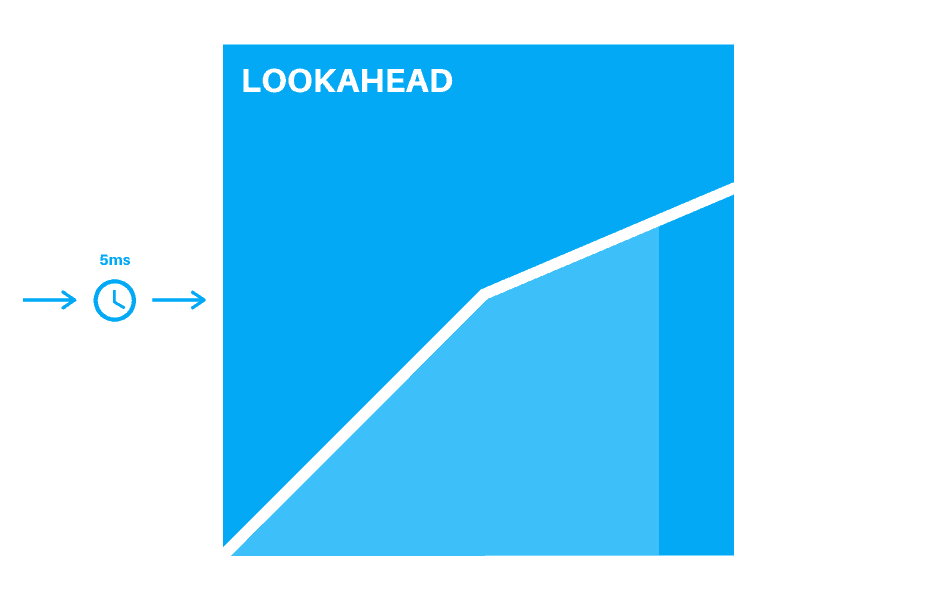
Lookahead solves this issue by adding latency in order to see the signal for a bit of time before outputting the compression. Even something small like 1ms can make a large difference.
Say you’ve set your ratio and threshold to a position where you are consistently getting between 3dB and 6dB of gain reduction. You like the effect it has sonically, but it’s a bit too intense.
Range scales back the compression by reducing the amount of dynamic range the compressor is ‘allowed’ to look at. Think of it as ‘relaxing’ the ratio control.
By default, the compressor could reduce the signal down to -∞dB if possible, but bringing the range up can control more intense gain reduction.
This is a more modern feature on digital/software compressors that allows you to easily blend both the wet and dry signal to dial back the amount of compression.

This is also known as parallel compression, as you are mixing the uncompressed signal with the compressed signal.
Before software compressors, a compressor was used on a send/return and was blended in with the original signal, but now you can do it all on the same effect.
Another more advanced control is peak/RMS switching.
Some software compressors will offer this feature, while analogue or modelled compressors will rely on the circuit type to perform either type of compression (some analogue compressors would be closer to RMS, some to peak etc.)
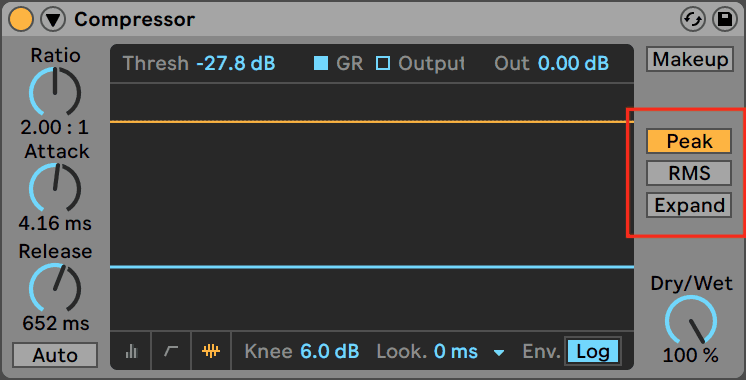
Peak compression acts on the momentary audio as it is, whereas RMS compression acts on the average loudness of the audio (closer to how humans hear sound).
Peak mode is great for precise compression (getting a snare drum to punch) whereas RMS can be more ideal for smoother, more musical compression (compressing a whole mix).
Certain compressors will allow you to choose between different shapes of curves. It’s not a very common control, but can be useful to know.
The most common two are Linear and Logarithmic.
Logarithmic tends to be how most audio is compressed, as it sounds natural to us.
Linear compresses in a straight line and sounds precise but very digital, especially when heavy compression is being applied.
Some other compressors (FL Studio’s Fruity Limiter comes to mind) have multiple different release curve types, as well as attack curves.

We’ll cover how sidechain compression works shortly, but the sidechain input allows you to set a secondary input as the ‘trigger’ for the compressor.
90% of compressors will have this feature, with the exception of older, analogue-style models.
There are many sub-controls, depending on the compressor, but it can include:
So aside from the controls we’ve just covered, different compressors may look vastly different, showing many different layouts and ways of providing visual feedback.
To clear this up, let’s see the main graphical interfaces you’ll come across.
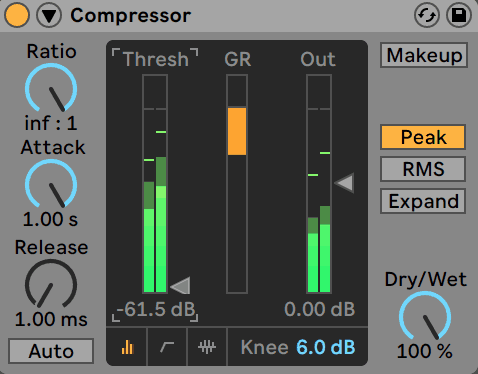
This is what most digital compressors will use, and it’s what I’ve been using to show you all this time.

It graphically represents the input level (on the ‘x’ axis) vs the output level (on the ‘y’ axis).
(Hopefully, your high school math lessons paid off.)
You can see how the ratio and threshold determine when the audio starts getting compressed.
This view is great for understanding how attack and release affect your sound, as you can see the gain reduction curve over time.
For example, longer release curves will take longer to get back to 0dB of gain reduction.

The threshold can be set in this view normally, but it’s hard to tell what the ratio is doing, besides making the compression more or less.
This is the most basic (but personally least helpful) view.
It simply shows 3 meters – the input level, gain reduction, and output level.
This is normally the case with old-school compressors.
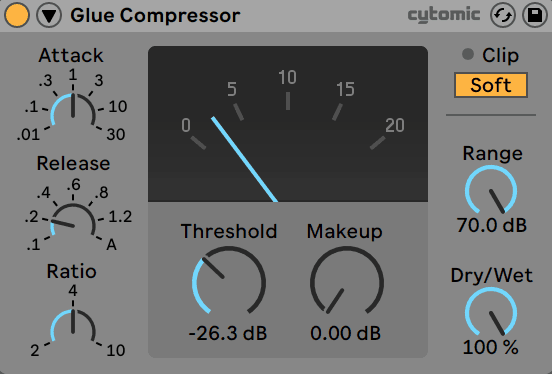
Basically, it’s a gain reduction meter shown by a needle. It looks cool and helps you be more deliberate with the amount of compression you are using.
So far, we have been talking about a specific form of compression known as downward compression.
The reason for this is because it’s the most common form of compression you’ll find, from software to hardware.
But there are many types of compression, so let’s go through them all.
As I said before, it’s the most common form of compression.

It works by making loud parts of the sound quiet.
This works because it’s easy to control a sound while maintaining the overall feel of it.
As you may have guessed, upward compression works in the opposite way to downward compression. But not in the way you might think.

It makes the quiet parts of a sound louder by turning up the volume when a sound drops below the threshold.
This type of compression can work wonders on some sounds, although it tends to be a rarer feature in software compressors.
Expansion is technically the opposite of compression – instead of reducing the dynamic range, it increases it.
It does this by making the loud parts louder (upward expansion) or quiet parts quieter (downwards expansion/gate).

Although expansion is a very rare-use case, it’s still helpful to know what it is and how it works.
If you want to get more precise, you can use what is called multiband compression.
This form of compression allows you to split the signal into multiple frequency bands (e.g. low, mid and high) and process each differently with compression.
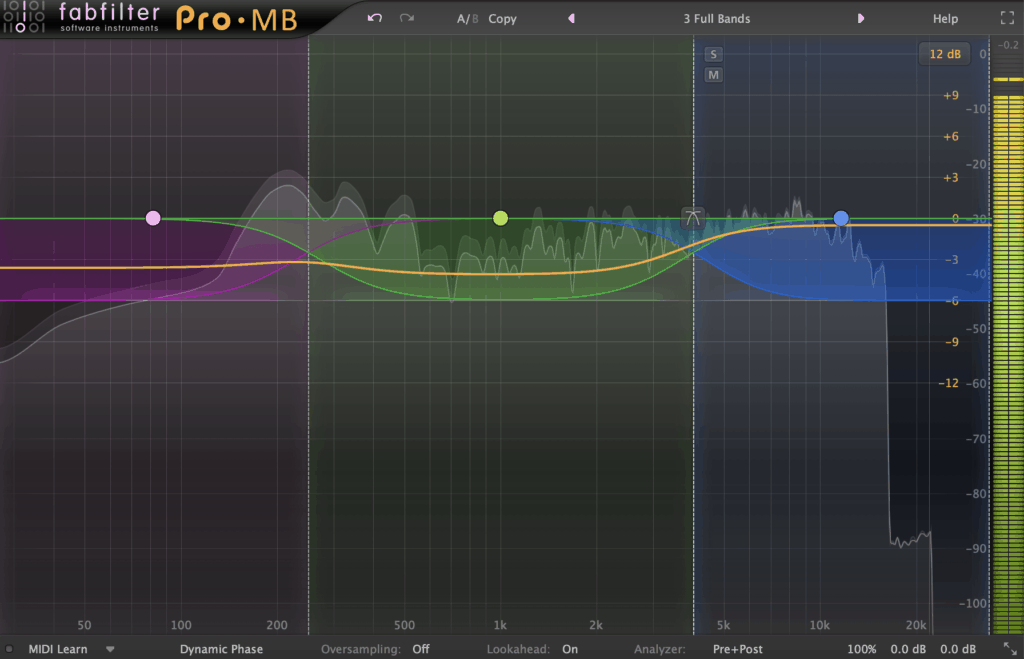
Multiband compressors often use a combination of both upward and downward compression to achieve the desired effect. A good example of this is Ableton Live’s Multiband Dynamics plugin, which allows for upward and downward compression, as well as expansion.
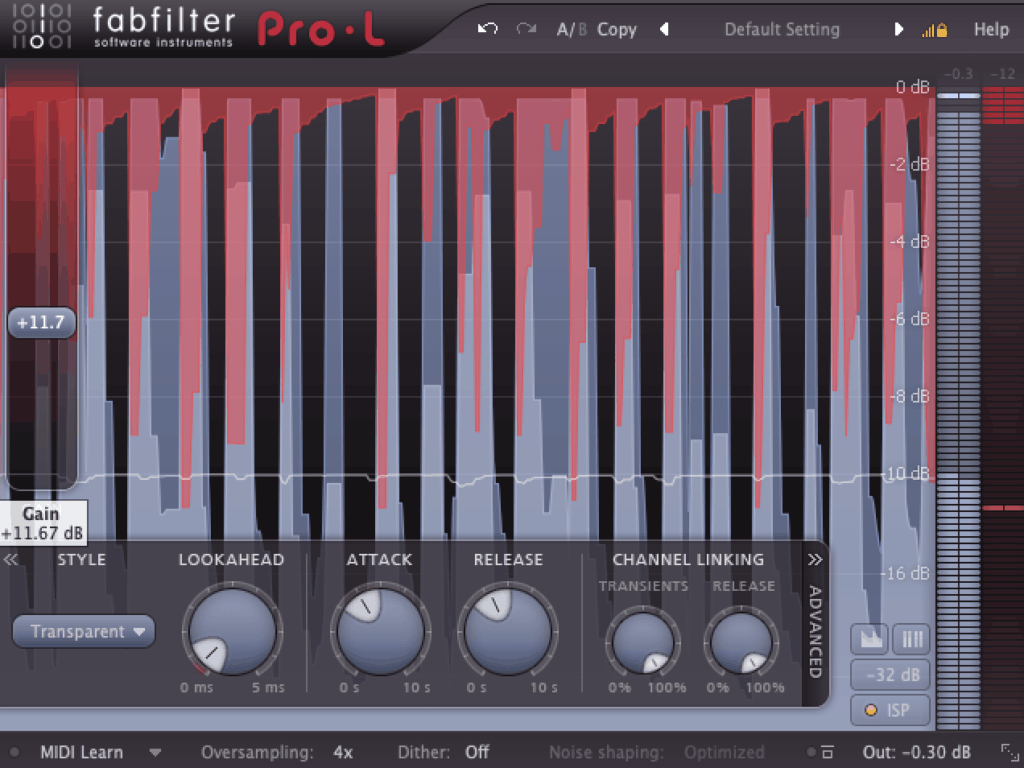
A limiter is basically a compressor with a ratio of ∞:1 and a threshold of 0dB. This ensures no audio passes the loudest point before distortion occurs.

But leaving the description at that is not doing most limiters justice. Most modern brick wall limiters also have smart algorithms that adjust the attack and release times to the incoming audio, allowing for greater loudness.
Many standard compressors will offer a sidechain input, allowing you to reduce the audio of one sound when another passes the threshold.
The most common form of sidechain is when the kick hits and other sounds (e.g. bass and synths) will duck in volume.
Sidechain compression can really help clean up a mix and put certain things at the forefront, and others in the background when needed.
Recommended: Sidechain Compression: How To Create Tight Mixes
Software compressors these days are a blessing and a curse.
Before software, analogue compressors had a lot of unwanted side effects from the compression process, meaning that often sounds may have gotten a bit more distortion or tonal changes as a result.
But now, compressors in a modern DAW just do what they should – compress.

The problem is that these artefacts have now become desirable, and some people regard digital compressors as too cold.
But as I’ve reiterated, compression is a tool, and different compressors are good for different applications.
I’ve groups both ‘true’ analog compressors and their software emulations into the same category here, because I’m not 50 (yet) and don’t care about whether people think they sound different or not.
Truth be told, most software emulations are extremely close if not better and are way more reliable then their hardware counterparts.
But the sound of these compressors definitely has a place, even in electronic music. So let’s take a look at the different types of vintage compressors.
Models: SSL G-Series Buss Compressor, API 2500
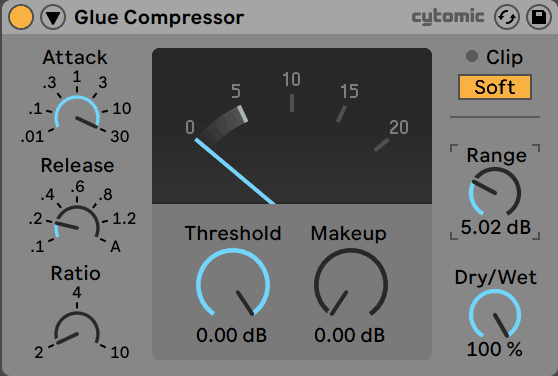
This type of compressor is what most digital software compressors tend to be based off, as it was designed to be the most transparent and least-colored compressor of them all.
Personally, I love use a VCA compressor on my drums buss or even the master buss. Even though it sounds very transparent, it just has a certain way of tieing all the audio material together (I use the stock Glue Compressor in Ableton Live).
Models: Urei 1176
FET has a very bright and intense compression in comparison to most compressors, so much so that people use it more like a distortion unit sometimes.

Works great on drums and sounds that can afford to be a little crunchier, not so much on the whole mix or on clean sources like vocals (hey, unless you want to experiment).
Models: Teletronix LA-2A, LA-3A
Opto compressors are more subtle compressors that are known for their smooth and silky sound.

They tend to be placed on instruments or recordings that need to be at the forefront of the mix, so they can sound full but not pumping.
Due to the age of the units, many opto compressors tend to be very simple to use, with just an input gain knob and a gain reduction knob.
Models: Fairchild 660/670
Vari-Mu compressors are known for their smooth, vintage sound. Not the best for heavy compression, but it can add a nice effect to a mix buss or certain instruments.

If I had to place it between two of the other types, it would be between Opto for its smoothness and FET for its coloration. But don’t think that it’s exactly a combination of the two – Vari-Mu compressors have a sound of their own.
The main purpose of using a compressor is controlling the dynamics of a sound – usually when a sound has too much variation in the volume over time.
This tends to happen a lot with recorded sounds, such as vocals, guitars and pianos, all of which have a very high dynamic range due to their acoustic nature.
Compression helps even these sounds out and allows them to cut through the mix more consistently.
Using a ratio of 2:1 works great for subtle dynamic control, although you can go higher if desired, especially if you want more of a brick-wall limiter-type effect.
Generally, faster attack times help to control dynamic material. Try setting it from 5-20ms, depending on the material. Less than 5ms can start to give a squashing sound if not used carefully, but more than 20ms will start to reveal the transients.
The release can ultimately be set dependant on the material. Generally, nothing over 200ms is fine, otherwise, the compressor will react too slow.
Another common use of a compressor is ‘glueing’ or buss compression.
This technique levels out the dynamics of a group of instruments, giving the mix a more coherent feel.
Generally, an analogue or analogue-modelled compressor is used to achieve this effect, due to the way it reacts to the audio and colors the sound.
A VCA-modelled compressor works well for this (like Ableton Live’s Glue Compressor). The point is to use a subtle amount of compression (4:1 at most) and have no more than 3-5dB of gain reduction.
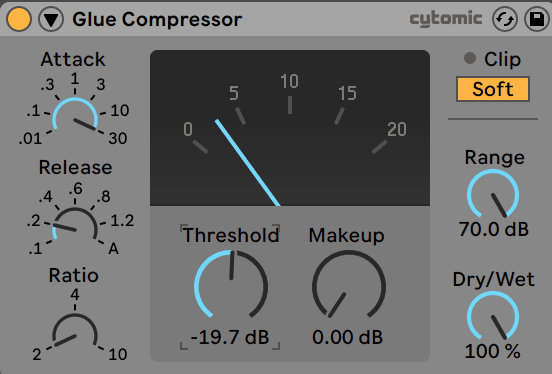
Medium attack and release are fine for this (20-30ms attack, 100-200ms release), as this tends to maintain the dynamics well. Adjust these values to the music you are working on, as faster genres like drum and bass might need faster times.
Transient shaping can be achieved by using a compressor with a slower attack, allowing the initial transient.
Usually, something around a ratio of 4:1 works well, with an attack of 40-60 ms and release at around 100ms.
Set the threshold past the transient so you start to hear the click come through. Usually, this is a bit more than you ‘normally’ may apply. The rest of the signal will be reduced in volume as a result.
Bring up the makeup gain to increase the signal back to the original volume, and the punch of your percussion will come through nice and clear.
Certain compressors have a character to them that allow you to drive them particularly hard, like the FET compressors.
Turning up the input gain, smashing the signal and increasing the makeup gain can help to get this type of effect.
But don’t think this only works with analogue compressors. You can color the sound with something like OTT; by smashing all 3 of the frequency bands in different ways.

The important thing here is to drive the compression harder than you usually would for standard dynamic control.
A limiter is the best tool for loudness maximization, as you can increase the input gain to the desired amount when the ratio is ∞:1.
Loudness can be achieved through other forms of compression, like multiband compression, and this can be used in conjunction with limiting to achieve a more transparent effect.
And that’s our definitive guide to compression. Make sure to bookmark this page to come back to it and give it a read.
