


Subtractive synthesis might sound like an obscure concept to you.
Yet, it is one of the essential building blocks of sound design. And although it might seem overwhelming at first, it doesn’t have to be that way.
This is why we’ve made this guide for you. Together we’ll run through:
- What subtractive synthesis is
- How it differs from other forms of synthesis like wavetable synthesis
- Some basic principles to get you started
Let’s dive in! 👇

Table of contents
What Is Subtractive Synthesis?
Subtractive synthesis is a form of synthesis where parts of a signal rich in harmonics are attenuated with a filter. By filtering out certain frequencies from a basic waveform, you are able to sculpt the sound to your liking.
You can also play with the ADSR envelope (more on that later) to shape how the sound fades in and out.
You can think of subtractive synthesis as sculpting: you start off with a slab of rock, and you end with a sculpture by removing the parts you don’t want.
This is how classic synths operate, such as the Prophet-5, Juno-106 & Jupiter-8.

A quick refresher on harmonics. A harmonic is simply a waveform whose frequency is a multiple of the original (or fundamental) frequency. For example, the note A at 440 Hz has harmonics at 880 Hz (first harmonic), 1,320 Hz (second harmonic), etc.
Harmonics are what gives a sound its richness and its timbre.
Listen to these two examples:
Let’s see how this translates visually:
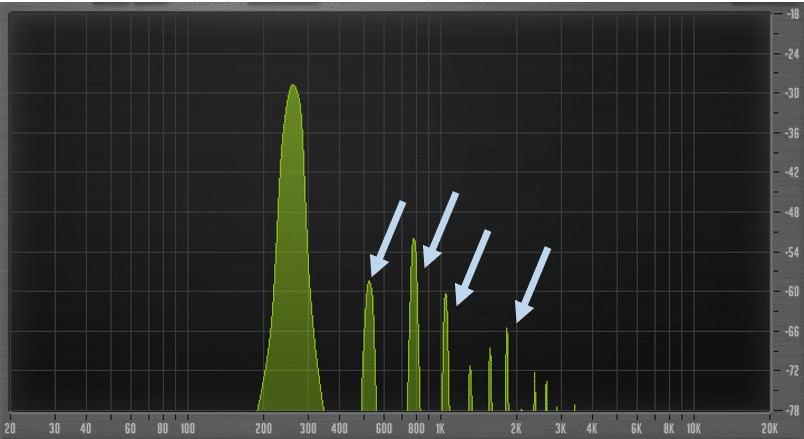
With subtractive synthesis, you take a signal rich in harmonics and filter out certain frequencies.
Analog synthesizers from the 60s and 70s were heavily based on this technique. The Minimoog, one of the most famous analog synthesizers of the past 50 years, is based on subtractive synthesis.
However, knowing that those classic analog synths can easily reach the US$10,000 price tag, most of us will be using soft synths.
Before going any further, let’s discuss what sets subtractive synthesis apart from other forms of synthesis.
If you feel like you need a refresher on sound design in general, make sure to check out our course Breakthrough Sound Design.
How Does It Differ From Wavetable Synthesis or FM Synthesis?
Wavetable synthesis has become a cornerstone of modern music production.
Sometimes called “sample-based synthesis” (due to sourcing wavetables from audio samples), wavetable synthesis uses morphing oscillator waves to create sounds.
Whereas subtractive synthesis is based around a single basic waveform, wavetables can store a number of different frames, allowing you to scroll through from one wave to the next. This creates the feeling of movement in your sound.
On the other hand, frequency modulation synthesis (or FM synthesis) takes the original waveform and modulates its frequency over time to create a new frequency.
The sounds you get from FM synthesis are often described as harsh and metallic. To get an idea of what FM synthesis sounds like, think of those growly mid-basses that you hear in the brostep era of the early 2010s.
The Basics of Subtractive Synthesis
As with all complex topics, it’s helpful to bring it back to the basics first. Let’s examine the different parameters that come into play in subtractive synthesis.
Choosing The Oscillator
Subtractive synthesis starts off with an oscillator. The oscillator is the source of the sound. There are a handful of basic waveforms that we can pick from as a starting point (make sure to turn down your volume a bit first):
Sin wave
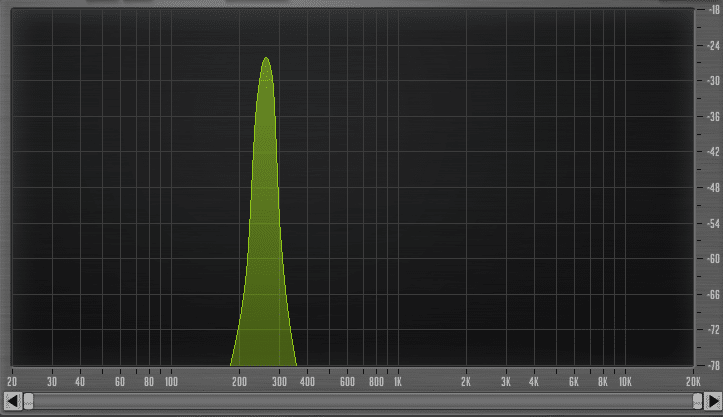
A sine wave is a pure tone containing just one frequency.
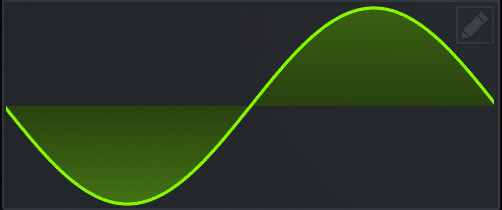
It’s commonly used for sub-bass and very soft key and pad type sounds.
Here’s a pure sine tone:
Square wave
On the opposite end of the spectrum, we have a square wave.

A square wave has a hollow sound with a lot of harmonics to give it a full sound. Squares are used for basses due to their distinct sound.
Sawtooth wave
A sawtooth (or saw) wave is the most dense wave you can get.
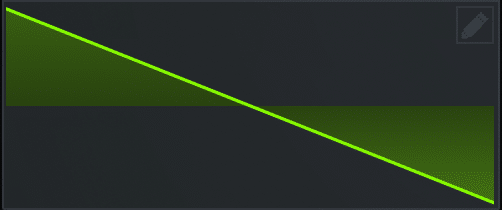
It features all odd and even harmonics and a lot of top end. For this reason it’s used for big chord sounds and leads quite often.
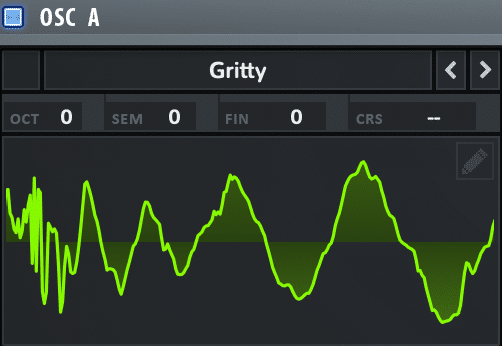
Triangle wave
A triangle wave is a curious use case. It’s very similar to a sine wave but has a bit more grit to it.
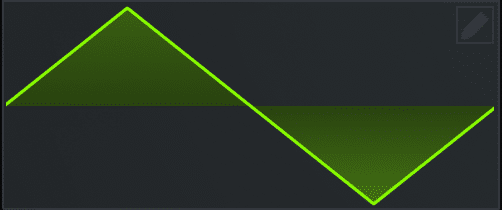
It’s commonly used for softer leads and bass sounds.
As you can imagine, choosing the oscillator is one of the most important steps. Before diving into filtering and LFO automation, ask yourself some questions.
Do you want a soft, smooth sound? Are you looking for something more aggressive with a lot of harmonics?
Answering these questions will help you choose the right waveform. Of course, you can also choose a waveform at random, experiment, and see where you end up!
You can also add several oscillators to create a richer sound.
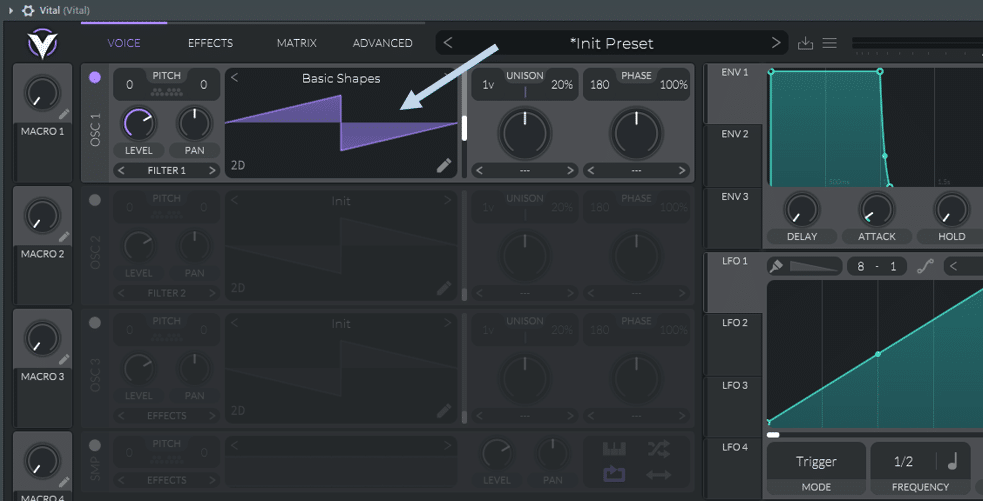
As we continue our exploration, I will be using the VST synth Vital (which is free and highly recommended to try out). The same parameters can be found in most synths such as Serum or Massive.
Selecting Frequencies Through Filtering
One of the first steps we can take to sculpt our sound is filtering. Many of the terms used here have been explored in our guide on audio filters, so make sure you are familiar with them.
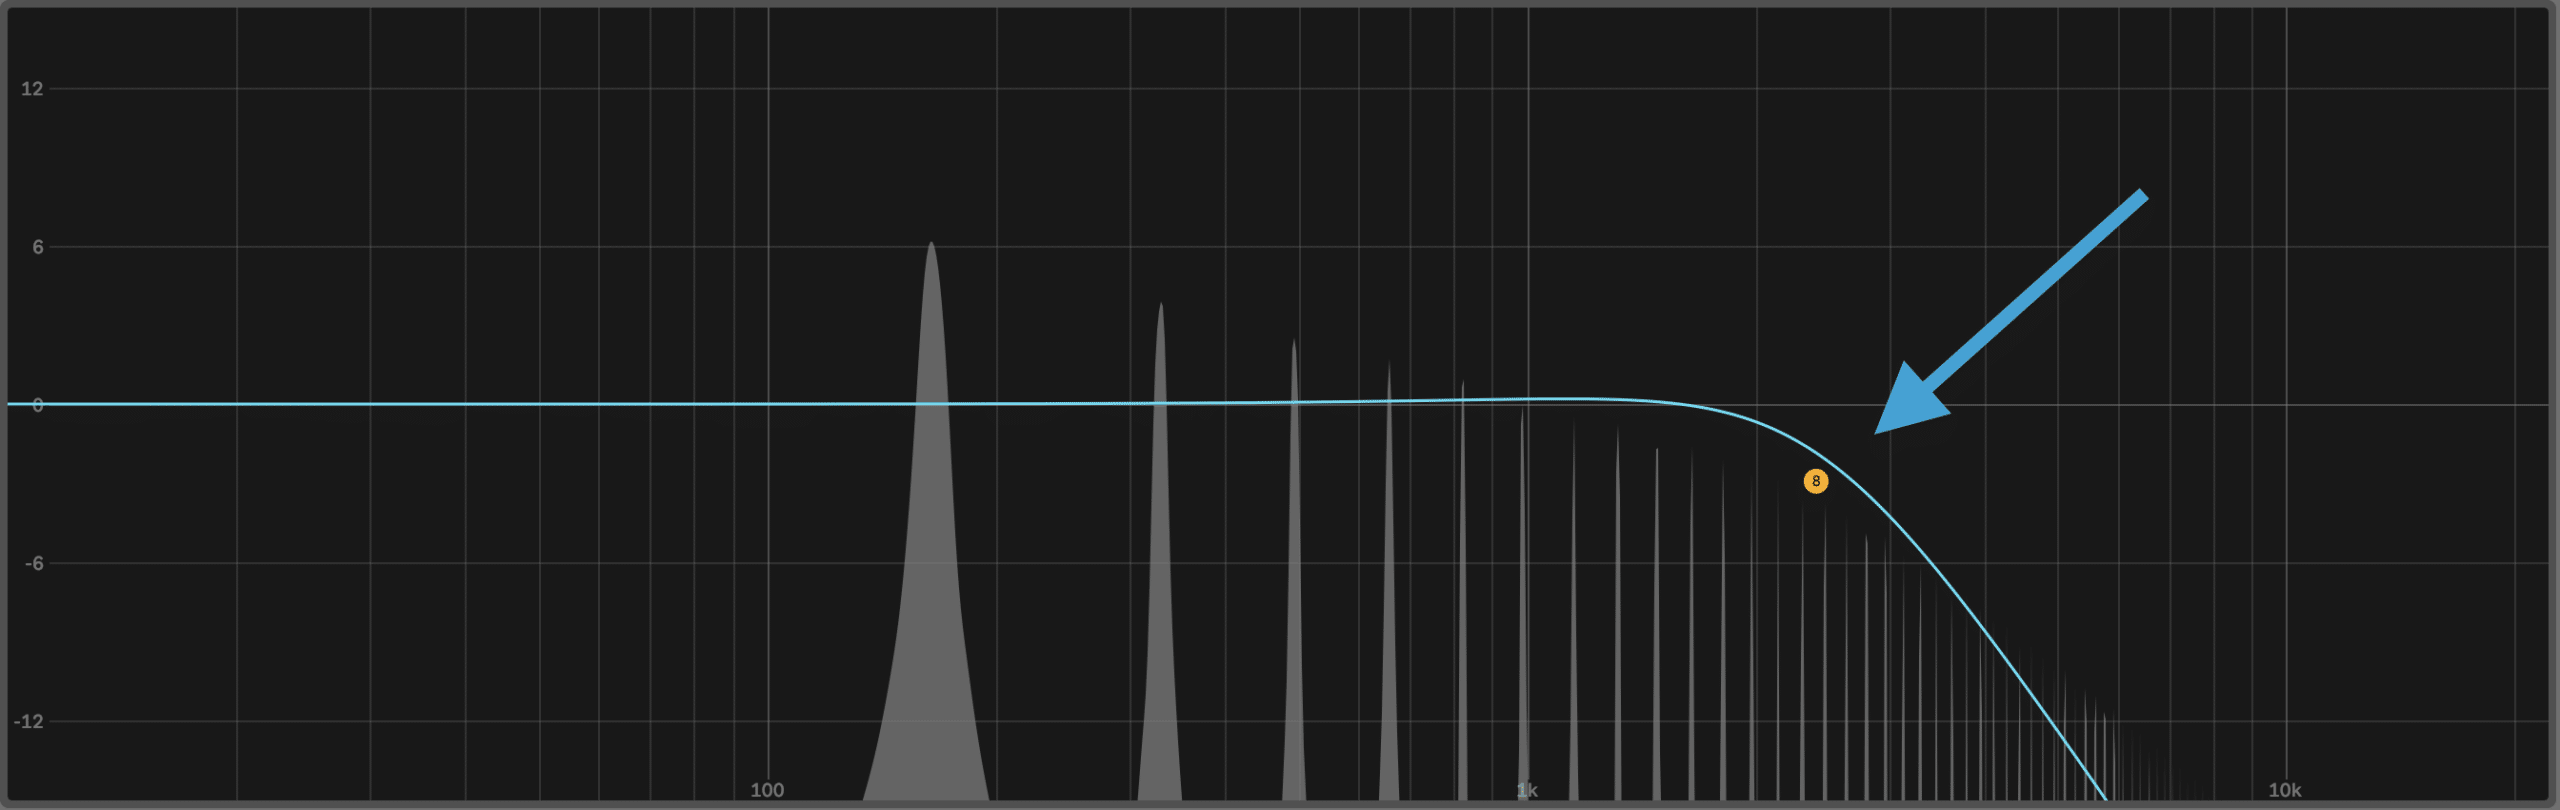
Let’s start with a sawtooth wave, and apply a low-pass filter:
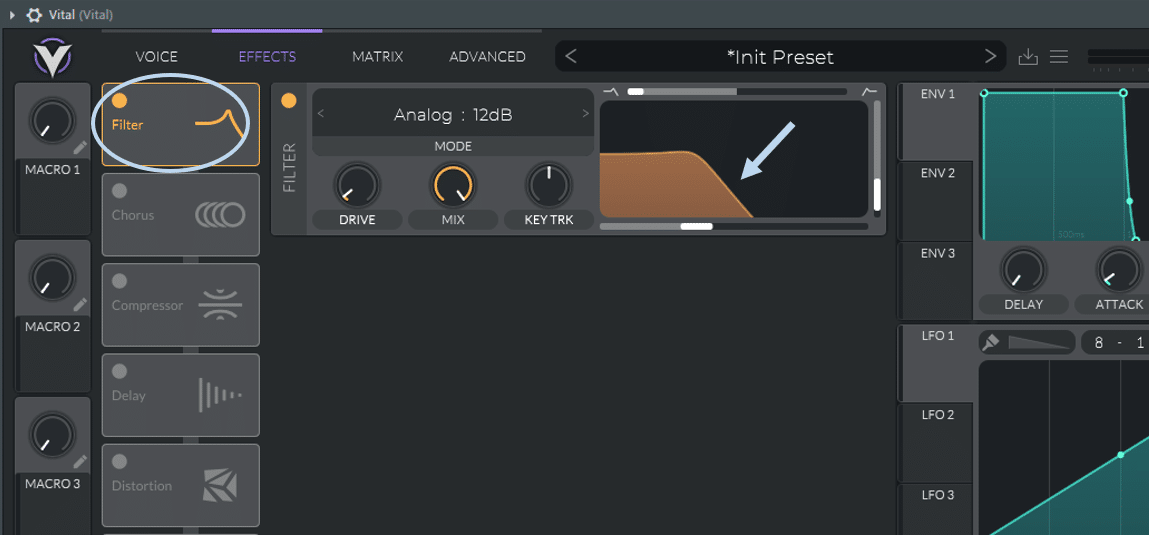
Let’s hear how our sound has changed:
Similarly, you could also apply a band-pass filter to select just the “middle” frequencies:
As you adjust your filter, you can also play with the resonance to accentuate the frequencies around the cutoff:
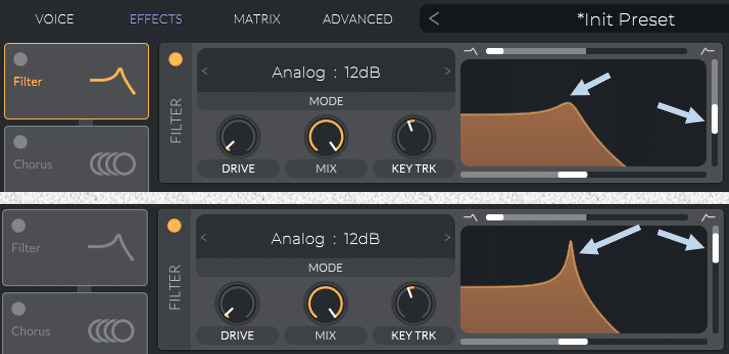
In this example, we are adjusting the filter dynamically through time with automation.
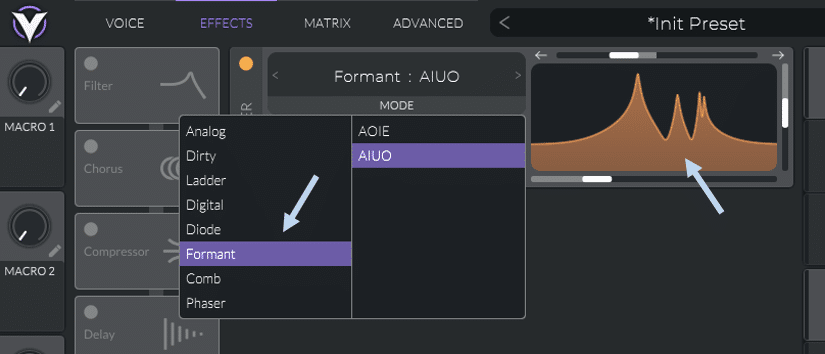
Beyond your standard filters, Vital also has some rather exotic filters.
One of my personal favorites is the formant filter:
Let’s have a listen:
Coupled with some automation, you can get really creative with some simple filters. However, frequencies aren’t the only parameter you can adjust.
In the next section, we’ll explore how controlling the volume of your signal can help shape your sound.
Playing With The ADSR Envelope
ADSR settings are a key component of all forms of synthesis. With subtractive synthesis, tweaking the ADSR envelope allows you to shape the amplitude (or volume) of your sound across time.
A quick refresher on ADSR – it stands for Attack-Decay-Sustain-Release, and dictates how the volume of a sound evolves through time:
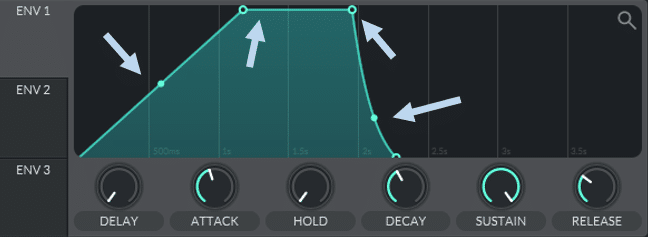
Here are how these 4 components affect a sound’s volume:
- Attack: how quickly the sound reaches its full volume after being activated/played
- Decay: how quickly the sound drops to its sustain level after its peak
- Sustain: the constant volume at which the note plays after going through its decay phase
- Release: how quickly the sound fades once the note stops being played
In the above example, the sustain is set to 100%, meaning the “constant” volume is the same as the one reached at its peak.
By tweaking these settings, we can shape our sounds with precision.
Let’s look at some examples.
Let’s start by setting a slow attack and a long release:

This type of slow fade in / out is especially well suited for pads and atmospheres.
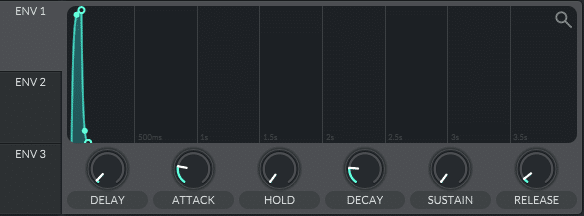
On the other hand, setting very low attack and release rates will result in a “plucky” sound – better suited for melodies:
As explained above, ADSR settings generally refer to a sound’s volume. By default, envelope 1 (ENV 1) in Vital is assigned to the sound’s volume.
However, an envelope can actually be assigned to a multitude of parameters.
This is why we have other envelopes (ENV 2 and ENV 3) with which to play with. Let’s explore.
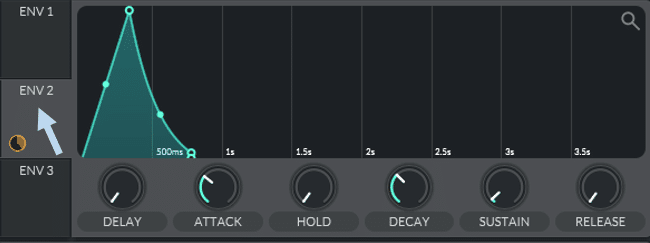
First, let’s draw a new envelope for ENV 2:
Let’s assign this new envelope to the cutoff of our low-pass filter. To do this, simply drag-and-drop envelope 2 over to the cutoff knob of the filter:
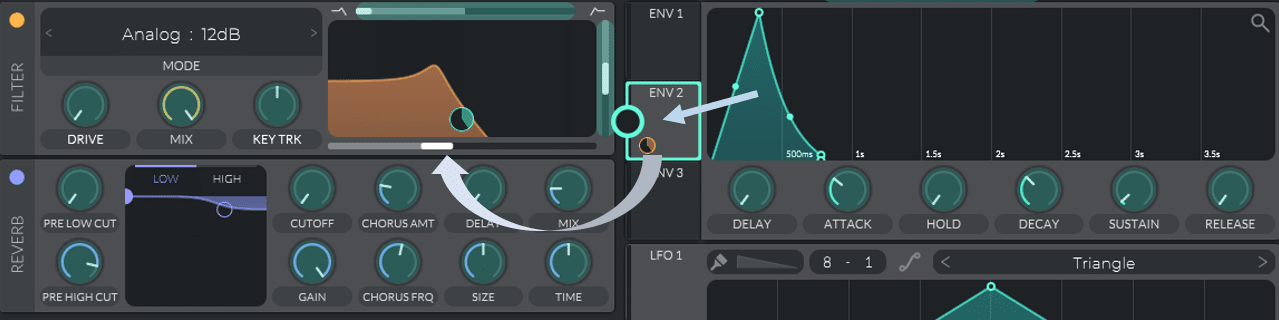
You will notice that once you start dragging your envelope, all the potential settings where you can assign it will be highlighted in green.
Let’s listen to the result:
So what just happened? Basically, we are now telling the cutoff of the filter to open up and close according to the envelope we drew.
You can imagine the infinite possibilities this brings.
Let’s look at another example.
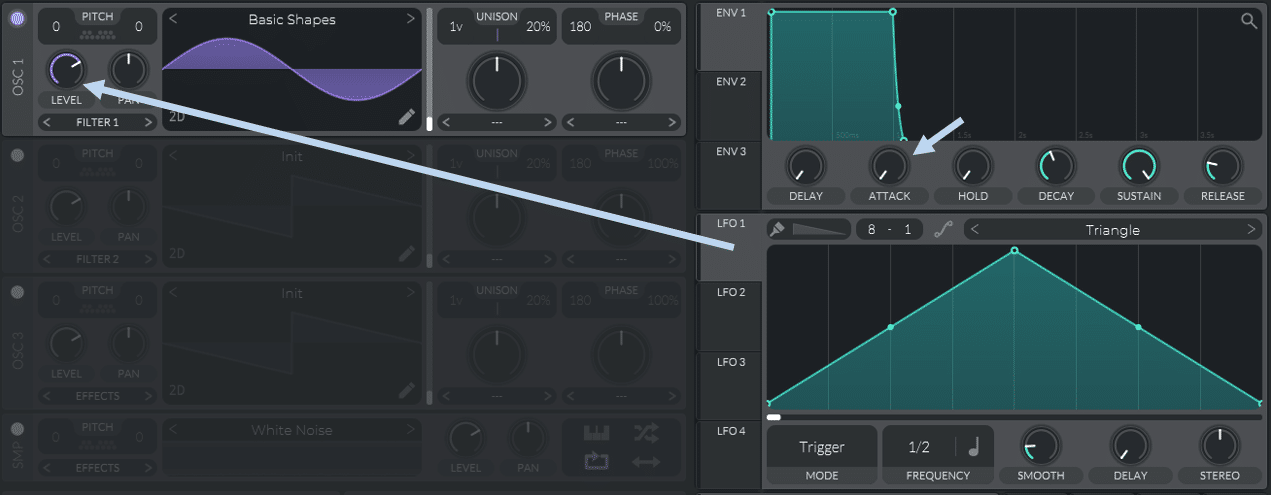
Start with a basic sound with 2 oscillators, 1 sin, and 1 sawtooth. Let’s draw a rising and falling envelope, and assign it to the Level of the sawtooth oscillator:
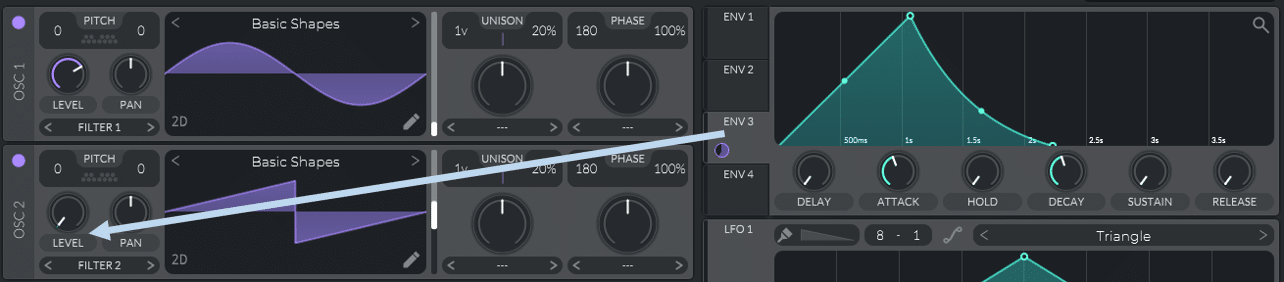
This means the volume of the sawtooth wave will rise and fall according to our envelope. Let’s give it a listen:
Once you grasp the power of assigning envelopes, the world becomes your oyster!
Creating Movement With LFOs
LFOs are another way of dynamically affecting a sound’s characteristics. LFO stands for a Low-Frequency Oscillator and takes its name from its frequency which sits below 20 Hz.
The human ear cannot perceive frequencies this low, so how are these oscillators used?
Similar to an envelope, an LFO is assigned to another parameter to control it dynamically.
Let’s look at a basic example. We will pick a sin wave for LFO 1, and assign it to the level of our main oscillator:
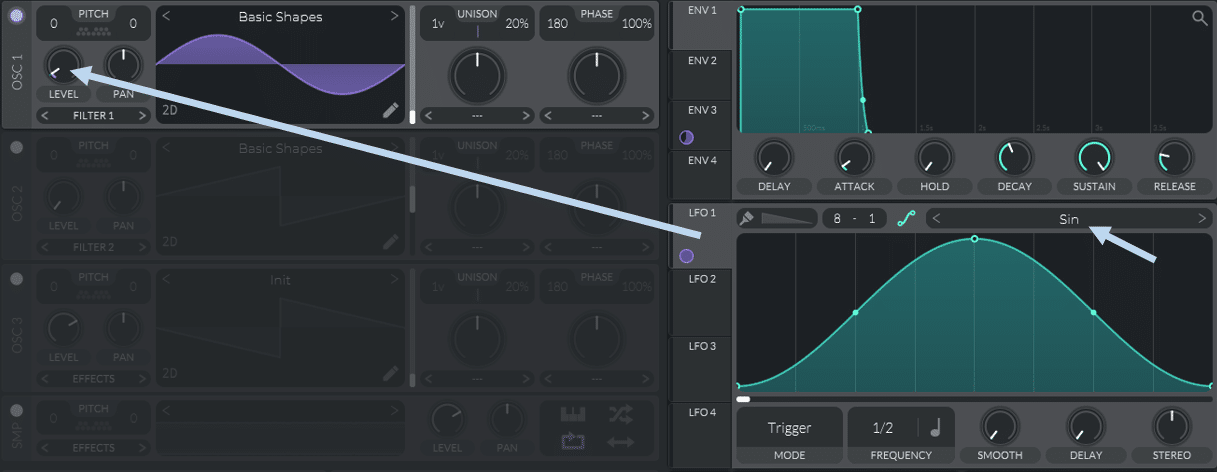
You can hear how the volume is now “oscillating” according to the LFO’s shape.
A very common way to use LFOs is to assign them to the filter cutoff:
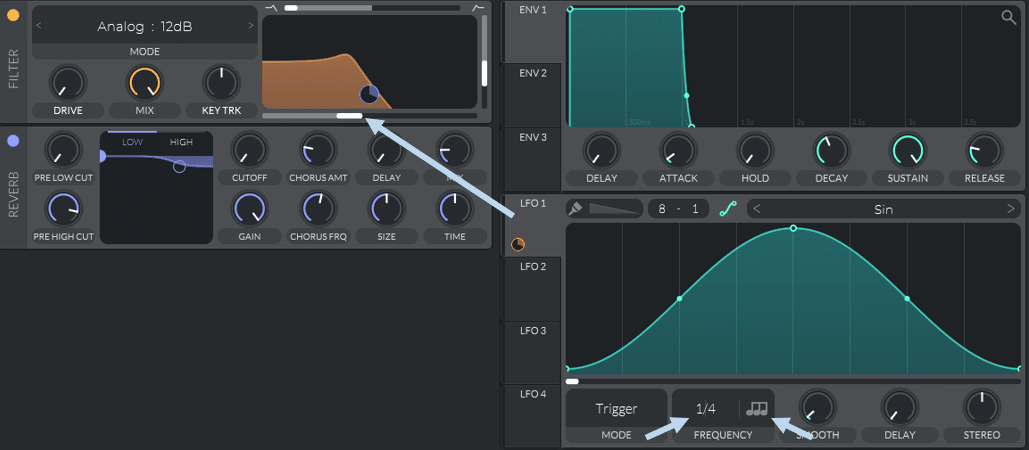
In this example, I picked a relatively fast tempo (1/4 tempo triplets), meaning there will be 6 cycles within a bar. I have then assigned the LFO to the filter cutoff. I have also set the amount of LFO modulation to about 30% to avoid the filter opening up too much:

Let’s listen to the result:
Let’s get even more creative. The sin wave isn’t the only shape you can use, so let’s try a square wave with a high frequency (1/8 note). Let’s select a formant filter, and apply the LFO to the Formant Transpose setting:
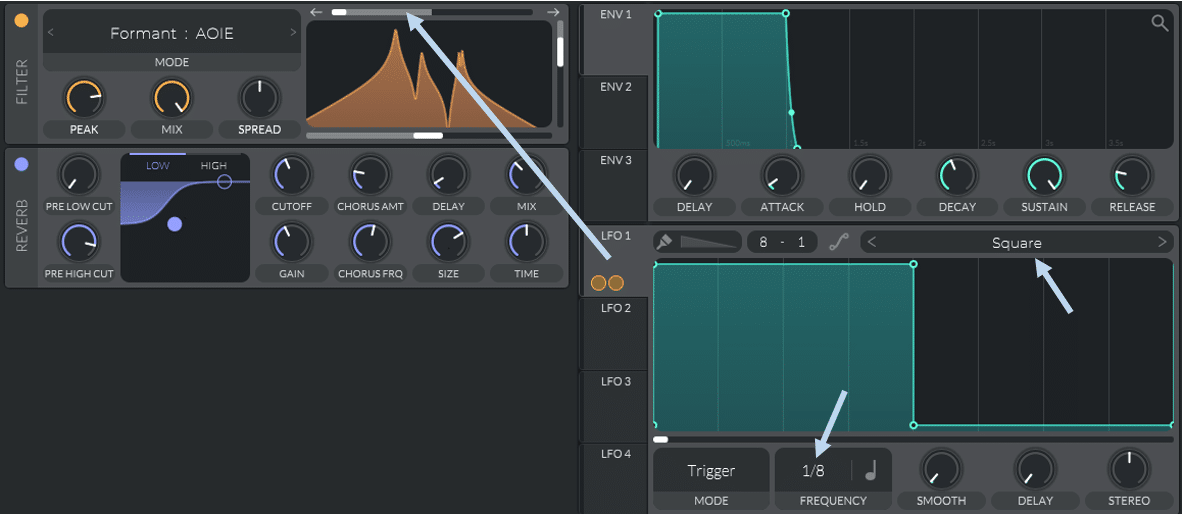
In effect, this means the LFO is making the filter toggle between two positions:
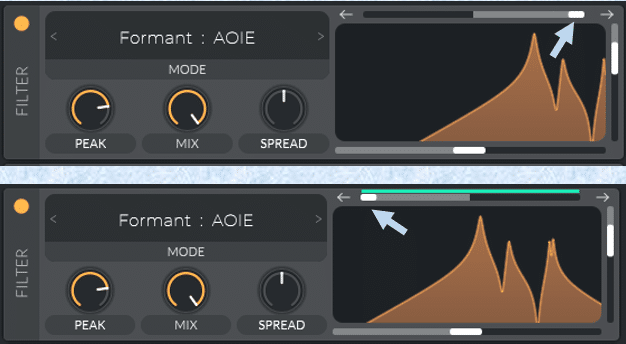
Let’s hear the result:
Creating A Kick Drum
Finally, let’s have a look at one last common example. This one combines the use of envelopes and LFOs: creating a kick drum.
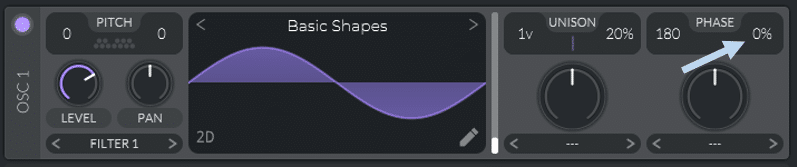
First, select a basic sin wave and set the Phaze Randomization to 0%. This will ensure the note always starts at the same point of the waveform:
Next, set the attack of ENV 1 to 0s, and assign LFO 1 to the Level of our oscillator:
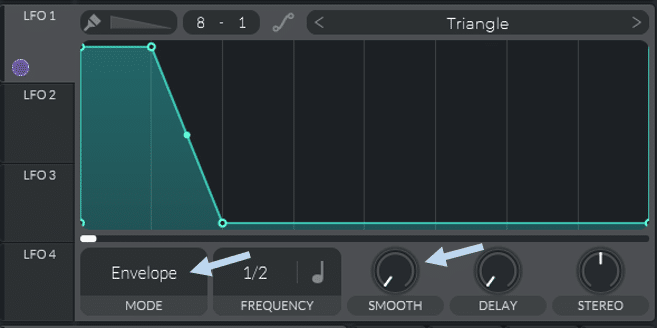
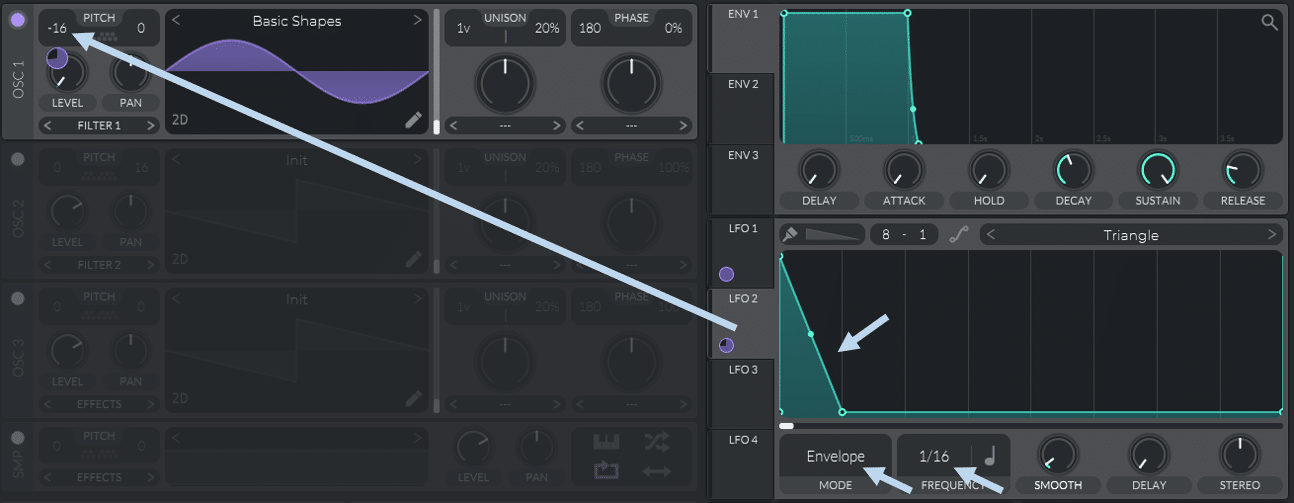
Next, draw the following shape for LFO 1, set the mode to Envelope and Smooth to 0. Choosing the Envelope mode ensures that LFO shape is played only once per note (and not re-triggered):
Let’s listen to what we have so far:
Next, draw in a downslope shape for LFO 2, set to Envelope mode again, set the Frequency to 1/16 and Smooth to 0. Drag it over to the Pitch of our oscillator. This will give us our transient:
Because this is a subtractive synthesis guide, I won’t go into further details. You can apply general post-processing techniques such as distortion and EQ’ing to further shape the sound to your liking.
I could go on all day about the power of LFOs, but I think you get the picture. You can get assign LFOs to pretty much any parameter, creating crazy results.
Extra Features
Although the following features are not exclusive to subtractive synthesis, they allow further control over your sound design.
Pitch is a very handy setting that allows you to fine-tune a selected oscillator. You can use pitch controls to create harmonies within your sound. Creating a deep Reese bass is a common application of this setting, such as in this tutorial from Aden:
Without going into a full bass design tutorial, let’s quickly see how de-tuning an oscillator can help achieve a deep bass sound.
First, let’s hear a simple sawtooth wave with a low-pass filter:
Now, let’s add a second oscillator and de-tune it slightly:
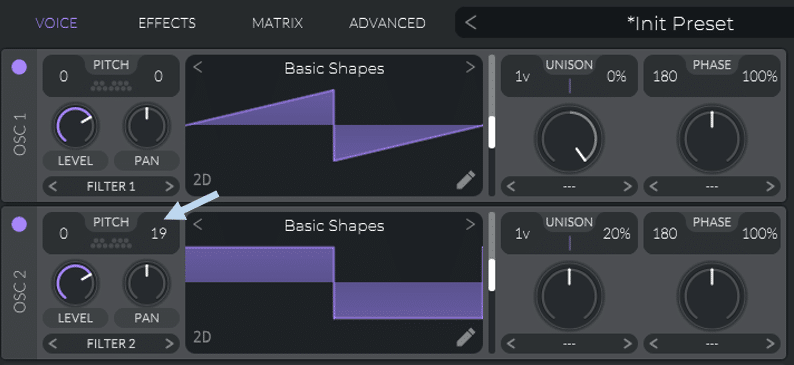
Let’s hear the result, with and without the de-tuning:
You can hear how de-tuning an oscillator brings width to the sound. A similar result can also be achieved by increasing the Unison to 4 or 5 voices and de-tuning them slightly.
Designing a bass would take a few more steps, but I’ll stop here for the sake of this guide. If you want to learn more about bass design, make sure to check out our Kick-Bass masterclass inside Drums By Design!
Glide is another function that comes in handy for bass lines. As the name suggests, it allows notes to “glide” from one to the next:
When used subtly, it can add a lot of movement and groove to your melodies.
Last Words
Hopefully, you will now have a better grasp of subtractive synthesis.
Although subtractive synthesis was a cornerstone of early analog synths, most modern VST synths combine different forms of synthesis. Popular synths such as Serum combine wavetable synthesis with subtractive techniques.
Nevertheless, it is always useful to remember some basic principles and techniques. If you want to improve your overall sound design techniques, make sure to check out our Breakthrough Sound Design course!
