


The dream home recording studio – it’s what every music producer wants.
The rare analog synths. The perfect monitors. But most of us don’t have the cash to splash on this kind of setup – at least not yet.
In fact, for most of us, the studio is either in the bedroom or somewhere at home.
That being said, what is actually necessary? In this comprehensive guide, we’ll cover:
- The myths about home studio equipment
- The three things you truly need to make great music
- Different types of studios and the gear you’ll need for each
- How to set up your studio as an EDM producer
- Whether acoustic treatment is actually necessary or not
Let’s take a look! 👇
The 3 Types of Studios
Before we dive into the list of gear you’ll be buying, I want to introduce you to a concept:
There is no ideal home recording studio – only the studio that suits you.
Everyone has different preferences, environments and needs. So get the equipment that suits you the best.
To help simplify this concept, I’ve broken the studio down into three design archetypes:
- The Minimum Viable Studio
- The Average Studio
- The Veteran Super-studio
You may fit into any of these, or somewhere between.
For example, I’m probably closest to the average studio, but also don’t have all the equipment required for it.
Note: these studio concepts are aimed at electronic music producers, and not traditional engineers or recording artists.
The Minimum Viable Studio
Don’t believe the lies – you actually don’t need much equipment to make music.

Many hits have been created with what we call the ‘minimum viable studio’, and most of the parts you likely already have.
At its core, a minimum viable studio has three essential parts:
- A computer
- A DAW (with good samples)
- Headphones
In this view, anything else superfluous, and possibly distracting.
The endless quest of plugins, synths, and gear can take you away from the goal – making music.
Besides, it’s also a highly-portable studio setup (if you have a laptop) and ideal if you don’t have a room or constant location to work at, or your room is small.
Lastly, it’s great if you’re on a budget and don’t have a lot of wiggle room.
The Average Studio

This studio consists of the ‘standard equipment’ recommended when you search for what you need.
Beyond the requirements of the minimum-viable studio, this includes parts like:
- Studio monitors
- An audio interface
- A MIDI keyboard
- A microphone
- Third-party plugins
- Acoustic treatment
These things are staples in studios for a reason – they help you make great music, and can help avoid a lot of workarounds.
Personally, I don’t subscribe to the notion that this type of studio is ‘essential’ for producing music, as many engineers and producers would have you think.
Granted, I have most of the items in this list (besides proper acoustic treatment), but I’ve gone without before and I was fine. The improvements are there but only marginal.
The Veteran Super-studio

These types of studios are the ones that people like to show off when they post ‘In the studio…’ on Instagram.
First and foremost, they’re highly creative spaces with lots of possibility.
Secondly, they look cool.
You’ll find among them:
- Analog synths and drum machines
- Modular/Eurorack setups
- Outboard compressors/EQs/rackmount gear
- MIDI Controllers
- Multiple sets of monitors
- Deliberately-engineered rooms
These studios are great, but are far from necessary. Hence why I’ve called it a ‘veteran’ studio – I think only those with plenty of experience and successful releases will make the most of these spaces.
Now we’ve cleared up these concepts, let’s start with the most essential gear.
Studio Essential #1: A Computer

Required For: All studio types
Average Price: $2000 (if you don’t have one already)
A good computer is the beating heart of the modern DAW.
I’d go as far as to say that if you don’t have a desktop or laptop, you don’t have a studio (if you ignore the DAW-less hipsters who think going without is a superior way of making music, for whatever reason).
All jokes aside, a computer is necessary because 90% of what you’ll be doing as a producer is in software, not hardware.
It’s also essential for the next piece of equipment – a DAW.
Recommended Options
First and foremost – you likely already have a good system to be producing on.
Sure, it’s not the super-computer you’ve always dreamed of, but it’s definitely capable of handling a solid DAW and some plugins.
However, if you’re not in that situation, or you want to upgrade anyway, read on.
First, a disclaimer. I’m not going to join the Mac vs PC debate, because the truth is it doesn’t matter. You can make the same quality of music on either system, regardless of what people might think.

So what’s the main differences?
Macs are quite expensive but come primed to make music (the audio drivers are particularly good), whereas PCs are cheaper and more customizable, yet require more setup to optimize them for audio production.
Personally, I use a Macbook, but have used both and like both systems.
Of course, the more money you spend, the better specs and performance you’ll get. Here are a few options from each camp:
Specs
Despite the system you use, computer specs are really what makes the difference as to what your system is capable of.
I’m going to list the most important parts of the computer in order, so you know what to consider when making a decision.
- Hard Disk: You might be surprised to find this option first, but a kitchen can’t function without the pantry. Think about it – every sample, piece of software and plugin lives on your hard drive. If it’s slow or too small, you’ll always come up short. Invest in an SSD for your main system at least (you can use a spinning disk drive for long-term storage) and you can thank me later.
- Processor: Definitely close to or as important as the hard disk. Go for at least a dual-core Intel processor, ideally i5, i7 or i9. Other processors are good, but you may run into compatibility issues as some software doesn’t like non-Intel processors.
- RAM: RAM is important, especially if you’re running huge multi-sample libraries, but is often over-emphasized. 4-8GB is actually fine for most producers, which most systems come with anyway these days.
- Display & Graphics: Not a big issue for producers, but it’s nice to have some screen real estate for your DAW and plugins. I’ve made music on massive screens, and small 13″ laptops. See what you’re comfortable with and make the plunge, and make sure you get a graphics card that supports what you need.
- Peripherals: Some people are fine making music on a trackpad, others may want dedicated keyboards and mice.
Studio Essential #2: A DAW

Required For: All studio types
Average Price: $500
If your computer is the cornerstone of your home recording studios hardware, your DAW is the same for the software – you can’t really make music without it.
It has everything you need to arrange, tweak, and export high-quality music, at such a ridiculously low price (compared to how much it used to cost to buy lots of hardware).
So even though they might sound pricey, they are 110% worth it.
Personally, I use Ableton Live, which is great for electronic music. The workflow is fast, the layout makes sense and it’s a highly creative environment.
A Word on Samples
Many DAWs come with a solid selection of processing tools, like EQ, compression, and distortion. But a majority of them are lacking in a particular department – samples.
Having high-quality samples to use in your DAW is 90% of what makes music good, so make sure to load up your software with a good selection.
A great, affordable place to start is something like Splice Sounds (sponsored), or check out our list of free resources.
Recommended Options
When it comes to DAW’s, it pays to be selective and to take your time. I’d highly recommend download trials for a few, read a guide and see if you like it or not.
Different DAWs have unique workflows, and it’s worth seeing what suits you best. Yes, the most popular may be Ableton Live and FL Studio, but check others out for good measure.
For a detailed comparison, check out our guide on the best DAWs.
Studio Essential #3: Headphones

Required For: All studio types
Average Price: $150
There’s not much point in having a solid computer with a DAW and samples, when you can’t hear any of it.
This is where headphones come in – they are the most affordable and accessible way to hear the entire frequency spectrum.
Sure, they might not have the accuracy delivered by studio monitors in a well-treated room, but they can get pretty close in a far more accessible way.
However, you don’t want to use any old headphones if you can avoid it.
And whatever you use, make sure you back up your mixes with solid reference tracks, so you can test the quality of your work.
Recommended Options
- Audio Technica ATH-M50x
- Beyerdynamic DT 990 PRO
- Sennheiser HD280 Pro
- Sony MDR-7506
- Audeze LCD-4 (High-end Option)
Check out our dedicated studio headphones article for more info.
Studio Essential #4: Audio Interface

Required For: The Average Studio, The Veteran Super-studio
Average Price: $200
Audio interfaces are a staple in many studios for a variety of reasons.
Firstly, they typically have greater sound quality than the built-in soundcard on your computer (particularly true of PCs).
Secondly, they allow you to connect studio monitors and headphones to your setup.
Thirdly, they are essential for recording microphones, synths or any sound source outside of your computer.
Recommended Options
We actually have an entire article dedicated to recommended audio interfaces. But if you want a few quick recommendations, here you go:
Studio Essential #5: Studio Monitors

Required For: The Average Studio, The Veteran Super-studio
Average Price: $400
You’ve got headphones, so why do you need studio monitors?
As great as headphones are (and you can use them purely), they don’t always give an accurate stereo image, or an accurate representation of how things sound in a room with speakers.
Studio monitors are the solution to this – they give the most accurate response possible of your music, acting like a microscope for your mix.
They are made ‘flat’, meaning they don’t have the hyped highs or lows of consumer-grade speakers or hi-fi systems.
Most of the options you’ll be wanting for a home studio will be a pair of nearfield active monitors.
Nearfield means that they are designed to be used in a small room, and active means you don’t need to buy a seperate amplifier – it’s all built in.
Some monitors are ‘ported’ – speakers which have a port at the back or front that increases the low end response, designed for those not using a subwoofer.
At the end of the day, as long as you know how your monitors sound then you can work with what you have.
Recommended Options
If you want more options, check out this solid roundup from Dustin at Musician on a Mission.
Studio Essential #6: MIDI Keyboard

Required For: The Average Studio, The Veteran Super-studio
Average Price: $200
While not an entirely essential piece of equipment, it certainly is more expressive than dragging and drawing notes into your computer.
And if you know your way around a piano keyboard – you’ll be miles ahead.
There is plenty of variation among MIDI keyboards, and you can get tiny portable ones, or giant 88-key centerpieces. The choice is up to you, depending on your needs.
Recommended Options
We also have a dedicated roundup of MIDI keyboards, if you want to deep dive into the breadth of options.
Studio Essential #7: A Microphone

Required For: The Average Studio, The Veteran Super-studio
Average Price: $200
If you’re planning on recording vocals or instruments, then you pretty much need a microphone.
Condenser vs Dynamic
One of the long-standing debates is whether you should start with a condenser or dynamic microphone.


On the one hand, dynamic microphones are more versatile and can allow you to record any number of sound sources with ease.
In contrast, a condenser is far better for recording high-quality vocals with, and captures the recordings much more truthfully.
My recommendation would be based on your needs. Are you going to be singing or recording vocalists? Or are you more interested in recording random sounds and instruments around your house?
Pop Filters & Shock Mounts

If you’re recording any sort of vocals, you need a pop filter and a shock mount.
Why? Because pop filters reduce the ‘puh’ sound from vocalists on certain syllables, making for a more pleasant recording. And shock mounts? They reduce low-end rumble from the microphone being moved and touched.
Most condenser microphones come with both, however if not, you can pick up a pop filter like the Shure PS-6 Popper Stopper and a shock mount like the Rode PSM1.
Mic Stands

Of course, a microphone is useless if it’s just lying on your desk, and you probably want it to be in a certain position to record something.
You can get all sorts of microphones, from desk mounts, to standard tripods, to adjustable arms.
Recommended Options
- Condenser
- Dynamic
Studio Essential #8: Acoustic Treatment

Required For: The Average Studio, The Veteran Super-studio
Average Price: Variable
To be honest, this one probably requires an article in itself.
Why is acoustic treatment important? Because your room often skews the response of certain frequencies, meaning some are more resonant than others and will give you an inaccurate idea of what you’re working on.
Acoustic treatment dampens your room’s reflections, giving less of a resonant sound and allowing less interference with your studio monitors and microphones.
Unfortunately, there is no one-size-fits-all approach to acoustic treatment, and you can often spend a lot of time and money on ideal placements and materials, only to get no better of a result.
So it pays to be methodical in your approach, especially if you’re going to be self-mixing and mastering.
Types of Treatment
The main types are acoustic foam, bass traps, acoustic panels and diffusers.
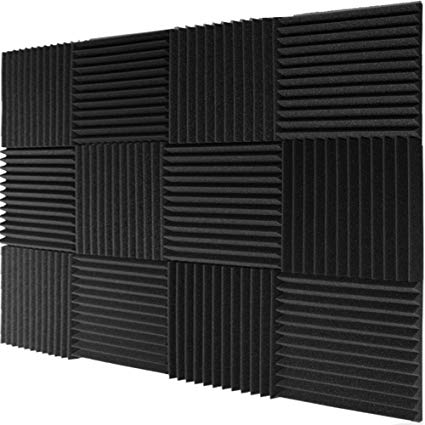
Acoustic Foam 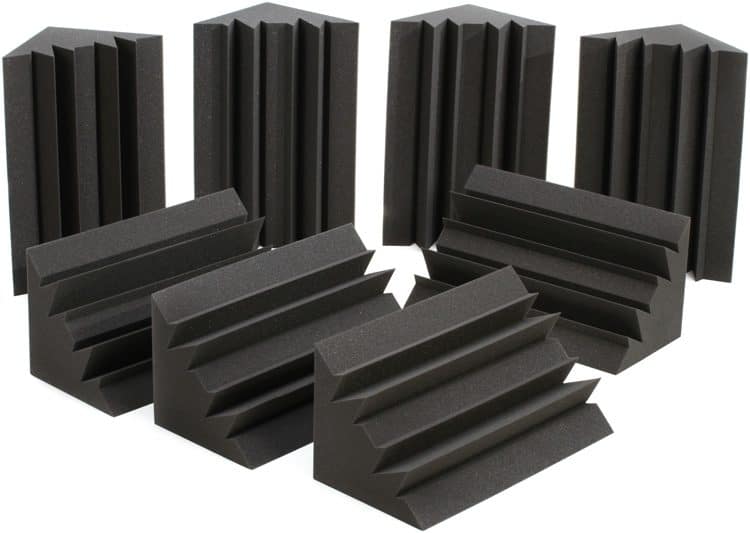
Bass Traps


Like I said – there’s no one size fits all approach here, and the topic is also highly divisive.
Some swear by acoustic foam in small rooms, others thing building your own panels is the only want to do.
Setting this up properly will be covered later, but I’ll be honest – I’m not an expert in this realm, and you can check out the guide from E-Home Recording Studio for more info if you wish.
We’ll briefly cover a simple version of setting this up later.
Other Studio Equipment You May Want
Beyond the essentials, you may want to consider a few other pieces or categories.
The following aren’t essential, but could be important depending on your setup:
Studio Chair

I wish I could put this first on the list, but okay sure, you don’t need it to make good music. However, having a good office chair to sit on makes all the difference in not only your productivity but your health.
You may already have one, but it’s good to think long-term about home studio ergonomics and your back, as well as your general comfort when producing.
Studio Desk

A good desk is important, as it will likely house a lot of your studio equipment.
Whether it’s a cheap IKEA desk or a full-blown studio workstation, finding a desk that works for you is imperative. However as with many cases here, you likely already have one, and it will probably do just fine.
Analog Synths

Are analog synths necessary? No, but they can be great for inspiration, workflow and getting a certain sound that you can’t get with VST plugins.
That being said, they’re often quite the investment, so make sure to give a few a go and get the ones that work for you.
Outboard FX Units

If analog synths are outboard plugin instruments, outboard gear is outboard plugin FX. They can range from guitar pedals, to rackmount compressors, to whatever.
Not only do they leave certain sonic imprints, but they can introduce interesting ways of working into your workflow, whether processing certain instruments or your whole mix.
Acoustic Instruments

If you play an instrument, it can be great to have it in your studio (space permitting) for coming up with musical ideas in a fresh way.
Whether it’s a piano, guitar or plastic recorder – making some space for it in your home studio can be super helpful.
Setting It Up: How To Design Your Home Studio
It’s one thing to buy all the gear (always a good feeling) but another to set it up. Especially when it comes to studio monitors and acoustic treatment.
That being said, most of you are producing electronic music. So acoustic treatment is not going to be as important as setting up your computer well.
This is especially true if you’re going for the minimum viable studio.
However, if you’re going for the standard studio, let’s see what’s involved:
Step #1: Find A Space
John Cleese says that it’s imperitive you have a dedicated creative space.

This could be a dedicated room, a separate location, or the corner of your living room.
Whatever it is, consider the following:
- Your limitations on space
- The acoustics of the room
- Avoid high ceilings
- Avoid non-rectangular rooms
- Avoid reflective surfaces, like windows
- Practicality of the location
- Surrounding noise and interruptions
Not everyone has the luxury of choosing the ideal space (I get it, this was me).
But you can make decisions to make the space you’re forced to use, the best possible.
Step #2: Arrange & Optimize
Having your home studio setup for maximum creativity and minimum reflections is key.
Even in a good room, you have to consider the acoustics of the location you choose.
First and foremost, this starts with where you are situated in the space.
Are you shoved in a corner? Or are you in the middle of the room?
Is the floor carpeted? Are there couches and rugs to absorb excess sound?
Try and avoid the ’empty room effect’ by putting in absorbing objects that help minimize sound reflections.
Simple decisions like this early on can avoid annoying acoustic treatment workarounds, and sometimes reduce the need for it altogether.
Secondly, you want to consider the placement on your studio monitors in the room (if you’re using them).

Optimal monitor placement:
- The monitors are at ear level.
- Your head creates an equilateral triangle with the speakers (30° angles).
- The monitors are on stands or non-vibrating surfaces.
- They are a little bit off the wall to give them space to breathe.
Once they are setup on stands or on your desk, make the rest of your studio fit around this setup. This includes keyboards, laptops, audio interfaces etc.
If you’re using a microphone, try to have it in the least reflective space in the room, ideally with a mic shield or nearby acoustic treatment (you could create a dedicated vocal booth, if you like).
Step #3: Test & Adjust
Once your gear is on your desk, everything is plugged in and ready to go, you’ll want to make sure everything is working. Here’s a quick checklist:
- Audio interface is connected and recognized by computer.
- Monitors connected to interface are producing sound. Both monitors are the same volume and colour (no tonal differences).
- The microphone is being picked up by computer through audio interface. Correct LINE/INST switch and phantom power is engaged (if necessary).
- Acoustic reflections are minimal or negligible (situational depending on room).
- MIDI devices are recognized and receiving MIDI information.
- Computer OS is up to most recently recommended update.
- DAWs & plugins are installed with compatible versions.
- Desk height and chair height is adjusted for ergonomics. Any displays are at eye level if possible.
You may find you have to adjust placements of monitors, update software or reinstall certain things to get your home recording studio in top shape.

It’s important to get this step right, because once it’s done, you can make music with no qualms.
Once your gear is set up, you’ll need to make sure your computer system is organized so you can be an efficient producer.
Check out our guide to sample and file organization for more info on this.
Next Steps
Now that you’ve set up your home recording studio, it’s time to get to making music!
Why not pick up our EDM Starter Kit, full of samples that you can use to make any type of music imaginable.
But if you’re new, creating your studio is only the first step. You need a comprehensive guide for learning electronic music as a whole.
That’s why we created our FREE eBook – How To Make Electronic Music. You can download it below.
