


If you’re new to music production, you might be here because you chose Ableton Live as your DAW. Good choice.
Or, you might be considering your options still, in which case this article might give you an idea of Ableton Live’s workflow.
Either way, this guide is designed to help you to get beyond the blank DAW:
to this:

This isn’t just a one-off tutorial. In this guide, I’ll not only cover how to use Ableton Live, but I’ll also cover:
- The two main ‘views’ you can use to create and sequence music
- The general sections of the interface
- Where to find the main tools for making music, and how to add third-party options
- Ableton Live’s secret power – racks
- Suggestions for how to approach making your own music in Ableton Live
Let’s get started.
Note: This guide is for Ableton Live Standard version 10.1, and was last updated in April 2020.
The Interface
When you first start learning how to use Ableton Live 10, no matter whether you have Intro, Standard or Suite, you’ll be confronted with the following interface:
If not, just press Tab and it should open up to this view, which we call the ‘Arrangement View’.
The other view, which looks like this:

is called the ‘Session View’.
We’ll get into both of these in a second, but let’s confront the general interface.
General Controls
Along the top we have the main transport section, which gives you all of your standard DAW features:
- Play
- Stop
- Record
- Looping
- Loop size is controlled by the loop brace in the arrangement
- + more

The benefit of Ableton Live is its unique transport functions, including a ‘MIDI Capture’ feature which allows you to ‘record’ MIDI after it was already played in.
The unique features are:
- Capture MIDI
- Automation Arm
- MIDI Arrangement Overdub
- Session Record Button
- Follow
For now, don’t worry about all of these. Just know they exist.
On the top left side, we have some more tempo, timing and quantization controls.

Here you can set the BPM and time signature of your projects, as well as enable the metronome, and clip quantization.
(Personally, I like to turn clip quantization to ‘None’ as I make music in the Arrangement View, but you can leave it on if you like. Just be aware that if you move the playhead when there is a quantization value of a bar, it will wait for the bar to reset before moving.)

On the right, we have some MIDI mapping controls, which allow as to map either our keyboard keys or MIDI controller parameters to certain Ableton Live features. We won’t go into this right now, but just know its there.
Recommended: Electronic Music Production Glossary
The Browser

Ableton Live’s Browser is where all of the sounds, instruments and presets are stored, and where you can load up your own sounds and plugins.
It’s fairly intuitive from the get-go – the main folders are on the left, and the subfolders are on the right.
To navigate, simply use either the mouse or the arrow keys. Personally, I like the arrow keys for their speed.
In Ableton Live 10, the Browser is split up into three sections:
- Collections
- Categories
- Places
And it has a sample player at the bottom for listening to what you’re browsing.
Note: the ‘Groove Pool’ is also pictured above underneath the sample player, but we won’t cover that in this article.
Categories
This is where a lot of Ableton Live’s default instruments, effects, sounds and devices are kept. As you can see, there are a number of sub-sections with different icons:

Each of these is self-explanatory. ‘Sounds’ contains, well, sounds.
That being said, I’ll explain a few things that you should know:
- ‘Drums’ contains a selection of Drum Rack presets that you can load it to start jamming on. Any Drum Rack presets you save will also show up here
- ‘Instruments’ and ‘MIDI Effects’ can only be loaded into MIDI tracks, audio effects can be loaded onto any track
- ‘Sounds’ organizes all the instruments by ‘type’ rather than by the device used to create it, but you can load up presets from either menu
- The dropdown menus next to each instrument/device shows the list of presets available for it – you can drag the preset and load it directly from the browser
- ‘Plugins’ shows any third-party devices you have installed
- I’ll show you how to do this in Ableton later in the guide
- ‘Samples’ not only shows all of Ableton Live’s default audio samples, but also any that you load in via the ‘Places’ section later on
- If you have over 10000 samples, it will only show 10000 at a time
Places

Here is where Ableton Live will show any relevant folders or third-party folders that you add.
The first three that will appear in the list are:
- Packs
- Shows any Ableton Live packs that you have installed from the Ableton website, including the Core Library that comes with Live
- User Library
- The default directory Ableton uses to store all of the user content, including samples, presets, clips and default presets
- Current Project
- Any material directly related to the project you are working on now. You can expand the dropdown in the project file to see the tracks you are using in any given project. Until saved, this is blank.
Beyond this, you can also add your own folders (e.g. sample packs), which we will cover later.
Collections
I have left collections to last because they don’t make sense unless you have been through the rest of the Browser.
Collections is also one of my favourite features of Ableton Live, because it helps you stay organized and on top of things.

How does it work? Well, you have up to 7 collections to add anything to – presets, samples, clips, anything!
Here’s a few ways you could use this:
- Use a collection for your favourite drum samples
- Save your favourite devices and plugins in one place
- Save a variety of presets and racks for you to quickly use on the fly
- Create ‘vibes’, combining presets, samples and effects into collections for different styles of music
There are endless possibilities.
So, how do you add something to a collection?
Well, no matter where you are in the browser, right-click on the file in question and select it from the list. You can also use the number keys to do this quickly.
If you need more collections, click the ‘Edit’ option while hovering over ‘Collections’ and tick the boxes for the colors you want to use.
At the same time, you can also hide other categories across the browser by doing this.
Preview Tab
When scrolling through your sample library, you want to hear what you’ll be working with.
This is where the Preview Tab comes into play. Any sample or ‘playable sound’ will simply play when selected in the browser.
You will also see the waveform down the bottom to get a feeling for the sound:

If you want to turn this feature off, simply turn the headphones icon off to the left.
If you have the arrangement playing while you are navigating the browser, Ableton Live will attempt to warp any relevant samples into time so you can audition effectively.
Once again, if you want to turn this off, just select the ‘Raw’ option on the right, and it will play the audio ‘as is’.
Session vs. Arrangement
The main differences between the two are the following:
| Arrangement View | Session View |
| Designed for music production | Designed for jamming and live performance |
| Useful for laying out clips over time and seeing the full structure | Great for trying out different musical ideas and swapping different patterns/clips in and out |
| Easier to implement automation and movement over time | Can be better for the mixdown with faders |
Most of the time, producers will be using the Arrangement View, as it is the easiest to understand and is similar to a ‘standard’ DAW layout.
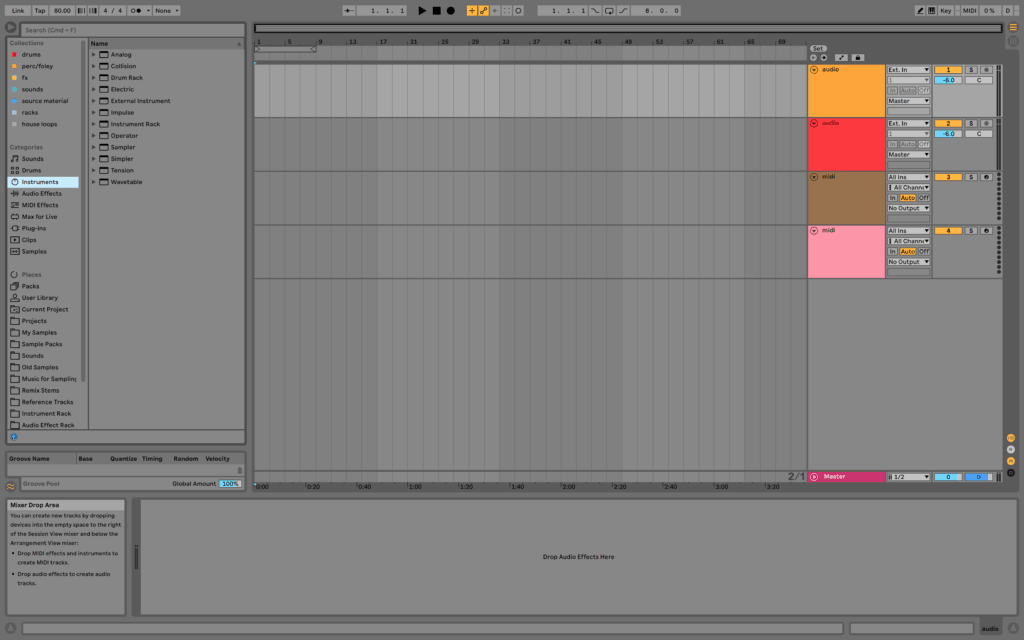
Arrangement View
On the right, you have the ‘Mixer Drop Area’. Here is where all of your instruments, audio and MIDI tracks will live when loaded up.
You can control the following controls for each track:
- Volume
- Panning
- Solo
- On/Off (Mute)
- Track Routing
- Recording

On the far right, you can also see a miniturized version of the metering for each track, which shows you how loud things are.
Down the bottom of this area is the ‘Master’ channel. This is where all of the audio routes to, and controls the overall sound of the track you are working on.

Generally, you want to leave the Master volume at 0dB, unless you have a specific reason not to. This is to ensure that any master processing will allow the audio to stay at the maximum loudness without clipping.
In the centre of the interface, however, is where the magic happens.
This is where you will drag in audio samples, create MIDI clips to program sounds, and draw in any automation.
Session View
Even though this guide will be centered around the arrangement view, I do want to briefly highlight the importance and usefulness of the session view.
Unlike the arrangement view, all tracks are listed vertically, and instead of an arrangement, you have ‘Clip Slots’.

In these clip slots, you can create/import loops and samples (on Audio tracks) and create MIDI clips (on MIDI tracks).
In the ‘Master’ section, you also have ‘Scenes’. These scenes allow the users to trigger all the clips in that row, which can be great for jamming and performing.
For example, you could have two different loops you want to switch between.
That way you can compose them individually, and then bring them together by playing with scene triggering.
Apart from this, you have a lot of the same controls as in the arrangement view, but with a different layout.
The most obvious difference is a fully-featured audio meter, which you can control more like a traditional fader.
Now, back to the arrangement view.
Audio & MIDI Tracks
Ableton Live utilizes two main types of tracks to create sound – audio tracks and MIDI tracks.
Both can be useful depending on your workflow and what you’re trying to achieve.
Audio Tracks
Audio tracks allow you to use raw audio ‘as-is’ in the arrangement. This can consist of loops, one-shots or any form of audio recording.

There is no ‘instrument’ to trigger or play sound in this case – what you hear is what you get.
That being said, you can drag effects and the like onto these tracks, in order to process and manipulate the audio.
This is where the Clip Editor comes into play. You can view individual audio clips on an audio track by double-clicking on one.

Here you have a variety of controls, including warping, which we will get into a bit later.
MIDI Tracks
Unlike audio tracks, MIDI tracks don’t produce audio in themselves.
The tracks require an instrument (e.g. Ableton Operator) to be loaded onto them in order for the programmed MIDI notes to tell it what to play.

For example, you might want a piano sound, but drawing in a couple of notes would only get you half way. You have to load in a virtual piano instrument for those notes to result in sound.
You could then change the instrument to any sound – a synth pad, a bass, or even a sampler.
For this reason, MIDI tracks are ideal for expressive composition, whereas audio tracks are great for arranging and manipulating.
When creating MIDI clips, you also get access to the editor and piano roll, which has a similar interface to the clip editor. Except you’re working with MIDI and not audio.

You can create a blank MIDI clip by selecting a portion of time on the arrangement, right-clicking and selecting ‘Insert MIDI Clip’.
Then, you can start adding in notes.
Recommended: Ableton Live Piano Roll: 19 Tips
Warping, Timestretching and Pitching
Going back to the audio tracks, one feature I briefly mentioned was warping.
Warping allows you to adjust the timing and pitch of an audio clip exactly how you want to.

Got out of time drums? Warping puts them in time.
This is in contrast to ‘normal’ timing changes, where the pitch is directly related to the speed of the audio.
In other words: faster = higher pitch & slower = lower pitch.
In my opinion, this is one of the most powerful and fun features in Ableton Live.
Why? Because not only can you keep the toughest audio material in time, but you can stretch, mangle and chop audio in ways that you couldn’t achieve with even the best plugins.
Let’s take a look.
Ableton Live’s Warp Modes
Ableton Live comes with a variety of warp modes, each designed to stretch the audio in different ways:
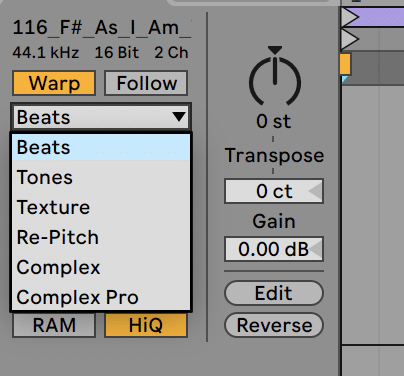
- Beats: designed to preserve transients in percussive material, like drums, plucks and other sounds
- Tones: designed to preserve the tonal quality of a synth, lead or other melodic material
- Texture: keeps the original texture of a sound in check
- Re-pitch: preserves the natural waveform dynamics by maintaining the relationship between pitch and time (i.e. the old school approach)
- Complex: works well on hybrid audio material or full tracks
- Complex Pro: ideal for vocals where it’s important to preserve the formants and qualities in a singer’s voice
Ableton Live’s Instruments, Effects and Sounds
One of my favorite feature sets of Ableton Live is the included devices and sounds that come included with it.
I actually recommend people who get Live not to download any plugins before trying them out.
(Don’t worry, I’ll still show you how to add plugins in Ableton Live later on.)
Using Instruments & Effects
You have an incredible range of synths/instruments:
Audio effects:
- EQ Eight
- Glue Compressor
- Saturator
- Multiband Dynamics
- Echo
- Drum Buss
- Amp
- Vocoder
- and more
and MIDI effects:
- Chord
- Arpeggiator
- Pitch
- Velocity
- Scale
- and more
These are found in the Browser under the respective categories and can be loaded in by double-clicking, or clicking and dragging.
Click on the linked resources to find out more about each of these powerful devices! 👆
Recommended: Finishing Music: Strategies For Completing Your Tracks
Samples & Clips
Ableton Live comes with a great selection of samples and clips available for you to use (especially in Suite).
But what’s the difference between clips and samples?
Clips: Ableton Live’s Superpower
Ever worked on an idea, but you only like a particular loop with some effects and processing on it?
Maybe you’re cleaning up your project library and you want to delete a particular project, but keep that one loop.
Your options are:
- Export the loop to audio, but lose the ability to tweak the MIDI or effects later
- Export the MIDI, but forget which synth and processing you use
- Export the instrument racks with the FX, but forget the notes played
But what if I told you can export a track with the clip, the way it is?

By dragging an Ableton Live clip directly into the browser, you not only save the MIDI/audio as is, but all the track settings along with it – the level, instrument and effects used and any other features (e.g. track color and name).
How neat!

Adding Plugins & VSTs
Of course, many of you are going to want to be adding your favourite synths, samplers, and effect plugins to make music with.
Fortunately, Ableton Live makes this very easy by scanning your system’s default plugin locations on your hard drive, no matter whether you use macOS or Windows.
If you plan on using Audio Units on Mac, you’re using a custom system folder for VSTs, or your plugins aren’t showing up, you’ll have to load up your preferences and enable them.
Click ‘Use Audio Units’ if applicable, and then click ‘Rescan’.

If you’re using a custom folder, you can set this here and then click the ‘On’ switch to enable the folder.
After that, you should have plugins show up! Depending on the plugin, they may show up organized by the manufacturer, or just come up under the list.
Using plugins in Ableton Live
There are two kinds of plugins: instruments and effects.
In Ableton Live, instruments will have a little keyboard icon next to the plugin name, and effects will have a blank box.

To load an instrument up, simply double click and it should automatically create a new MIDI track with the instrument loaded up. Otherwise, you can click and drag your instrument plugin onto an existing MIDI track.
With an effect plugin, double-clicking will load it up onto the currently-selected Audio or MIDI track, in the next available section in the signal chain. You are also welcome to drop and drag it into a specific location.
Adding Your Own Samples in Ableton Live
Even though we’ve discovered Ableton Live has some great audio samples (especially in Suite), you’ll still likely want to add in your own samples, whether they are downloaded packs or from a service like Splice Sounds (sponsored).

Once again, Ableton Live makes this simple by offering an ‘Add folder…’ option in the ‘Places’ section of the browser.
Simply navigate to your samples location and add the folder. You can add and organize them however you like – all in one folder or using multiple folders.
Once you’ve added your folders, you can treat these like standard samples, and drag them into the arrangement, or into an instance of Simpler/Sampler/Drum Rack.
Recommended: Free Sample Packs
Some General Beginner’s Tips for Ableton Live
Now that you’re a bit more comfortable with Ableton Live, here are a few of my recommendations.
Audio Settings
One of the first roadblocks I ran into as a producer was dealing with an inadequate system.
I’m sure many of you out there are the same, and are experiencing clicks, pops and glitches when trying to play audio.
In order to overcome this, you’ll have to play around with the audio settings in order to get the best performance on your computer.

First and foremost, if you’re on Windows, make sure you grab the ASIO4ALL drivers, if you don’t have them already (if you’re using an audio interface, sometimes it may come with it).
Once you have selected the appropriate audio driver type (CoreAudio on Mac, ASIO on Windows) then you can select your output device.
Underneath this you have the Latency section. Here is where you can change the ‘Buffer Size, which is key in reducing unwanted clicks and pops.
Zoom Display
If you’re like me, and you’re using a smaller display on a laptop, then changing your display zoom can be a life saver.

Simple head to the ‘Look Feel’ preferences and play around with the ‘Zoom Display’.

Lots of fun!
Template
When loading up Ableton, wouldn’t it be nice if your favourite sounds and devices were already pre-loaded?
Fortunately, you can do this. Simply head to your Preferences and under the ‘File Folder’ preferences, you will see an option titled ‘Save Current Set as Default’.

Once you have things set up the way you want, simply click Save, close Ableton Live and reopen it. Your template will now open every time.
Auto Fades
Many students in our EDM Foundations course came across this problem when using samples in Ableton Live for the first time.

Punchy and percussive samples would not sound the same as they did when previewed.

To fix this, open up your Preferences and navigate to the ‘Record Warp Launch’ tab. There is an option under ‘Warp/Fades’ to turn off ‘Create Fades on Clip Edges’.
Ableton Live Themes
As creatives, we often like to make our workspaces customised to our wants and needs.
One of the ways you can do this is to use a different color theme. You can choose from the default options by heading to the ‘Look Feel’ preferences and selecting an option.

Apart from that, there are a number of online resources for Ableton Live themes. One of the beauties of Ableton’s interface is the fact that it’s easily changeable.
Our favourite resource is abletonthemes.com.
Sidechain Compression
Everyone wants to learn sidechain compression. Probably because it’s a very sought-after effect for that drastic ‘pumping’ sound.
But the reality is sidechain is a very useful thing to know, and Ableton Live makes it very simple.
If you don’t understand compression first, check out our definitive compression guide first.
Once you know the basics of compression, load up Live’s Compressor on the track you want to sidechain.
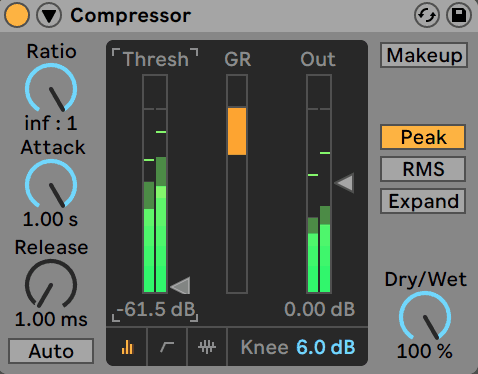
There’s a little arrow up the top left next to the On/Off switch. Clicking it will bring up the extended interface.
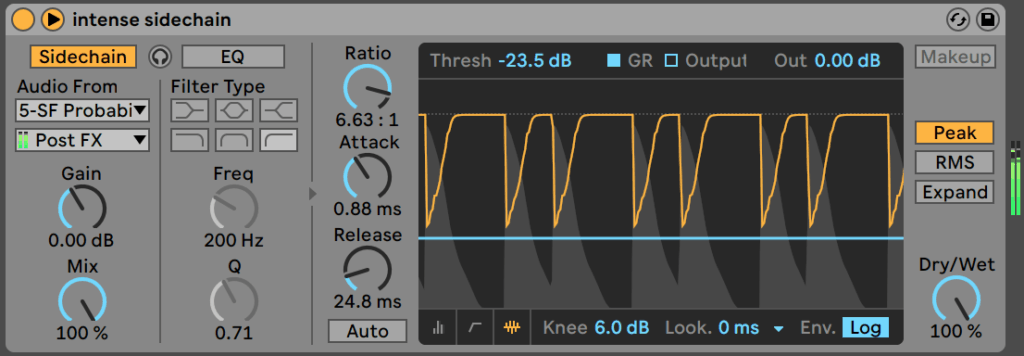
From here, enable the sidechain button like I have above, and choose your input source (e.g. if you’re sidechaining from a kick, select the kick channel).
Once set, configure the controls to shape your sidechain envelope. You should start to hear a ducking effect, especially once the threshold is brought down.
And that’s a few tips to take your learning further.
If you want more inspiring tips for Ableton Live, check out 100 of them here. Or if you prefer YouTube tutorials, check out our curated list.
Optional: Ableton Push
The Push is a great addition to any Ableton Live setup, especially if you like a more hands-on approach, even if it’s technically not a necessity.

While this isn’t a comprehensive resource for the Push, I’ll leave a few links below for you to check out:
That’s A Wrap!
Hopefully you’re feeling a bit more comfortable in Ableton Live, and are able to start making music.
But understanding the basics is only the first step – you’ll need a more comprehensive yet simple way to go further.
And who actually reads the manual, right?
That’s why we created the Ableton Workflow Bible – a complete eBook to help you master working inside Ableton Live.
Like I said earlier, we used to charge money for this, but now you can grab it for free below:
Missed anything? Email me at [email protected] and I’ll sort it out for you.
