


Sidechain compression is the hallmark of electronic dance music. It’s that unmistakable pumping effect when you hear the kick hit and the bass duck.
But it can be a bit daunting to approach – especially if you’re new. So to help, in this guide you’ll learn:
- How sidechain compression works
- Different routing options you can setup to get cleaner mixes
- When to apply sidechain and when not to
- Modern alternatives to traditional sidechain compression, like volume ducking
- Tips and tricks for fine-tuning your sidechain settings
If you want to get those tight, controlled mixes – this is for you. Let’s dive in! 👇
What is Sidechain Compression?
In the realm of mixing, sidechain compression is similar to normal compression, but with a twist.
With normal compression, when the signal gets too loud it’s turned down. This achieves a more even, controlled sound.
However, with sidechain compression, the compressor isn’t listening to the incoming audio. It’s listening to a sidechain input.

This sidechain will apply the gain reduction of the sidechain signal onto the main signal.
In other words, when the kick hits above a certain loudness, it turns down the bass.

So why would you want to do this?
The Purpose of Sidechain
In any song, all the elements are competing for a limited amount of space. You have the kick, bass, synth, vocal, other drums, FX, and all sorts of other instruments and sounds.
Normally, the solution would be to turn something up so it’s louder than everything else. But doing this overpowers other sounds, so then you want to turn other things up to compensate.
And then you get caught up in the endless loop of turning things up, screwing up your mix.
An alternative approach is to turn things down only when the other element is present, and that’s where sidechain compression comes in.
Typically, sidechain helps shorter elements punch through the mix, like percussion hits. These sounds are the first to get buried in the mix because longer sounds (like basses, synths and vocals) always feel louder to the listener.
As we’ll discover, this is why kick-bass sidechain is so important in electronic dance music, and it’s also how you can achieve that classic pumping effect that we hear in our favorite tunes.
So, let’s dive in and start setting it up in your DAW.
How To Set Up Your Sidechain
If you’re in one of the major 3 DAWs:
…then fortunately sidechain compression is super easy to set up.
Ableton Live – Stock Compressor
Under ‘Audio Effects’ in Live’s browser, you’ll find the ‘Compressor’ device:

Simply load this onto the sound you want to apply the compression to by clicking and dragging.
For example, if you want to duck the bass using the kick, drag it onto the bass.
Once it’s loaded in, you can click the ‘Sidechain Toggle’ arrow and flick on the ‘Sidechain’ button:

This will enable you to choose the track you want to trigger from, under the ‘Audio From’ dropdown.
By default, I find leaving it on the ‘Post FX’ mode is the best in most cases. This way any changes to the fader volume won’t effect the amount of sidechain.
Now the compressor is setup for sidechain compression, so adjust your ratio, threshold, attack and release as desired.
FL Studio – Fruity Limiter
Firstly, make sure both the sidechain trigger and track you want to apply sidechain to are both routed in the mixer.

After that is done, select the sidechain trigger channel. Under the channel, you want to process, click the dropdown in the routing section, and select ‘Sidechain to this track’.

Now, this channel is ready for sidechain. Select the channel and simply just load a ‘Fruity Limiter’ on one of the FX insert slots.

When the interface is open, make sure it’s in Comp mode and select ‘1’ as the sidechain channel input.

Now you can adjust the normal compression parameters as you like.
Logic Pro X – Stock Compressor
You can apply sidechain compression by using the default Logic Pro X Compressor.
First, you want to load up the ‘Compressor’ on the audio track you want to sidechain (under Dynamics > Compressor).

Ideally, you want to leave it on the ‘Platinum Digital’ setting for sidechain, as this will sound the most precise. Feel free to use other settings if you prefer.
Switch on the ‘Side Chain’ switch on the top right of the main interface. I like to use ‘Peak’ mode for sidechain compression, especially if you’re going for EDM-style sidechain (less natural, more obvious).

Up in the top bar of the plugin window, you’ll see another ‘Side Chain’ drop down. Depending whether the trigger is an Audio track or Instrument track, will depend on the sub-menu your desired trigger will be under.

Select the correct channel and begin tweaking your compressor!
If you’re in another DAW (e.g. Pro Tools), then I’d recommend doing a quick YouTube search for a tutorial that shows you how to set up sidechain.
Now we’re going to cover when you want to use sidechain compression and some ideal settings to use.
When To Use Sidechain Compression
Sidechain compression allows your mix to fit together like a puzzle. It carves out the perfect amount of space for each element to fit in.
For that reason, there are many different ways you can use sidechain compression in your mix:
Kick-Bass Sidechain
The most common way to use sidechain compression is on the bass, with the sidechain input set to the kick drum.
This is because the kick and bass occupy similar frequency ranges, and by default, there are clashes in the bass range.

This is genre-dependant, as some genres will have lower bass and higher kick drums, and vise-versa.
Regardless, sidechain can still be an extremely useful tool here. Take this kick-bass pattern:

The kick and bass playing together create a strange clashing effect, and the kick drum is nearly dwarfed by the bass.
To avoid this, we can add in some sidechain compression. Here I’ll use a ratio of 5:1, an attack of 4ms (to avoid any clicking, which can happen when sidechaining bass), and a release of 60ms:
Now the kick cuts through loud and clear, and the bass is still front and centre where it needs to be.
Kick-Instrument Sidechain
Although most higher-register instruments don’t directly collide with the kick drum, ducking them out of the way allows the transient of the kick to punch through neatly.
Not to mention, when the effect is exaggerated, you get a cool sucking effect, which is prominent in subgenres like big room house, future bass and trap.
Take the below audio example:

This sounds fine, but we could add some more interaction with some sidechain.
Here, I’ve applied a 4:1 ratio with a fast attack and release to the sidechain compressor.
Now the kick drum punches through, and you can hear the synth ducking a little bit to make way.
We can turn this effect up even more by reducing the threshold:
This is the kind of effect you’ll hear in the drop of many big room house tunes. At this point, it stops being simply a mixing effect and is more of a creative effect.
Recommended: Mixing EDM: The Complete Beginner’s Guide
Snare Sidechain
Not every genre will call for instruments to be side-chained to the snare. However, in genres like dubstep or hip-hop where the snare can be quite chunky in the low end, this is a handy tool.
Here’s a hip-hop beat with a kick, snare, bass and some piano. Sidechain compression is already being applied to the bass and keys from the kick:

This sounds great already, but to carry this groove we can apply a subtler sidechain from the kick drum too.
I’ll use a 4:1 ratio again, but only getting 1-2dB of gain reduction:
The effect allows the snare transient to pop through, and also moves the mix in an interesting way. This sounds great in genres like hip-hop, trap, dubstep, and drum & bass.
Vocal-Instrument Sidechain
When working with vocals, 90% of the time we want them to be forward in the mix.
But in dense mixes with a lot of midrange (synths, pianos and pads), even clean vocals can get a little lost.
Take the below example:

Applying some gentle sidechain could allow that vocal to remain consistent throughout this section.
In this case, I want to ‘massage’ the other instruments out of the way. So I’ll apply a compressor to the instrument buss, route the vocal as the sidechain input, and the following settings:
- Ratio: 2:1
- Attack: 30ms
- Release: 250ms
This will allow the compressor to sound natural. Let’s drag the threshold down until we get 2-3dB of gain reduction at most:

Much better.
Instrument-Effect Sidechain
Effects like reverb and delay can chew up a lot of space in the mix.
But sometimes you want the effect without it overpowering other important elements like synths, pianos, guitars or vocals.
If you set up reverb or delay on a send, you can carve out space on them by using sidechain from the desired element.
Take this musical snippet:
The reverb is quite powerful and is a little too noticable with the vocal present in the mix. However, I want to keep the effect and that level when the vocal isn’t present.
Using similar settings to the vocal-instrument sidechain setup, we can get a gentle ducking to clean up the mix:
An Important Note on Sidechain Compression
After the above example, you may be tempted to use sidechain compression on everything.
I would strongly recommend against this.
While it’s a lovely effect, it can easily fall prey to shiny object syndrome, much like regular compression has over the years.
It seems novel due to the exciting sound it has, but sometimes the best thing you can do for your mix is to avoid using sidechain compression.
If you’re trying to go for a natural mix, sidechain compression might actually lead you astray. Ducking might create strange volume movements that actually separate your mix apart rather than glue it together.
My recommendation? Use it only as a problem-solving tool, or as a creative tool. Don’t use it ‘just because’ – that approach never works.
Additionally, when you do use it, don’t apply it the same on every instrument necessarily. There is merit to allowing some instruments to breathe while others receive a bit of ducking.
Use different ratios, thresholds, attack and release values. Keep things interesting.
Modern Alternatives To Traditional Sidechain Compression
When sidechain compression first came about, it was used as a ‘de-esser’ to reduce the ‘s’ sounds in vocals. It would listen to a narrow frequency band of the vocal, and turn down the original vocal when that band got too loud.
The result? Less harsh vocals that you could actually listen to.
Since then, sidechain compression has evolved a lot, and with digital plugins, we can get a lot more nuanced and controlled.
Here’s a few of the plugins offering sidechain-like effects at the moment:
Cableguys ShaperBox 2
ShaperBox 2 is an amazing modulation tool in general, so confining it just to sidechain compression is a bit of an insult.

That being said, it is very versatile for this kind of application. Not only can you use the VolumeShaper module to add volume ducking, but you can draw in your own shapes for different frequency bands.
This means you could apply sidechain to just the low-end of a certain sound from the kick, and draw the shape perfectly to the style of the kick.
Beyond that, you can also shape pan, width, filtering and much more.
Find Out More at Cableguys.com
Xfer Records LFOTool
LFOTool has become a staple replacement for traditional sidechain by many producers.
If you’re a user of Serum, this plugin is basically the LFO section in a standalone VST.

You can shape the volume, filter and other parameters by drawing in the curve, selecting the timeframe and tweaking to your desire.
You can also have a MIDI trigger to determine when the LFO envelope will trigger.
Find Out More at Xferrecords.com
Nicky Romero Kickstart
Kickstart is a beautifully simple VST tool for 4-on-the-floor sidechain compression.

Basically, this plugin emulates a house-style kick drum trigger, meaning you’ll get that consistent 4/4 pumping effect.
You can also change the amount of volume automation, as well as select from a bunch of great preset shapes.
Find Out More at Kickstart-plugin.com
Waves OneKnob Pumper
Similar to Kickstart, you just want simple 4-on-the-floor sidechain ducking, then OneKnob Pumper is the plugin for you.

This option is even simpler than Kickstart – it’s just the one knob to control the amount of ducking. No-fuss whatsoever.
Wavesfactory Trackspacer
Trackspacer has been one of my favourite purchases of late.

Unlike traditional sidechain compression, Trackspacer ducks out certain frequencies based on the sidechain input’s frequencies, instead of just turning the original signal down.
For example, if you use Trackspacer on a piano pad with the sidechain input as a midrange-y vocal, it will duck out just the mids on the piano pad. Super neat.
You can also filter which frequencies are going to get ducked with the low-cut and high-cut knobs, so you can zero-in on the parts of the sound that really need to get out of the way, leaving the rest intact.
Find Out More at Wavesfactory.com
Sidechain Tips & Tricks
We’ve covered a lot of ground in this guide, but there are even more cool things you can do with sidechain compression in order to get the effect you really want.
Let’s look at a few of my personal favourites:
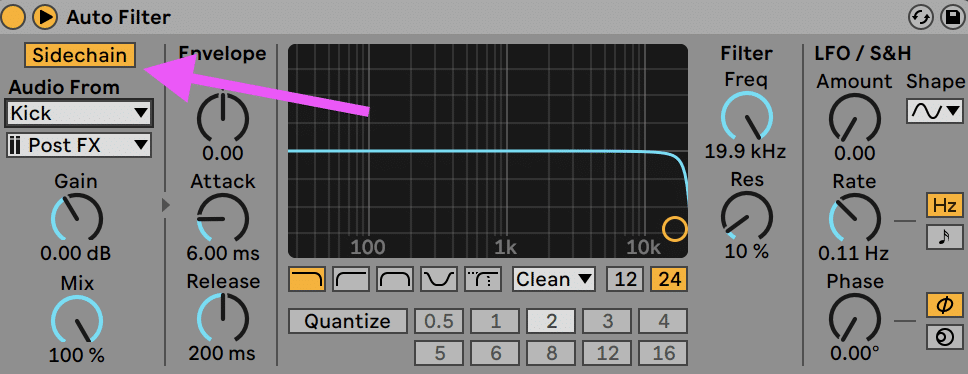
EQ the input
Many compressors have a filter or EQ section build into the sidechain section, because it’s useful to shape the sound when using it as a trigger.

For example, you don’t want the kick drum’s low end to trigger the compressor if you want short and snappy sidechain. So you can high-pass the low-end out.
Ghost Sidechain
It’s great to be able to sidechain from other instruments in the mix, but what about things that aren’t in the mix?
What if you want the sound of 4/4 sidechain (e.g. house and techno) but in a trap or future bass tune?
This is where ghost sidechain comes in.
In one of our upcoming courses, I demonstrate this using a sidechain kick which plays even when the actual kick is not. The channel is then turned off so you don’t hear this version:

This is cool for building energy in sections leading up to the drop, because you hear the pumping but no kick.
Beyond this, as you can imagine the possibilities are endless. Here are a few further ideas:
- Use a short click sample as the trigger that aligns with the kick, allowing tighter control of sidechain
- Automate sidechain threshold to bring in volume ducking slowly
- Ghost sidechain from random noise to create movement in sounds
Use multiband compression
Multiband compression combines two of the best tools into one: compression and EQ. And when sidechain is involved, it just gets better.
I kind of teased this idea when talking about Cableguys ShaperBox 2 – multiband sidechain compression.
This allows you to duck only a very specific band of frequencies when sidechain occurs, resulting in a more subtle and clean effect.

There are many different plugins that can do this, but if you don’t have access to these, try using the solutions in your native DAW.
You could:
- Use a stock device that supports multiband sidechain (e.g. Multiband Dynamics in Ableton Live)
- Split your frequency band into different audio signals and process a particular one with sidechain compression
- Manually draw in gain reduction using an EQ (tedious but gives you a lot of control)
Automate it
Instead of relying on the automatic nature of a compressor, you can use volume automation instead.

This way you can control the exact amount of gain reduction, how long for, and the movement of the curves.
This is a much more tedious way to sidechain, but depending on your workflow, it could be what you need. My recommendation is to use some sort of volume utility plugin for this – don’t automate your fader volume. Otherwise, when you want to change the overall volume later, you’ll get stuck.
Go beyond volume
Volume isn’t the only thing that can be sidechained.
Depending on your DAW, you could use a filter, panpot, or even distortion as a sidechain device, adding movement and mix interest.
In other words – go nuts.
Beyond Sidechain Compression?
That pretty much covers sidechain compression for this guide. I really hope this helped you grasp this powerful tool and how you can use it to create tighter and more controlled mixes.
But if you’re still struggling with the compression side of things, make sure to grab our free compression cheat sheet below:
Lastly, if you want more sidechain resources, check out the links below:
- Sidechaining Effects + Adding Atmosphere To a Synth
- 11 Creative Sidechain Compression Techniques
- Sidechain Ideas – Advanced, Creative Sidechain Techniques
Did I miss anything? Drop me a line at [email protected] and I’ll try to get back to you.
