


To most new music producers, multiband compression seems like a dark art.
How is it different from EQ? How does it work compared to ‘normal’ compression? Can I use it to fatten up my bass?
All of these are great questions, but most producers end up just slapping it on their master, hoping for the best.
Obviously, that won’t work, which is why we compiled this article to help you understand multiband compression as a whole.
You’ll learn:
- When to use multiband compression instead of a normal compressor
- The controls you’ll find on a standard multiband plugin/device
- The technical side of multiband compressors and how they work
- Different use cases (leads, bass, drums etc.)
- Why you shouldn’t always use one
Let’s dive in.
But first, need some help understanding the basics of compression?
Make sure to grab our FREE compression cheat sheet. Not only will it help you with this guide, but also in general when using a compressor in the studio.
Note: there is a companion video for this article linked below, that can help if you want a more visual approach.
The Basics of Multiband Compression
So, what actually is multiband compression?
Essentially, multiband compression is the process of splitting the frequency band into 2 or more bands and applying different types of compression on each.

Think of it as combining an EQ with a compressor.
This allows you to achieve more nuanced compression because you could, for example, compressor the high-end above 10kHz heavily but leave the low end more subtly compressed.
But why would you want to do that?
Sometimes, a sound has what we call tonal inconsistencies. That is, a narrow or wide range of frequencies may have a lot of dynamics in them, but the rest of the sound doesn’t have as much variation.
Applying a normal compressor might not solve the issue, as the tonal inconsistency may still not be loud enough to trigger the compressor as a whole.
Instead, imagine you could take a slice of the frequency range out and compress that as a separate source. This is what multiband compression allows you to do, and that’s why it sounds so transparent. You can leave the rest of the sound intact.
But why can’t you just use EQ to turn down that specific frequency range?
Well, sometimes you can, but when you turn something down, remember it is always turning it down by the same amount.
In other words, the adjustment is static.

So if the high end has the occasional piercing sound, and you go to solve it with EQ, you’ll not only be turning down the pierce, but also the high end when there is no pierce. Then, you could end up with a dull balance overall.
Multiband compression could solve this by turning it down only when it’s loud, and leaving in intact otherwise.
An analogy: imagine you’re wanting to put on weight, and you say that you’re going to maintain a net of 3000 calories a day.
This means you plan on eating 3600 calories, and burning 600 a day. But say you do some extra exercise and burn 1000 in a day.
If you still plan on only eating 3600 calories, you’re not going to achieve your goal – you need your diet to be dynamic depending on your exercise.
This is why multiband compression is such a powerful tool.
Knobs, Dials & Multiband Workflow
So you’re eager to start using multiband compression in your own mixes. Great!

But you open up your plugin/stock device of choice, and the interface has you feeling like:

What do I start with? What am I listening for? This is too hard!
Relax. First thing you should do when you encounter any tonal issues is to use either EQ or compression first to try and solve the issue, especially if you already know how they work.
In fact, 90% of mix problems like this can be solved with either of those tools.
But if you’re still running into issues, now is the time to pull out the multiband compressor. This way, if you’ve tried solving it with EQ or compression, you’ll know:
- the problem frequency areas
- approximate compression settings to dial in
which is a head start, because a multiband compressor combined these two sets of controls into one interface.
Here’s a brief recap if you’re unfamiliar:
Bands
These are like broader EQ curves that allow you to process a wide or narrow range of frequencies. The bands are typically split next to each other, meaning the curves are controlled by a ‘crossover frequency’.
This crossover frequency can be controlled in certain multiband compressors, allowing you to choose both a particular frequency point and either a steep (e.g. 48dB/oct) or gradual (e.g. 12dB/oct) curve, depending on your needs.
Remember that gradual curves will sound more natural yet less transparent, whereas steep curves will sound precise yet more noticeable.
If you’re unfamiliar with slopes, check out our EQ guide.
Compression Settings
Once you have a specific band that you want to work on, most multiband compressors will have a standard set of settings you can use, perhaps including any of the following:
- Ratio (the amount of compression)
- Threshold (when the compressor should start engaging)
- Attack & Release
- Knee (a gradual increase of ratio as the signal gets louder)
- Range (scales the amount and direction of compression/expansion)
- Lookahead (latency allowed so the compressor can analyze the signal before compressing)
- Dry/Wet (amount of processed vs original signal)
There will be an entirely unique set of these controls for each band (except dry/wet, which is normally universal).
It’s also worth noting that most multiband compressors aren’t going to color the sound in the same way that an analog compressor would unless the plugin specifies using an analog-modelled algorithm, or you’re using a hardware multiband compressor.
If you are unaware of these controls, check out our compression guide.
The Process
So now you understand the basics of a multiband compressor, so how do you know when to reach for one?
Well, like I have already said, multiband dynamics processing is a very niche tool, and should only be approached when absolutely necessary.
Below I will list a variety of different applications.
Tonal Inconsistency Balance
This is when you’ve tried using an EQ to fix some problem frequencies in the mix, but normal EQ just isn’t cutting it.
Likely because the content of that frequency range is particularly dynamic, so a static band change doesn’t sound good unless you automate the gain, which is tedious.
Most likely, you’ll be working with some sort of acoustic or organic sound/instrument in these cases, like an acoustic guitar or vocal, as these sound sources tend to have far more dynamics then synthesized/digital ones.
This is when you can bring in a multiband compressor. The point here is to use the minimum number of bands to solve the issue by targeting only the specific frequency range, and leaving everything else.
This leaves the audio intact while solving the problem.
Here’s a general step-by-step workflow approach you can try:
- Try and solve the problem with EQ.
- If that doesn’t work, target the same frequency range in your multiband compressor of choice.
- Use a ratio of 4:1 (give or take) and set the threshold so that the incoming audio triggers at the time of the inconsistency.
- Balance the attack and release so it sound natural, depending on the material.
- Adjust the ratio and threshold one way or the other to furthermore make the adjustment more transparent (you may want to ease back the ratio and increase the threshold, or vice versa).
- A/B test the signal to see if the problem is resolved. Use the dry/wet knob if the effect is too noticeable.
General Dynamic Control
Say you’re trying to balance and glue your mix together to make it fatter and fuller, but the bass pumps way too hard when you use a normal compressor.
This is where multiband dynamics can save the day. Instead of applying a one-size-fits-all compression solution, you tailor it to each band. Now you can control the mids and highs differently to the lows, where you can be a little bit more relaxed.
For example, high-end energy can sound nice when compressed quite a lot, but that compression wouldn’t sound too great on the rest of the mix. So you can dial in a ratio of 10:1 on the 10kHz+ band, but dial in a more subtle 2:1 on the mids and a 4:1 to tighten up the bass.
Here’s an example workflow:
- Try and control your mix with a compressor (try a couple at least to see how different compressors affect the mix, including an analog-modelled compressor).
- If the problem isn’t solved, listen to the parts of the audio that suffer under normal compression.
- Lows?
- Mids?
- Highs?
- A particular range?
- Start processing the parts that aren’t affected as much by the compression first, with similar settings.
- Work your way down with less extreme settings, applying the appropriate amount to each band.
- A/B test the signal to see if the problem is resolved. Use the dry/wet knob if the effect is too noticeable.
Remember a golden rule with dynamic range control – the mids is where the music is, and compressing this range too much can lead to an overly-squashed mix.
Recommended: How To Make House Music
De-essing and De-popping
You’ve likely heard about a de-esser before.
Well, essentially a de-esser is a multiband compressor, but for a specific frequency range and more nuanced controls.
In fact, de-essing is actually just another form of tonal inconsistency balancing on vocals in particular.
De-popping is a similar phenomenon but in the low-end of the spectrum.
You’re welcome to use a traditional de-esser plugin or a general multiband compressor plugin to solve these issues, and you can follow the same process as the first workflow above, except it’s unlikely that EQ will solve an overly-sibilant vocal without dulling the overall recording.
Creative Sound Design
Abusing a multiband compressor can yield some unexpected yet interesting results.
Take the OTT preset in Live’s Multiband Dynamics. Clearly the aim of this plugin is not to solve subtle mix problems, but to drastically alter the character of a sound, making it more squashed and fat.
This is because multiband compression can alter the tone and dynamics of a sound at the same time in a unique way, allowing you to achieve something you couldn’t have done with EQ and compression alone.
Check out our OTT tutorial for an example.
There is no set rule here fo using a multiband compressor in this way, but you could try the following:
- Play around with presets
- Use multiple instances
- Crank the input gain up so you compress the sound a lot
- Tweak random things and see what happens
Recommended: Finding Your Sound Design Flow & Building Online Connections With Slippy
The Best Multiband Compressor Plugins
So you want to purchase/download a multiband compressor.
Maybe you want to see if your stock plugin is any good in comparison to what’s out there.
Either way, here’s a list of recommended plugins/VSTs you should check out.
- FabFilter Pro-MB
- Waves C4/C6 Multiband Compressor
- UAD Precision Multiband
- iZotope Ozone 9
- Ableton Live Multiband Dynamics
- FL Studio Maximus
- Logic Pro X Multipressor
FabFilter Pro-MB
This one is my personal favourite, not only because the interface is truly beautiful, but also because it’s insanely customisable and sounds great.
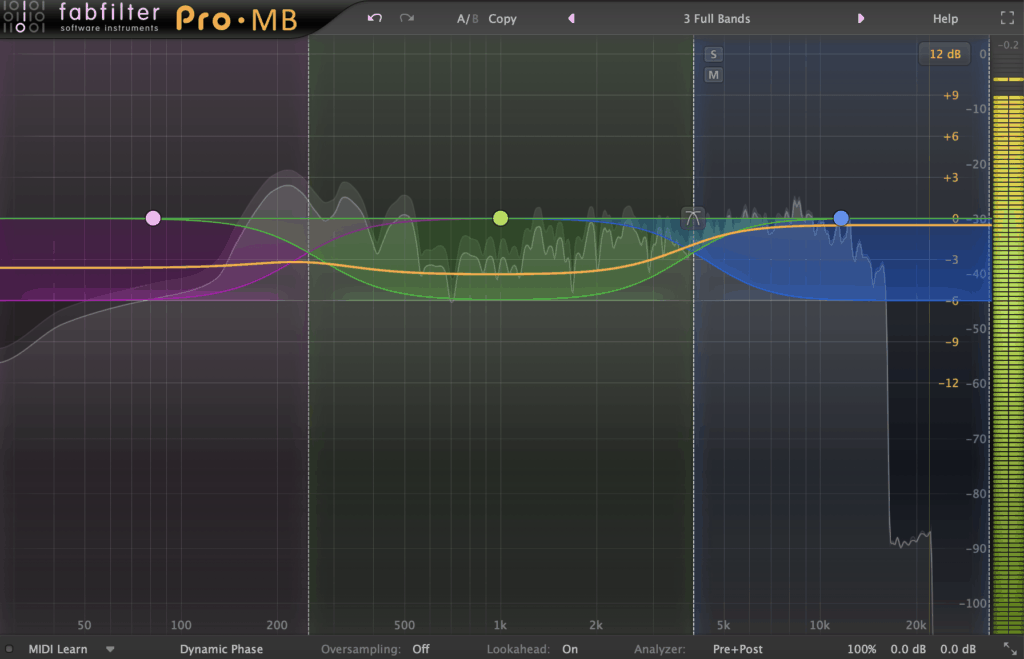
You can create a band anywhere by clicking the + icon on the interface, and any bands you add can be either completely separate or adjacent by dragging the crossover frequencies at either side of the band.
Beyond that, you can a whole host of compression controls to dial in, including the standard ratio, threshold, attack, release and gain, but you also have the range control which allows you to scale the amount of gain reduction in a particular direction. Very powerful.
You also have the option to use different phase modes depending on your aim, including the ‘Dynamic Phase’ mode which aims at retaining the dynamics on your channel as best as possible.
Waves C4/C6 Multiband Compressor
The Waves C4 and C6 plugins are a classic and still a top choice among many producers for multiband compression applications.

Unlike Pro-MB, this plugin(s) use 4 pre-defined bands, with an adjustable crossover in between. While this might seem less flexible, it helps to limit your options and focus on what’s important.
The only difference between the C4 and C6 is the number of bands allowed. Although the C4 will handle most applications, if you have a particularly difficult application, then the C6 can come in handy as well.
The 2 extra bands on the C6 do not follow the same crossover functionality, and can be independently dialled in on a particular frequency range, useful for something like de-essing or de-popping.
Apart from that, the bands have fairly standard controls: ratio, threshold, attack, release and more, as well as global controls for setting the algorithm, knee and general compression approach.
UAD Precision Multiband
UAD’s plugins are quite often coveted by many producers because of their great sound quality and offboard processing through one of their UAD devices.

Precision Multiband is the multiband compressor of choice for UAD users, and it’s a beast.
While its interface looks a bit dated, it is actually laid out very well and is simple enough to understand.
You have up to five bands of compression/expansion/gating to use, which can be turned on and off, and use crossover functionality instead of independent frequency settings, like the Waves alternative.
The graphic interface in the centre shows all of your curves, gains and thresholds, so you won’t get lost when dialling in some dynamic control.
iZotope Ozone 9
Unlike the other plugins in this list, Ozone isn’t just a multiband dynamics unit – it’s an all-in-one mastering suite. But the multiband dynamics section is just as capable as the competing options.

While it only has up to 4 bands (you can use it as a single compressor too), each band has a compressor, limiter and a gate on board, to help you shape your dynamics with as much control as you want.
You also have all the standard controls, plus the new adaptive release mode, mid/side compression and the ability to compress either the Peak, RMS or using the Envelope mode. So this is more than just your standard multiband compressor.
Your DAW’s Native Multiband Compressor
Now we get into the stock plugins. You might be tempted to ignore this section because you’ve just seen a variety of high-quality paid options with fancy interfaces, but don’t be deceived.
Often the stock devices are looked over due to their simple interfaces and lack of features, but most of the time, they’re all you need.
Note that not every DAW will have a stock multiband compressor, but the most common three do: Ableton Live, Logic Pro X and FL Studio:
Ableton Live Multiband Dynamics
This is a personal favourite stock multiband compressor of mine, because unlike other multiband dynamics plugins, it combines both upwards and downwards compression, allowing you to tame your audio on both sides.

You also get all of the standard controls and a unique but helpful interface in the centre, that allows you to see the gain reduction and signal level being affected by both sides of compression.
It’s also home of the OTT preset, which the Xfer OTT plugin was designed to recreate, so you can use it not only as a mixing tool but as a sound design tool.
One of my personal favourite features is the ‘Time’ knob, which scales the attack and release of all the bands, allowing you to shape a preset to any audio material quickly.
FL Studio Maximus
Maximus is a beast of a plugin, with a great user interface and 3 bands of compression as well as a master band designed for limiting.
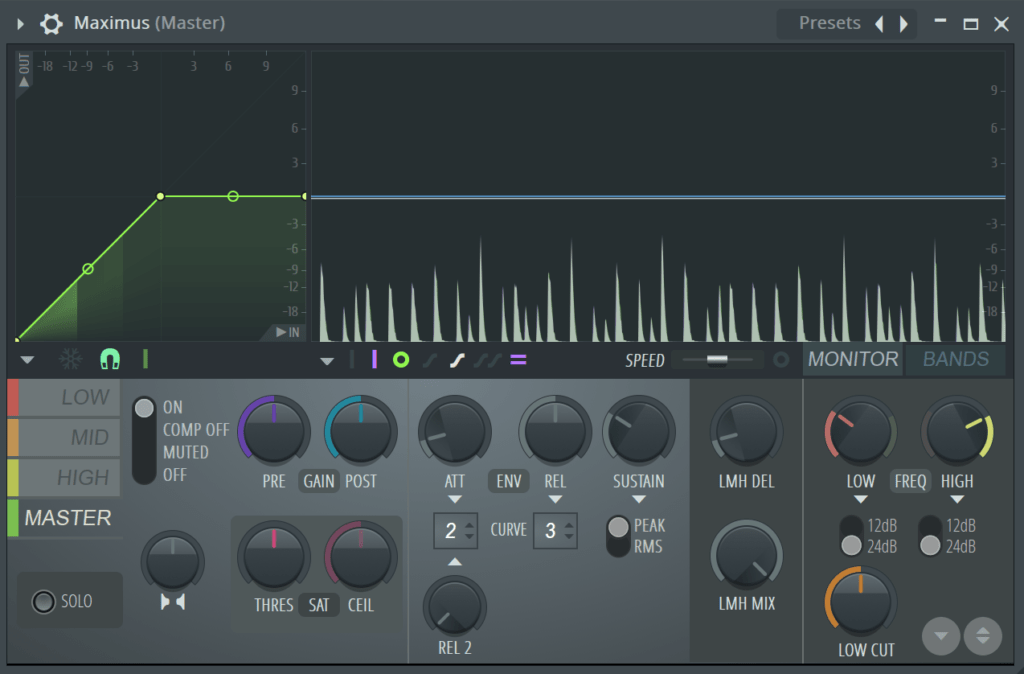
The kicker with Maximus is that you can draw in the compression transfer curve yourself. So technically, you can also use it as a multiband waveshaper too.
It also has a hell of a lot of controls – dry/wet mix, crossover control, attack and release for each band, customisable display options and even stereo width control. Crazy.
Logic Pro X Multipressor
So the interface here might look a bit confusing, but Multipressor is equally as powerful as many of the other options mentioned here.

For starters, everything is laid out on the screen, so you don’t have to go clicking any hidden tabs to discover features – what you see is what you get.
You get 4 bands of control with all of the standard features for dynamic control – ratio, threshold, gain, attack, release and even a dedicated expansion section, allowing you to control both sides of the dynamic range.
Recommended: Music Production Software Guide
And That’s It
That should be enough to start you off in the right direction.
And if you need extra help understanding mixing, make sure to grab our FREE compression cheat sheet below!
As always, any questions – let me know at [email protected].
