


We’ve all been there. You’re listening back to your tune in your DAW, checking the mixdown when suddenly everything cracks and stutters. Sound familiar? Then you’re probably having CPU issues.
Your computer specs set the limits of what your DAW is able to process. However, there are many steps you can take to optimize your computer performance.
So in this guide we’ll walk you through:
- The difference between CPU load and latency
- General tips to optimize your CPU performance (in any DAW)
- 5 specific tips to optimize CPU load in both FL Studio & Ableton Live
Let’s dive in! 👇
Table of contents
CPU, Latency and Buffer Length
As electronic music producers, we generally think of ourselves as artists. However, working with hardware and software also requires a basic understanding of technology.
And although buffer sizes and sample rates are not the most exciting topics, they are crucial to ensuring a smooth workflow. And we all know the link between workflow and creativity.
So before diving any further, let’s clarify some terminology that will be used throughout this guide.
Latency
Latency is the time it takes for data to move from one point to another. In networks, latency refers to the time it takes for a request to go from the source to the destination.
Think of a website taking too long to load, an email not going through, or a game freezing and then moving again.
Need a more visual explanation? Check out this video:
In other words, it is the time it takes for your computer to respond to an action you took. In our context, this might refer to the delay between pressing a note on our keyboard and hearing a sound.
Or imagine recording vocals, but hearing everything you say with a half-second delay.
Typically, you will want your latency to be imperceptible. But this comes at a cost of increased CPU usage, as we’ll explore later.
CPU
CPU stands for Central Processing Unit, sometimes simply called processor. It is the basic unit of any computer that executes instructions.
You can think of the CPU as a ‘brain’ that receives inputs from your mouse, keyboard, and any software you are running. It then performs those tasks or instructs other units to do something.
To keep it simple, the more powerful your CPU, the more tasks it will be able to complete without running into issues.
Other factors such as RAM and storage size are also key to your computer’s performance, but we’ll leave those for another article.
Buffer Length
Buffer length (or buffer size) is the amount of time allowed for your computer to process sound.
A low buffer size will reduce latency, but increase the strain on your CPU. On the other hand, increasing the buffer size will lighten the load on your CPU, but introduce latency.
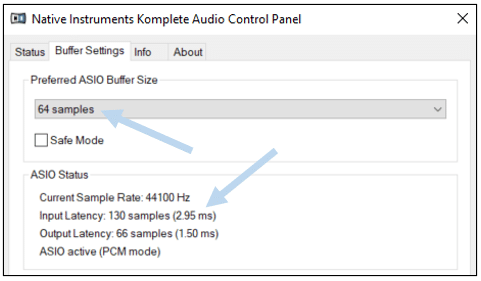
Note here the inverse correlation between buffer size and latency. This means there is a tradeoff to make between CPU load and latency.
Here’s a simple explanation:
Lower Buffer Size = Less Latency = More CPU Usage
Higher Buffer Size = More Latency = Less CPU Usage
So one question to ask yourself is: are you optimizing for live performance or stability?
If you are recording, you need to hear what you are playing in real-time (lower latency). But if you are listening back to a track with 50 plugins working at the same time, you want the sound to come through seamlessly (lower CPU usage).
Because many producers run into CPU issues, we will be focusing on optimizing for CPU usage rather than latency in the rest of this guide.
5 Tips to Save Your CPU (for any DAW)
Although producers love to praise their favorite DAW versus another, the inner workings of most DAWs are quite similar. This is why a lot of CPU-saving tips are applicable to most (if not all) DAWs.
Setting The Right Buffer Length
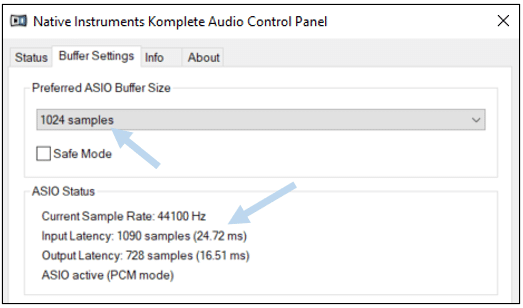
As explained above, setting the right buffer size is the first step to lighten your CPU load. The best way to go about this is trial and error.
You might want to start at 1024 samples and see if the latency is not too big for you. This will be highly dependent on your way of writing music.
If you work mostly with samples, then a high latency might not be an issue. If you are the kind that will jam out on the keyboard, then you need low latency.
Based on my own workflow and CPU specs, I find that a buffer size of 1024 samples works well for me. If I need more responsiveness (i.e. lower latency) when live recording, I will drop the buffer size to 512 samples or lower.
Setting The Right Sample Rate
The sample rate is the number of times that audio is captured every second. It is the audio equivalent of FPS, or frames per second in the video world.
Make sure your computer sample rate and your audio interface sample rate match:
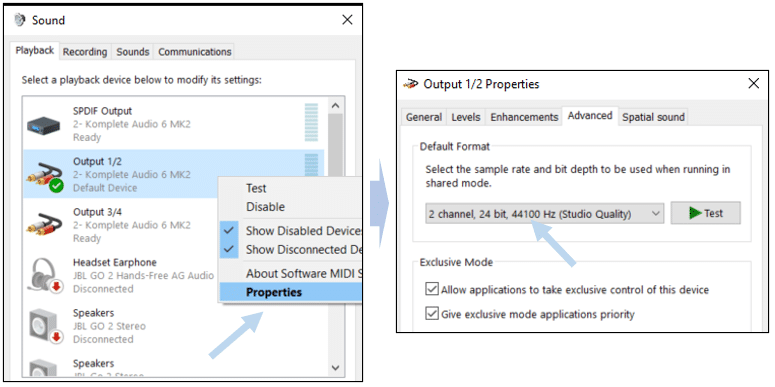
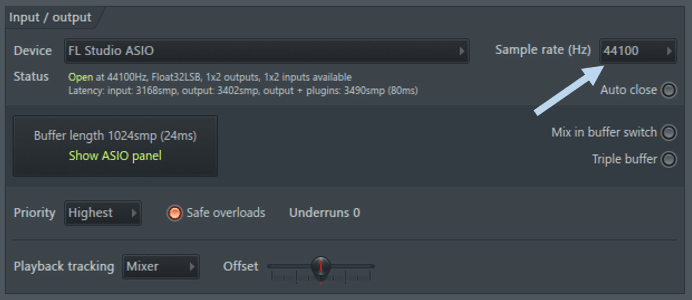
Although sample rates can go up to 192 kHz, the majority of digital music (think Spotify, YouTube, etc.) is at 44.1 kHz, so that should be the sample rate you set.
Making Maximum Use of Your CPU
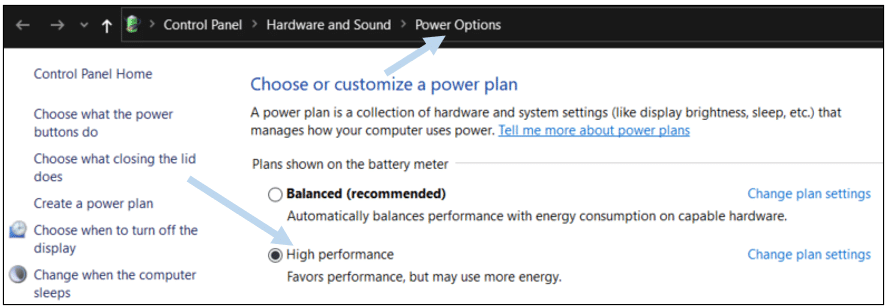
In an age of energy-saving and optimization, your computer might have a battery-saving setting enabled by default.
In Windows, you will want to choose the High-performance mode from the power options:
For macOS, make sure any sleep settings are de-activated. In the Battery menu, uncheck “Put hard disks to sleep when possible” and “Enable Power Nap“.
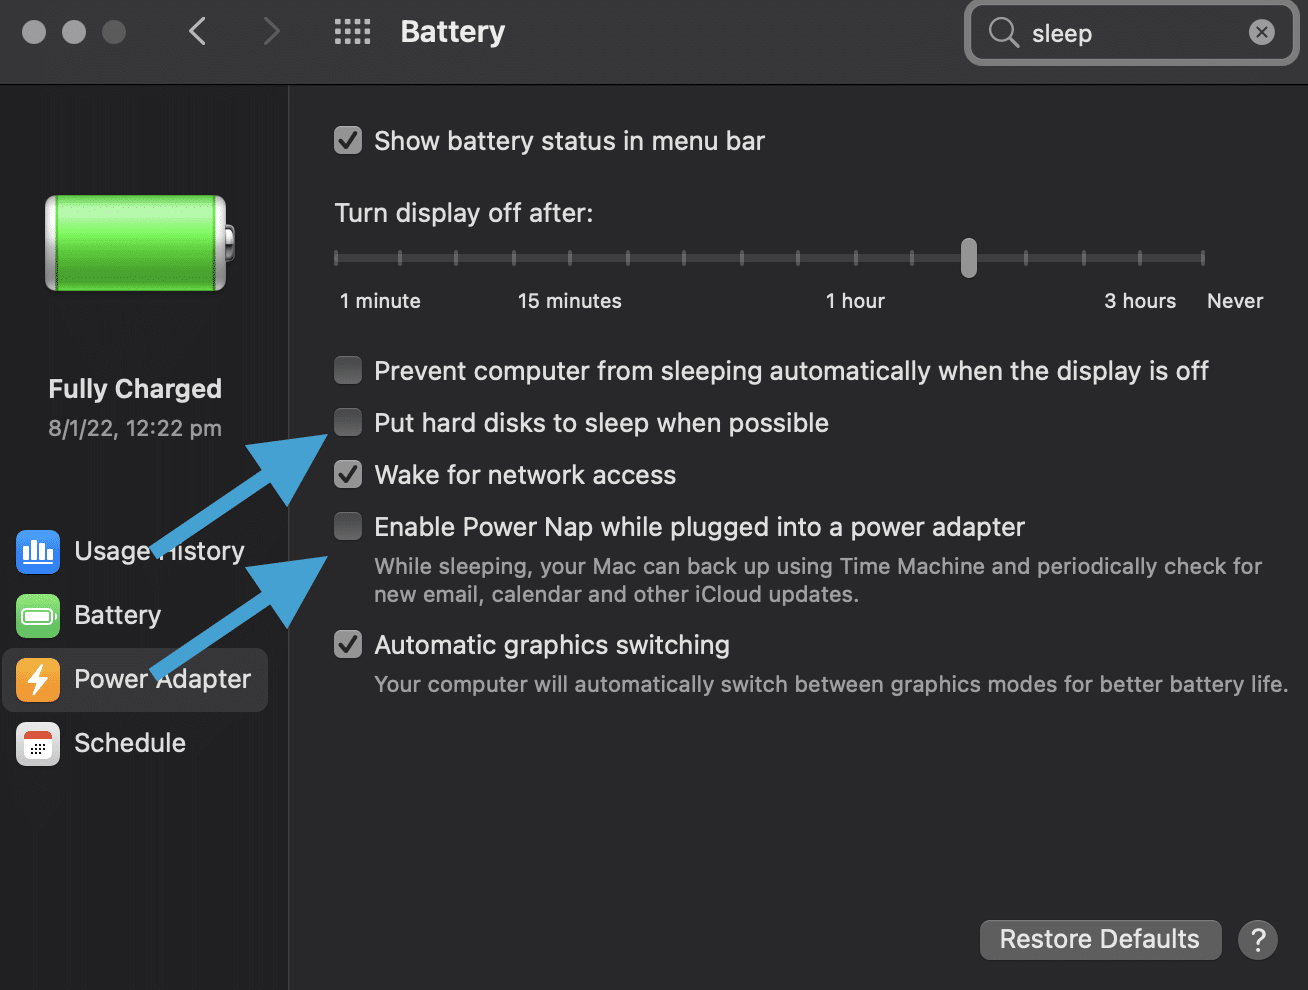
Essentially, you will want to de-activate any settings that sound like the aim is to save energy. Also, make sure your laptop is always plugged-in, as this will allow it to use maximum resources.
Close Any Other Programs and Computer Functions
As explained previously, the CPU is a bit like the brain of your computer. It is constantly juggling multiple tasks at the same time.
One of the best things you can do when producing music is to close all other applications. This will free up your CPU, and allow it to focus on your DAW.

Check your Task Manager/Activity Monitor for any unnecessary background apps that have launched at start-up, and close them.
I personally restart my computer when I’m about to produce music. This ensures that there aren’t any background programs running and taking up the CPU.
I’ll even sometimes turn off my Wi-Fi, which has the added bonus of keeping me focused on the task at hand!

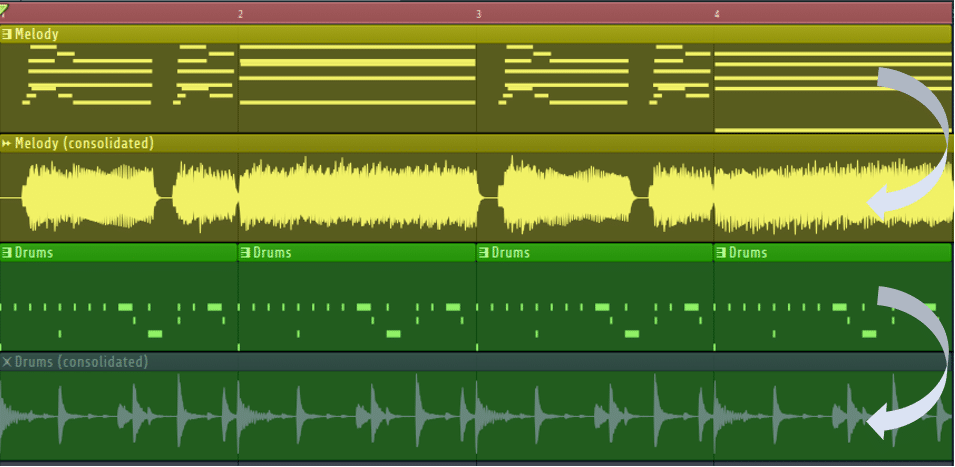
Don’t be Scared to Render to Audio
Rendering to audio has been a revelation for me. Previously I used to be very cautious: what if I want to change the pre-delay on that reverb later on? What if I want to change the ADSR of my lead synth?
But rendering to audio has led me to 2 great realizations.
Firstly, it frees up a ton of CPU. Having 5 instances of Kontakt and a dozen FabFilter plugins takes its toll. So being able to close all those plugins and work with audio is a lot gentler on my laptop.
Secondly, it has sped up my workflow dramatically. Committing to audio and not having to ability to constantly go back and tweak settings forces you to move forward with what you’ve got.
If you need more tips on speeding up your workflow, make sure to check out our 100 Ableton Live Tips!
In Fl Studio, you can render to audio by selecting a portion of the playlist and pressing CTRL+ALT+C.
In Ableton Live, right-click a track and click”Freeze Track”. Right-click again and choose “Flatten” to render to audio.
You can always save a new version of your project before rendering to audio different sections.
In FL Studio, your CPU load is indicated at the top of the window:

Double-clicking on the window will open up the Plugin performance monitor, showing you the CPU usage by plugin:
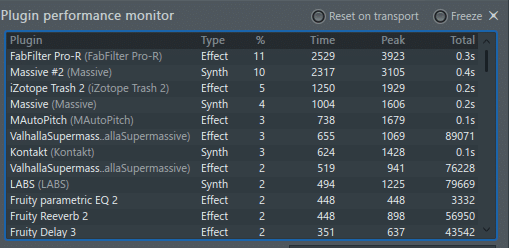
This allows you to detect high CPU-using plugins right off the bat, and replace or render to audio the problematic ones.
5 Tips to Save Your CPU in FL Studio
Driver and CPU settings
Although we have already discussed CPU settings, there are a few steps specific to FL Studio that you can take to optimize your CPU performance.
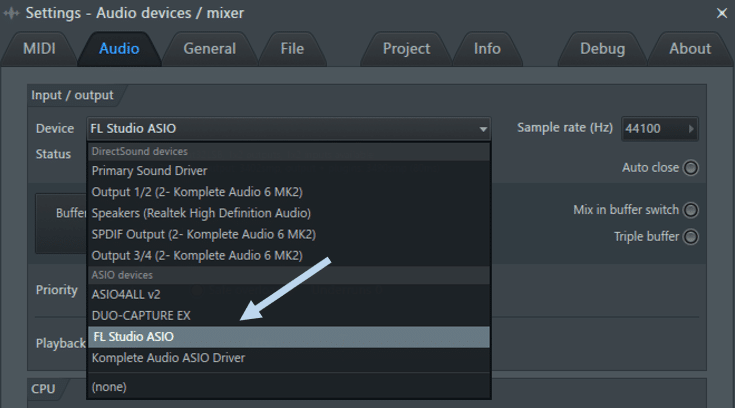
Firstly, make sure to select an ASIO device for your input/output. Unless you’re on macOS, in which case you can skip this step.
You can choose your soundcard’s default ASIO driver if it supports one, or the FL Studio ASIO:
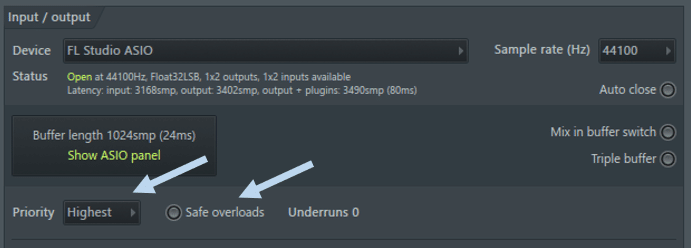
A few other audio settings to select are the following:
- Set Priority to highest and deselect Safe overloads:
- Set re-sampling quality to 24-point sinc or lower:

- Finally, set your CPU settings as follows:

- You can also try to activate Triple buffer and Mix in buffer switch if CPU issues persist.
Closing Plugin Windows
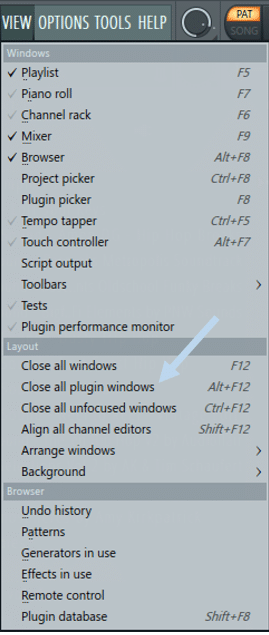
Leaving your plugin windows open will draw quite a bit of CPU. Try to close plugin windows when you are not using them, and definitely don’t leave 15 windows open on top of each other.
You can also close all plugin windows at once:
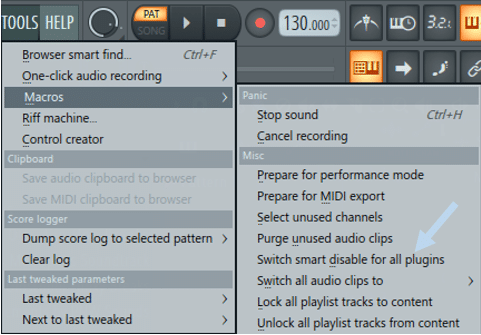
Smart Disable Plugins
Even when they are not actively used, plugins can take up a considerable amount of CPU. Switching “Smart Disable” on will disable any plugins that are standing idle:
Avoid Bridged Plugins
Bridged plugins occur when running 32 Bit versions of plugins on a 64 Bit system. If FL Studio does not find the 64 Bit version of a plugin, it will “bridge” the 32 Bit version. This uses more CPU than simply running the 64 Bit version of a plugin on a 64 Bit system.
You can check which version of each plugin you are running by opening up the Plugin Manager under Options – Manage plugins:

Turn Off “Keep on Disk”
For projects with a lot of audio samples, deactivate “Keep on Disk” in the Channel Sampler:
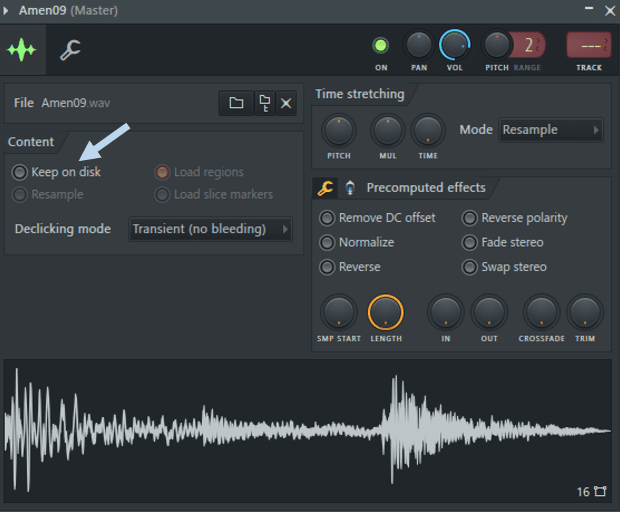
This will allow samples to be pre-loaded into memory before being played.
5 Tips to Save Your CPU in Ableton Live
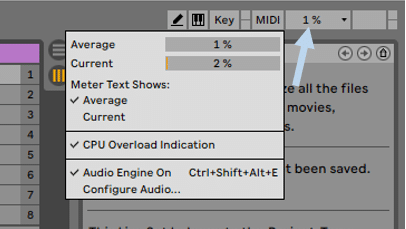
In Ableton Live, the CPU meter is indicated at the top-right hand corner of the window:
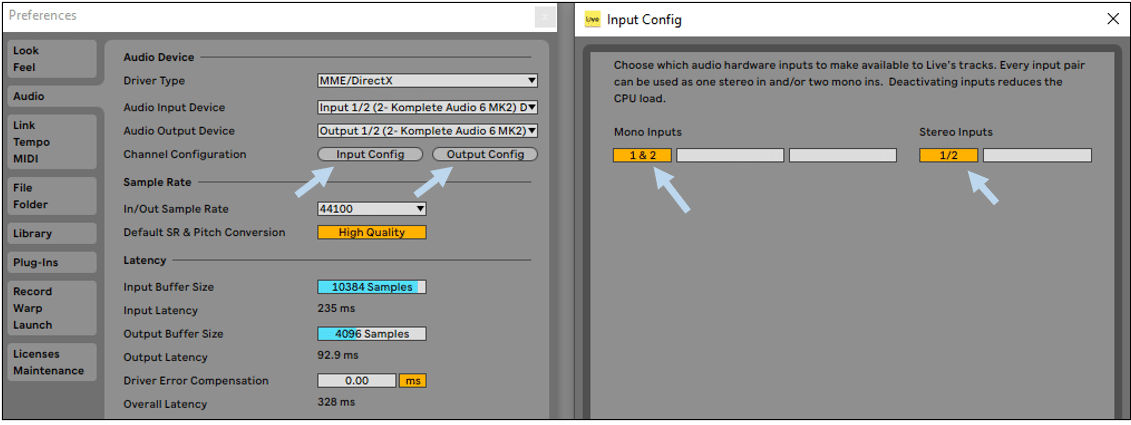
Disable Unused Inputs/Outputs
Under Preferences – Audio – Channel Configuration, select Input Config and Output Config and disable any inputs/outputs that you are not using. You can leave only the mono input activated for example if you are not using the stereo input, and vice versa:
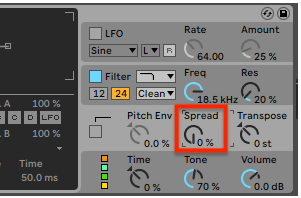
Set Spread to 0%
The Spread function on Ableton’s Operator (and other instruments) creates a second voice that is slightly de-tuned from the first. This means you need twice the processing power every time a note is played.
Setting the Spread to 0 will save up on CPU:
Bonus tip: reduce the polyphony number on Ableton’s native instruments to a minimum. Each additional voice adds more CPU strain.
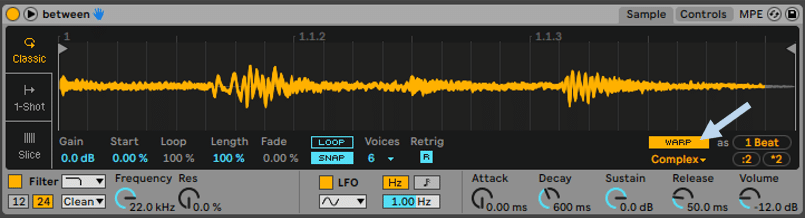
Disable Warping
When using Simpler, make sure that warping is deactivated. If you do need to warp samples, avoid using the Complex and Complex Pro settings as these use more CPU. You can also render to audio once you have warped the sample:
Manage Audio Clips Efficiently
When working directly with audio samples, there are a few settings you can tweak to lighten the burden on your CPU.
Open up your sample settings by double-clicking on it, de-select HiQ, and select RAM:
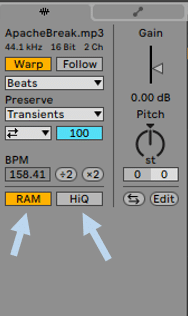
Activating RAM will allow the sample to be pre-loaded in memory, while HiQ uses a higher sample rate for audio file conversion.
Use Return Tracks
Although this tip is not exclusive to Ableton Live, it is good practice to use CPU-intensive effect plugins on return tracks.
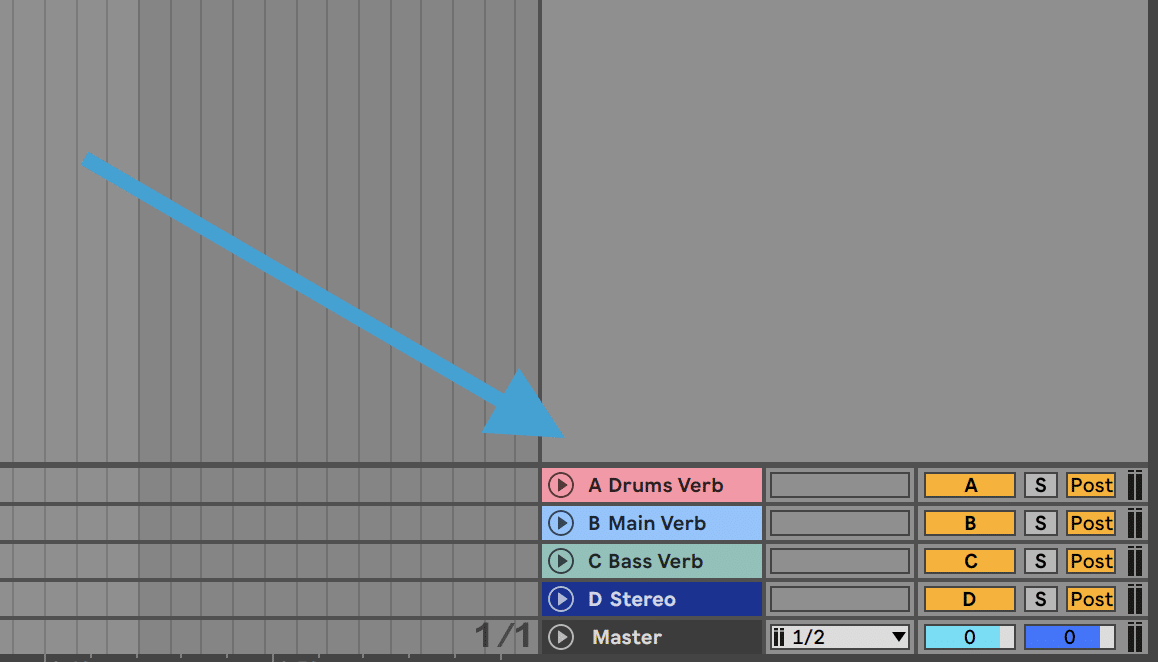
Firstly, return tracks save on CPU by using only one instance of the plugin.
Secondly, your track will gain cohesiveness. For example, using the same reverb settings on multiple instruments will add unity and coherence to your arrangement.
If you need a refresher on mixing in general, make sure to check out our Complete Guide to Mixing EDM!
Wrapping Up
Hopefully, you will now be able to run your computer to its full potential!
Despite these tips and many more we could have covered, you will always be limited by your laptop and CPU specs. This is why choosing the right laptop and audio interface is one of the most important decisions you will make.
Did I miss anything here! Feel free to drop me a line.
