


Of course, music production is a creative pursuit.
You can’t use science alone to write a quality song.
But does that mean that creating systems for your music production will ruin the creative process? Absolutely not.
In fact, combining creativity with a deliberate process ensures that your music can be of the highest quality.
It means your music will be unique, memorable, and have that professional polish you’re after.
One key tool to ensure this quality in your music is a checklist.
And as we’ll discover in this article, it’s simple to set up, easy to use, and actually allows you to be more creative.
So let’s look start by looking at what they actually are.
So, What Is A Checklist?
A checklist is a sequence of tasks that you complete in a particular order.

As you go through them, you ‘check’ them off, meaning you have completed that task.
It’s an incredibly simple idea, but powerful for one reason:
When making music, our brains are all over the place, and a checklist streamlines this process.
Checklists are good for many reasons:
- helps you to eliminate objectively bad elements from your music
- stops you from falling prey to sunk cost fallacy (more on this soon)
- gives you a direction to head in, in order to finish
- reduces the need for guesswork
Objectivity & Taking Out The Trash
We’re not thinking about the mix when we’re doing sound design.
We’re not considering EQ when we’re applying compression.
And we’re not thinking about releasing our music when we’re programming or drums.
For these reasons, a checklist helps to move from the ‘creative ideas’ phase to an ‘objective decision-making’ phase.
Because it’s one skill to come up with ideas, but another to determine whether they are worth using. If they are objectively good.
For example, many producers fall into the trap of thinking that different equals good. In fact, this was once me.
Or you might happen to choose the first drum samples you come across, even though they could be better.
Now don’t get me wrong, as a lot of this is subjective to the listener and to you as an artist. Ultimately, your sound is your sound.
But there definitely is a point where you have to decide if something is good or bad.

Think of it as ‘letting the tree grow wild’ and then pruning it afterwards.
You can let your musical ideas run wild by trying new melodic experiments, designing synth patches, and using processing techniques.
But then you cull what doesn’t work.
A Brief Primer on the Sunk Cost Fallacy
The sunk cost fallacy is when you believe something is worth keeping or continuing with, simply because you’ve spent a lot of time or money on it.
When applied to production, it’s spending hours on a crappy snare, just to make it even worse.
It’s spending ages changing presets on a dodgy melody line that needs to be re-written.
And yes, it’s spending a lot on plugins that you think you need but probably won’t use.
So how does this apply to checklists?
Well, as producers we often avoid any objective decision-making in the name of creativity. But making decisions like these (through the use of a checklist) is exactly what can help you avoid the sunk cost fallacy.

It’s slightly painful at first, but you will learn to love the process of ‘ruthless elimination’.
Checklists provide a ‘bar’ for whether something makes it, or not, and can help you detach from the time spent on it.
And the less time you’re worrying about how long you spent on something, the sooner you can focus on finishing.
Towards The Finish Line
Checklists ultimately aim to provide a clear path to finishing music, which is something everybody wants to achieve, right?
So why wouldn’t we layout that roadmap in the form of a checklist? It’s the most practical way to go from 90% to 100%.
This is why I believe checklists are so powerful and yet so under-utilized. As you’ll see, you can structure them in a way that aligns with our workflow and creativity in order to get the result you want.
It doesn’t have to be overcomplicated either – it can be the bear necessary steps to move from nearly done to done.
Eliminating Guesswork
There’s so many things you have to remember about music production, and when you’re in a creative mindset, you’re not remembering them all.
Checklists can provide the antidote to random concepts floating around in our brain, and solidify them in one place.

That mixing technique you saw in that course? Add it to the checklist.
Always forget to add vocals to your songs? Add it to the checklist.
Neglect dithering when you master your music? Add it to the checklist.
At What Point Do I Use A Checklist?
It can be confusing as to when you should actually implement a checklist.
Because you want to be open as much as possible throughout the creative process, but there comes a point where you need to finish.
Let me tell you something most producers or musicians won’t ever say.
Moving from a sketch to a finished song actually requires less ‘creative’ work and more ‘objective’ work – especially in terms of structuring and polishing your song.
Why? Because there’s less and less room for creative tweaking once you’ve written and arranged a basic song.
In our Project Extraction Masterclass, we refer to this as Open Creativity vs Decisive Action.

In other words – be ruthless.
Sure, you never fully stop being creative throughout the process.
You’ll always want to throw in a cool effect here and there, or try a new idea – these things are good and I encourage them.
The real problem is that producers neglect this skill of objective decision–making altogether because they think it’s the antithesis of creativity.
And when you think about it – it makes sense to at least consider that endless creative tweaking might not be helpful.
Say you have a song with an intro, verse, and a chorus. At this point, what is actually left to do? You could make a different second chorus, or a bridge section of course, and these creative tasks would require, well creativity.
But you’re not writing a new song from scratch when you make a second chorus. In fact, you’re probably copy-pasting a lot of elements over, and changing a few things.

This is the point where producers get stuck in this tweaking loop, with no way forward.
Doubt settles in and we begin to think that it’s not good enough yet (sometimes true but often not) and we justify the time spent fixing things that don’t matter.
However, in order to actually move forward with your song, there are certain things that need to be done.
Deciding that you need to change the levels, do a final mix, finalize the structure, seeing if your track holds up against your reference – these are all common tasks that all producers need to do, with vague objective criteria attached to them.
I call these ‘universal best practices‘.
For example, clearing low-end mud out of sounds is a ‘universal best practice’ in electronic music production.
Why? Unless you are going for a specific effect, no other sound besides the kick, bass, and maybe some percussion needs to occupy the sub frequency range.
Or perhaps your mix is too wide, so you need to mix it better so it’s compatible on mono systems.

Both of the above are somewhat objective aims that require a set of tasks to achieve.
And these are the kind of things that work well on a checklist.
Because they automate these boring, objective tasks and actually allow you to focus more on creativity.
Yes, every person’s ‘universal best practices’ will be slightly different. But you do need to decide on them, and build checklists around them.
Let’s make some.
So, How Do I Make One?
Firstly, when designing your checklists, make sure you design it such that your checklists work for you, not so that you work for it.
The worst thing you can do when creating your checklists is mapping down too many steps so that finishing music becomes a chore.
In other words, keep it simple and streamlined.
Beyond that, the best way to start a checklist is to think of all the general tasks you should do (whether consciously or unconsciously) in order to finish a track.
This can be things like:
- Selecting samples
- Structuing the track
- Transitions between sections
- EQing sounds to make them fit the mix
- Layering sounds
- Etc.
These aren’t necessarily sequential tasks either, and at this point, you’re just brainstorming.
If you want, you can also include promotional and marketing activities involved with releasing the music.
- Sending to labels
- Emailing producer friends
- Submitting to Spotify playlists
- Etc.
Once you have a collection of tasks, start to group them together. In terms of grouping, I like to reference our production pyramid as a great starting point:
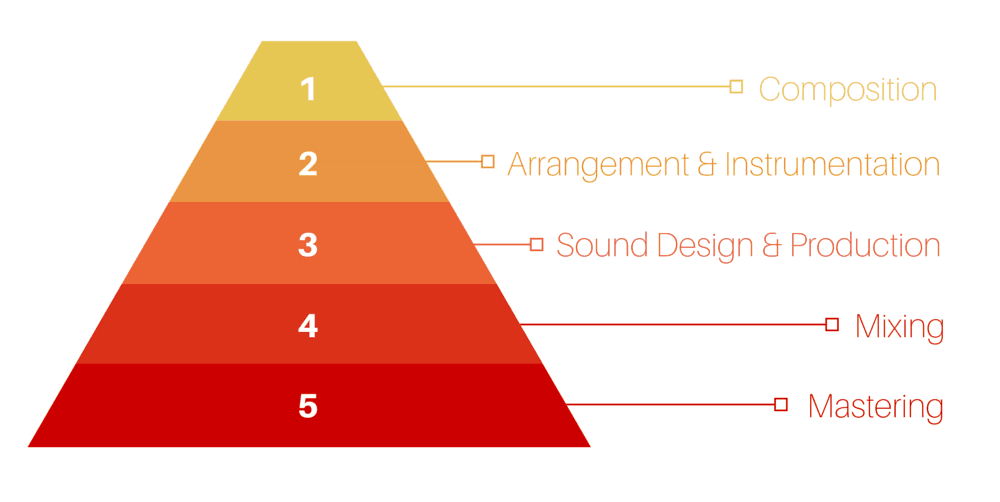
For example, you’ll notice a lot of them relate to EQ, compression, panning etc. so you group them under ‘Mixing’.
Maybe some of them involve structuring, adding transitions etc. so you make one called ‘Arrangement’.
And so on, until you have a collection of different tasks.
What You’ll Notice
After doing this, you’ll probably see that most of the tasks relate to latter-stage disciplines like mixing and mastering (and promotion). That’s because as we covered, these are more quantifiable stages.
Like I said earlier, you’re less judgmental and more open in the beginning, so there’s less of a rigid path.

Also, it’s hard to use a checklist for the composition stage – you’re being creative and coming up with ideas. Sure a checklist might help when you’re stuck, but you’re not going to be going through making sure that you tick it all off.
But towards the end, you’re needing to move towards a final product.
As mentioned, checklists work for more left-brain tasks like mixing and mastering.
Ordering
Once you have these groups, it helps to order the groups as per the production pyramid and using your intuition.
If you have a group of tasks called ‘Getting Feedback’, it probably has to be after the ‘Finishing’ checklist.
Not only do you have to order your checklists, but the items inside them too.
Try and think logically and in terms of importance/effort. The 80/20 rule applies here.
- Fader balance has more of an impact than EQ, so it should go first.
- EQ has more of an impact than sends, so it should go next.
- Etc.
Don’t worry about ‘the perfect order’, and just try and have the most logical progression that makes sense to you.
Checklists In Practice
Once I have all the checklists I need, I save them in my notes app and have them on hand whenever I need them.
Then I pull them out when the time is right, but in the early stages of a tune, I don’t look at them at all.
For example, I might have a cool idea for a new track, so I sketch an 8 bar loop out in Ableton Live. I might leave it after working on it for an hour and then come back later the same day.
I’ll flesh out a basic arrangement and add a build and intro to it. This might take me 2-3 hours.
After this point, most of the track is done (functionally speaking) and you’re not sure how to polish it off.
This is where the checklist comes in.
You might start with something like a ‘Final Arrangement’ checklist, adding all the necessary sections and transitions.
Then you might move onto mixing, then mastering etc. – all of which have checklists you can follow.
Then, fully complete each task as you go. Don’t jump back and forth – you’ll just tire yourself out.
And of course once you’re done, give yourself a pat on the back.
Checklist Examples
These are some personal checklists I use for my own music production sessions. Personally, I have them all embedded in software called Notion – think of it as the closest thing to paper.

In my particular case, I have a few checklists setup in a more elaborate way for each of the tunes I’m working on, but honestly paper and pen works just as well (or you could just reference this article).
Here are a few I use:
Pre-Engineering Checklist
Helpful to prepare a track for mixing and mastering, by tweaking different aspects of the arrangement instead of relying on ‘fixing it in the mix’.
- Load in a Reference Track
- Remove unnecessary elements
- Replace bad elements
- Layer weaker elements
- Tweak synths/samples for the mix
- Remove redundant processing/FX
- Check overall time and structure
- Remove clicks and pops from zero crossings
Mixing Checklist
The final mixdown I’ll do at the end of a project. Of course, I’ll intuitively mix as I go, but I’ll always do one more dedicated mixdown to maximize the quality of my tune.
- Start using studio monitors (not headphones)
- Adjust volume to ideal level (around 85dB SPL)
- Balance faders across mix
- Pan elements that ought to be
- Check overall stereo image/phase cancellation
- Apply EQ where necessary – filtering and cuts
- Compress any overly dynamic sounds
- Add sidechain from kick (and snare) to most elements
- Add other sidechain routing for clashing elements
- Create sends
- Reverb for Drums
- Reverb for Music
- Delay
- Parallel Compression/Saturation for Drums
- Buss Processing on All Busses
- Monitor Bass Response and see if certain notes are too loud/quiet
- Enable High-Quality Modes on all plugins
- Make sure mix is gain staged to -6dB
Mastering Checklist
For when I master my own tracks. In this particular case, I can automate a lot of the processes by dragging on a mastering chain.
- Add a Glue Compressor
- Add Multiband Compression
- Add Master Reverb
- Add Stereo & M/S Processing
- Add Master EQ
- Add Analog/Color EQ
- Add a Limiter
- Enable High-Quality Mode and Oversampling on all plugins
- Topping and tailing – check start and end of track
- Final listen through
- Turn on dithering at export – Triangular
- Export 24bit 44.1kHz WAV or AIFF
Label Release Checklist
If I decide to release a finished tune on a label, this is the process I’ll follow.
- Finalize Track Name(s)
- Send to one label (start with the ‘best-fit label’)
- Wait a week for a response -> send follow up if no response
- Wait a 1-2 weeks for response -> send final follow up
- Send to second label
- Repeat until track gets signed
- Take on board any feedback to make release-ready
- Send pre-master of track
- Sign a contract (proofread for any legal issues)
- Liase about promotional activities
- Find a release date
- Promote tune as per promotional activities
- Extra promotion (reference self-release checklist)
Self-Release Checklist
Of course, releasing your own tunes is quite involved, especially in terms of marketing and promotion, so you might want to create multiple checklists for this process. Note the differences between the above Label Release Checklist.
Pre-Release
- Finalize Release Name
- Create/Get Artwork
- Attach Artwork and Metadata/ID3 Tags
- MP3 320
- WAV
- AIFF
- Get Feedback
- Improve Track
- Finish
- Upload Final to Soundcloud Private
- (Ask for Premiere from specific tastemaker)
Distribution
- Upload to Soundcloud
- Schedule
- Monetize
- ID3 Tags
- Upload to Bandcamp (Draft)
- Upload to triple j Unearthed
- Distribute to Spotify, Apple Music etc. via Distrokid
- List on APRA (PRO)
Release Day
- Share on FB – Page and Personal
- Tweet and Pin
- Put on IG Story
- Album art on Instagram post
- Message friends on Facebook Messenger
- Email bigger artists
- Post in relevant FB groups – feedback and promotion
- Post in subreddits (Later For Reddit)
- Post in discords
- Add to personal Spotify playlist
- Share with blogs, YT channels, other artists
- Publish Bandcamp
- Soundcloud Spotlight
- Spotify Artist Pick
- Use album art on Instagram
Feel free to adapt, expand, simplify or do whatever you want to these lists. For some, they might seem too elaborate. For others, they’re not detailed enough.
Remember – make them work for you.
Checklists Not Enough?
The reality is with all of these checklists, is that you still need the skills behind each of the items on there.
Simply putting them on a list doesn’t make you a better producer.
And if you’re new, and not even starting ideas to finish, then checklists won’t help you.
But there is a way you can get started: our free video training.
This training covers the right path to get started on as a producer, and you can sign up for free below:
