


So, you want to know what the Haas effect is? Let’s start with a better question.
Do you ever feel like elements in your mixes sound too thin and lack any depth? I know I have in the past, and no amount of EQ or gain staging could help me.
Enter the Haas effect – a simple trick to make any element in your mix sound wider and fuller.
In this guide, we will go through:
- What is the Haas effect
- A few simple ways to achieve it in any DAW
- Traps to avoid when using it (so you don’t ruin your mix)
- Some concrete examples on when to apply it
Let’s explore! 👇

What Is The Haas Effect
The Haas effect, also called the precedence effect, is a psycho-acoustical phenomenon generated when 2 identical waveforms separated by a relatively short time delay are perceived by our ears as being a single sound.
It was discovered by a guy Dr. Helmut Haas the late 40’s, hence the name
Under a threshold of 40ms, our brain will interpret the 2 waveforms as being the same sound. Beyond 40ms, our brain will understand that 2 different sounds are being played. The result will be a perceived echo.
Listen to this example. You can hear that as I increase the delay time, your ear picks up an echo:
In practice, this effect can be used to enhance the stereo field of any sound.
As you might be able to tell, this can become a handy technique to use in your mixdowns to quickly add width to a sound.
Let’s explore a few methods to achieve this.
How To Achieve The Haas Effect
All of the following methods will be done in FL Studio, but can easily be replicated in any DAW (such as Ableton Live). We will explore 3 methods:
- using a delay plugin
- adding a manual sample displacement
- inserting dedicated stereo enhancement plugins
Using A Delay Plugin
One of the most common ways to achieve the Haas effect is to use a delay plugin. I am using FL Studio’s stock plugin here, but you can replicate this in the plugin of your choice.
We will be focusing on the Time, Stereo, and Level controls to achieve the Haas effect.
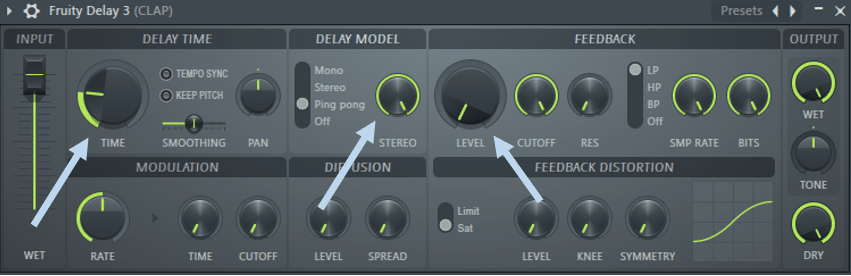
Firstly, pan your original sound hard left or hard right. Decrease the level all the way down so you only have one echo, and select the “Ping pong” delay model with 100% stereo spread.
You should have a single echo that is in the opposite ear to the original signal.
To achieve the Haas effect, deactivate Tempo sync so that you can adjust Time directly in milliseconds, and decrease Time to anywhere between 5ms and 40ms.
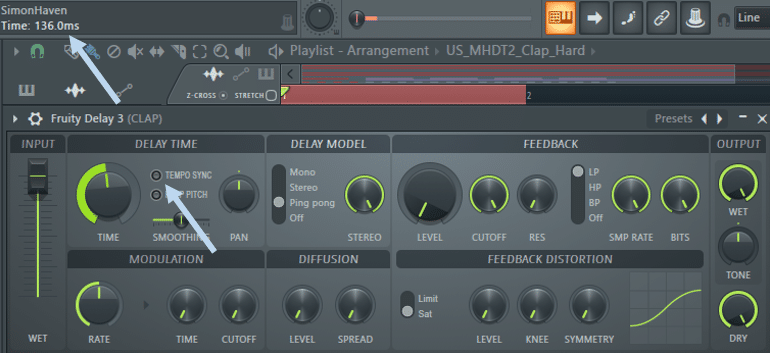
As you decrease the delay time, the echo will slowly morph into a single sound, but with added stereo information.
You have just achieved your first Haas effect – congratulations!
Displacing The Audio
Sometimes, simpler is better. Another straightforward way to achieve the Haas effect is to duplicate the audio file, pan each version hard left and hard right, and then move one slightly out of sync:
Let’s listen to the result:
Using Dedicated Plugins
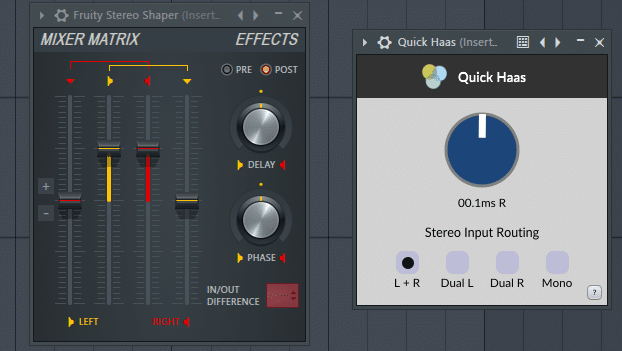
Finally, you can also use dedicated plugins aimed at artificially creating or enhancing a stereo image. I love using FL Studio’s Fruity Stereo Shaper in Stereoize mode to quickly achieve the Haas effect.
Other free plugins such as Quick Haas are a great way to achieve width in your instruments.
Want more free plugins? Check out our ultimate list of free VSTs.
Things To Pay Attention To
As Uncle Ben said, with great powers come great responsibilities. As you learn the Haas effect (and stereo mixing in general), you will quickly run into two concepts that you need to pay close attention to: phase cancellation and mono compatibility.
Let’s quickly go over them and see how they relate to the Haas effect.
If you’ve read our previous article all about time stretching and pitch shifting, you will recall how different waveforms have different frequencies and are perceived as being at a higher or lower pitch by our brain.
Phase cancellation occurs when adding two or more sounds whose waveforms are inverted, causing a reduction in volume.
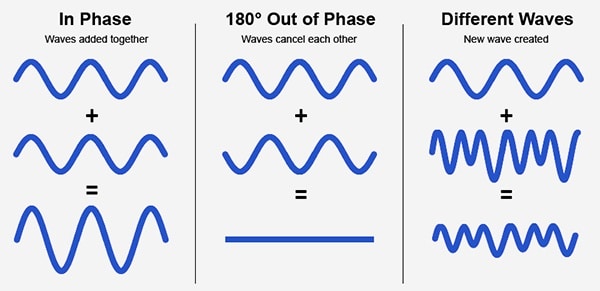
You can see that when 2 waveforms are perfectly in phase, their amplitude will simply add up, resulting in increased volume.
However, as they move out of phase, the “highs” of the first waveform will be canceled by the “lows” of the second, reducing the overall volume and creating unwanted artifacts.
Mono compatibility on the other hand is the process of checking that your track still sounds good in mono.
Why does mono matter? As artists and audio engineers, we like to think that everyone will listen to our tunes on quality headphones or speakers. But you would be surprised at how many people still play music from their iPhone or a lone little Bluetooth speaker.
This is why the mono compatibility of your tunes is crucial.
You want to make sure that your song still sounds good when the stereo information is collapsed to mono, i.e. when the left and right channels become identical.
If you want to dive into this further, check out this detailed video from Aden on stereo and panning:
Back To The Haas Effect
Because this technique uses 2 exact copies of the same waveform panned left and right and delayed, there is a high chance for phase cancellation to occur. The more delay you add, the more out of phase the sounds will be.
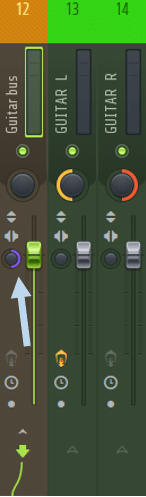
If you are mixing on headphones, it will sometimes be hard to pick up on phase issues. One solution is to route your two signals to a single bus channel, where you can easily collapse from stereo to mono.
In FL Studio, you can achieve this by turning the Stereo separation knob to 100% merged:
As you collapse to mono, any phase cancellation issues will become apparent. In the context of a full mix, pay special attention to any significant drop in volume, which would indicate waveforms canceling each other out.
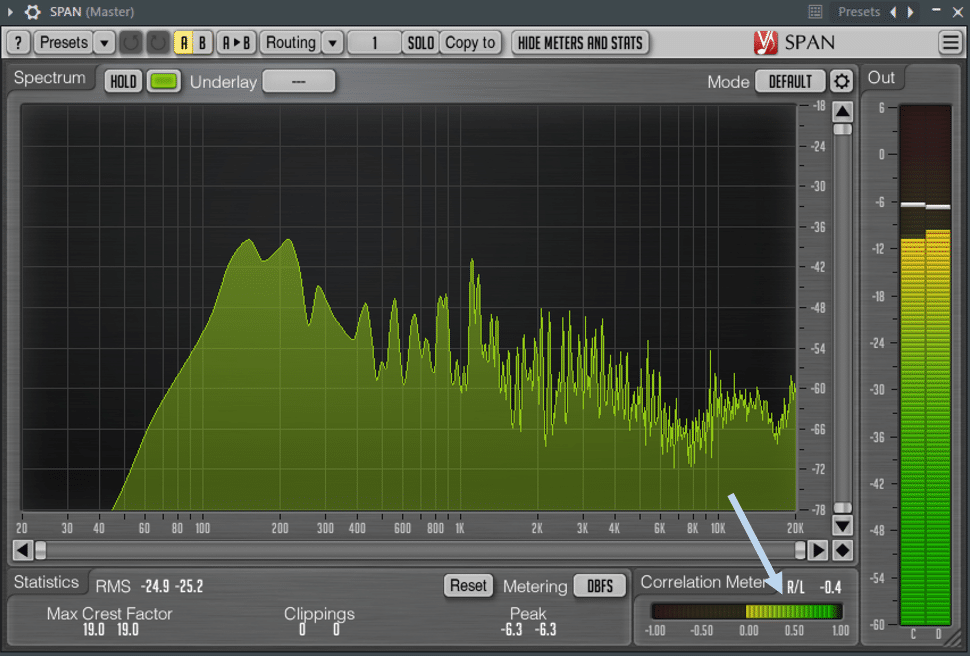
If you’re mixing on headphones like myself, it might be hard to pick up phase cancellation issues. This is why I prefer to use a phase correlation plugin, such as SPAN.
SPAN is a brilliant (and free!) spectrum analyzer plugin that also provides a correlation meter between your left and right channels:
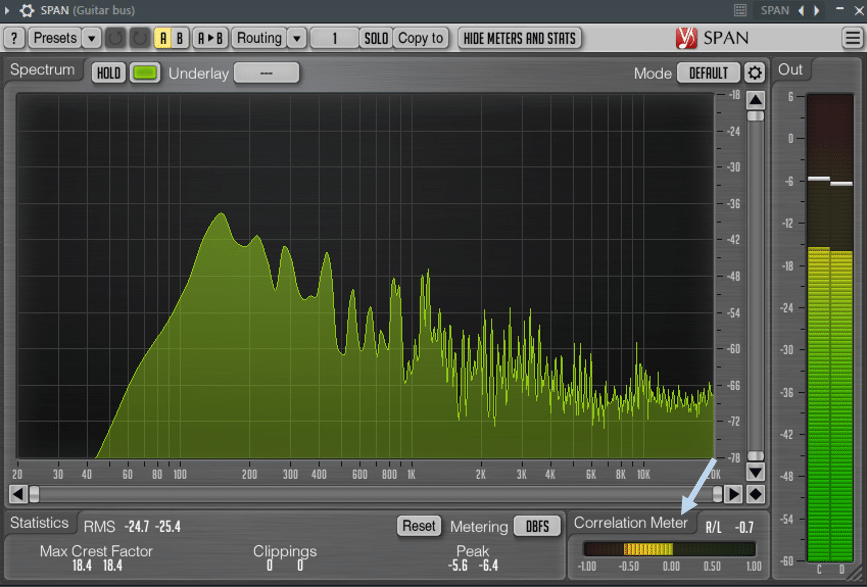
If you are having phase cancellation issues, the meter will read a value between 0 and -1 (as shown in the screenshot). While it’s OK to dip slightly below 0 for short periods of time, you want to remain between 0 and 1 at most times.
As you apply the Haas effect, monitor in real-time the phase correlation of your signal to make sure you are not introducing unwanted phase cancellation.
3 Creative Ways To Use The Haas Effect
Parallel Processing For Important Elements
A great rule of thumb is to keep the important elements of your mix (kick, snare, sub, main vocal, etc.) in the center of your mix to make sure they retain their presence in a mono mix.
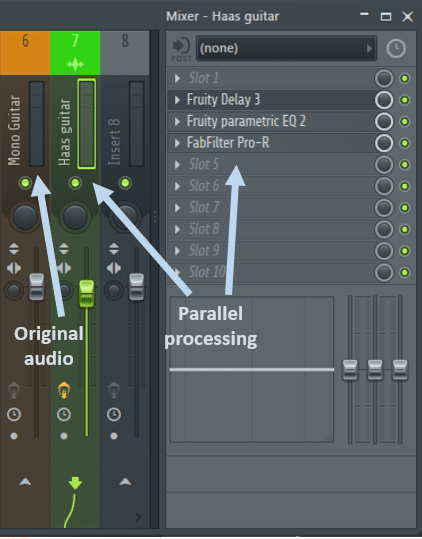
If you want to give them some extra dimension, try adding the Haas effect in parallel instead of on the main channel.
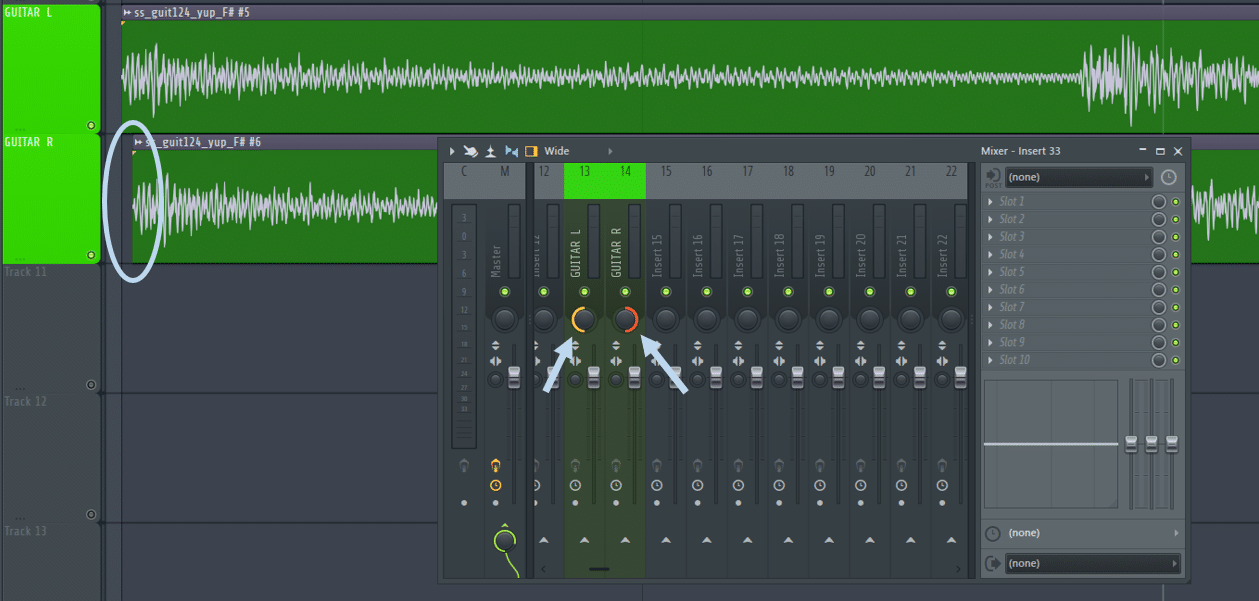
I love using guitars in my productions, but often only have a single take if I’m working with samples. I will usually duplicate the channel and use the Haas effect on the second slot with some dedicated EQ’ing to avoid an accumulation of frequencies in the low end in particular:
Let’s listen to the result:
As I am processing the parallel signal, I have SPAN on my Master bus to make sure I am not running into phase cancellation issues:
Give Room To Your Drum Bus
Breathing life into my drums was a constant struggle for me in the past. My drums would often sound dry, but if I added reverb, they sounded washed out.
A friend gave me a great trick that involves the free plugin Wider. Wider is a brilliant stereo expansion plugin that will always keep your signal in phase – a perfect candidate for applying the Haas effect!
Let’s look at how to use Wider in practice to breathe life into a drum bus.
First, here is the dry drum break we will work with:
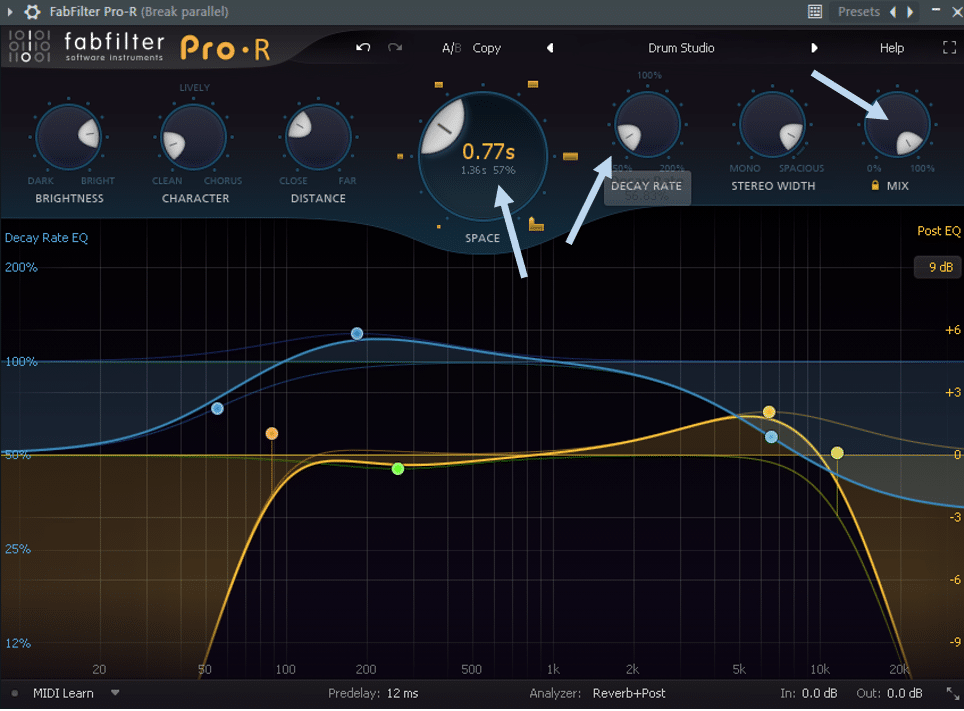
First, set up a parallel track, and add a reverb set to 100% wet with low decay:
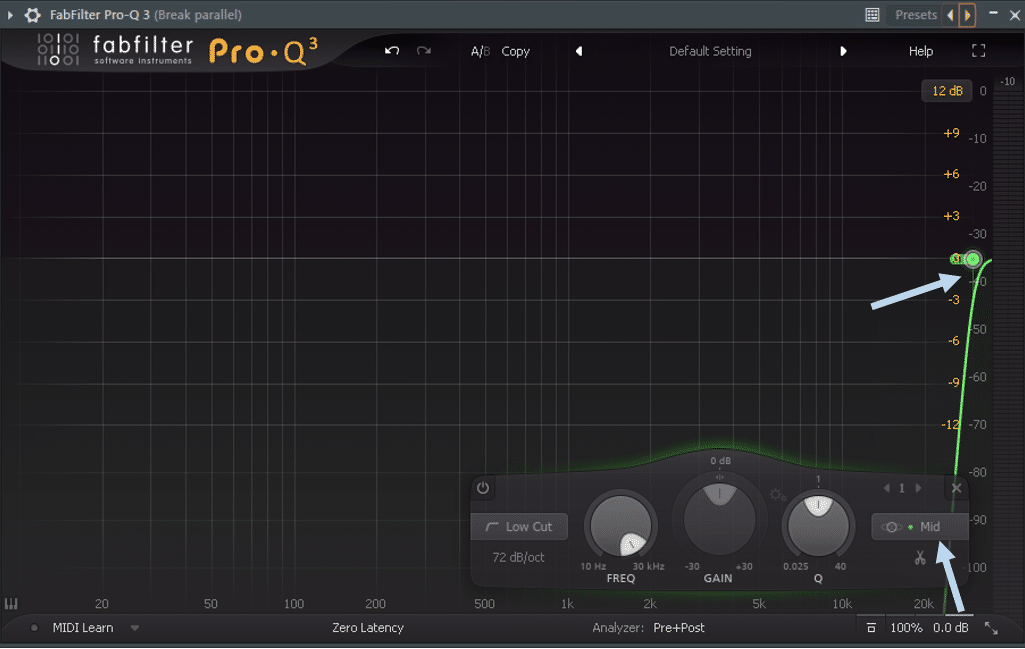
Next, we are going to remove the entire mid information of the signal, so we are just left with the side (i.e. stereo) information:
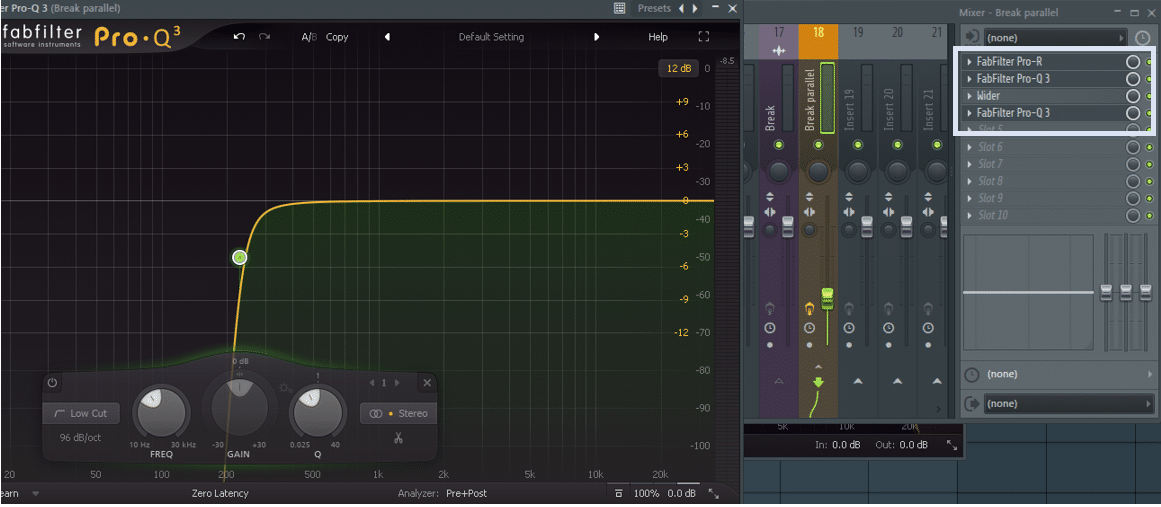
Next, add Wider and set it to 200%, then add another EQ to remove the low end from your signal. Your chain should end up looking something like this:
Finally, blend the parallel signal to taste. Let’s hear the final result:
I find myself using this trick in every single track since I learned about it, so give it a shot and see how much it improves your drums!
Add Body To Your Bass
Finally, the last trick I like to use is to apply the Haas effect to make my bass stand out in the mix.
Let’s listen to the before and after, and I will then guide you through what I did:
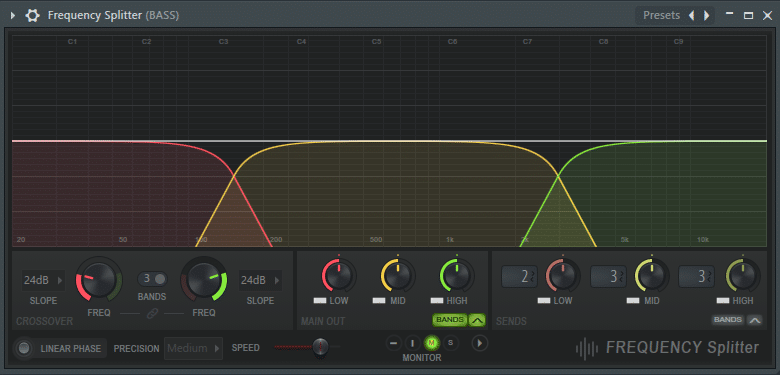
Pretty cool right? To achieve this effect, make sure to split out your bass signal into sub and mid.
This is because everything that sits below approx. 200Hz should only contain mono information, so we want to make sure we are not applying the Haas effect to the sub-bass.
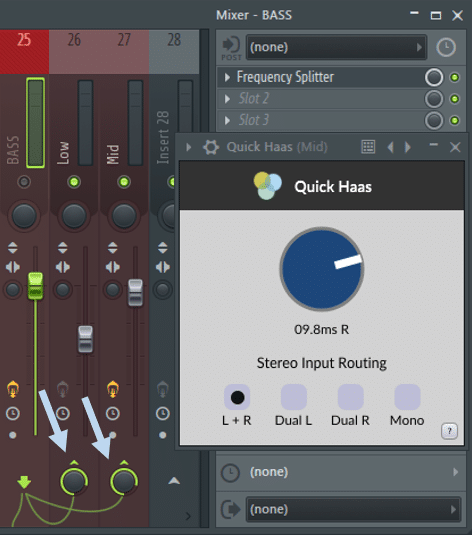
I use FL Studio’s Frequency Splitter to send specific frequency regions to separate mixer channels, but you can also duplicate your signal and EQ out the frequencies:
We are going to leave the sub untouched, and apply the Haas effect to just the mid signal. In this case, I used the previously mentioned Quick Haas to add some width:
Last Words
Hopefully, you now have a better grasp of the Haas effect.
As explained, artificially creating a Haas effect from a single sample does have its limitations. If you are recording yourself, recording two takes and panning them hard left and right might be a better solution.
The timing differences will create a natural Haas effect, and add natural space to your recording. Tracking a guitar twice with slightly different tones/EQ curves will almost always yield better results than using a single take.
Finally, remember that simply panning elements left and right will create width in your mix. Using one shaker loop panned hard left, and another shaker loop panned hard right will create natural space without any phase cancellation issues.
Want some samples and other resources? Make sure to grab our EDM Starter Kit below! 👇
