


The delay effect is probably the most famous effect of all. Its echoing result is instantly recognizable and can add depth and emotion to your music.
But apply it too much or with the wrong settings and it can destroy your mix.
In this guide, we’ll cover the basics of delay. We’ll look at the most important parameters, how to use delays creatively, and some of the best plugin options out there.
As always with music, there is no right or wrong. But there are good practices to follow!
Let’s go! 👇

Table of contents
What is Delay?
Let’s start from the top and define what a delay effect is.
According to Wikipedia (which never lies), delay is “an audio signal processing technique that records an input signal to a storage medium and then plays it back after a period of time.”
Pretty straight forward right? In essence, you play a sound which is then played back a specific number of times and at a specified volume:

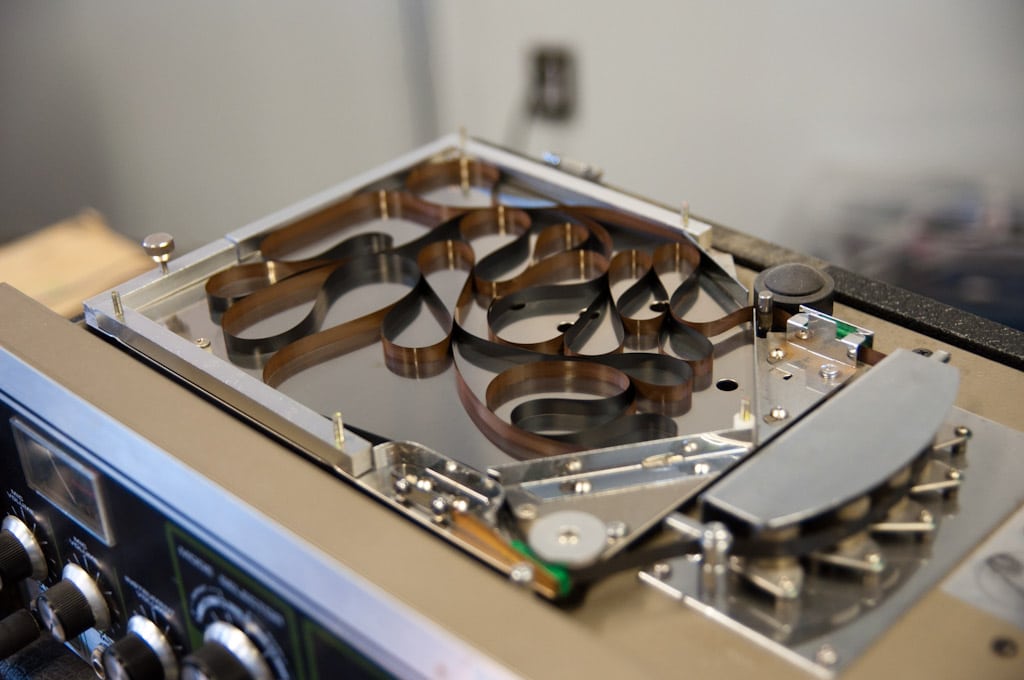
Delay effects were developed in the 40s and 50s with the appearance of tape loops. By cutting and “re-stitching” together with a small section of magnetic tape, you create a circle where your sound plays back endlessly:
With the advancement of modern technologies, most modern delays are actually digital. This is true in both physical guitar pedals as well as VST plugins.
But what is actually the difference between analog and digital delays? And can you hear the difference?
Analog vs. Digital Delay – What’s the difference?
Spend any time on producer Subreddits or Facebook groups, and you’ll hear about the “days of analog gear”. But what do people mean when they talk about analog or digital equipment and effects?
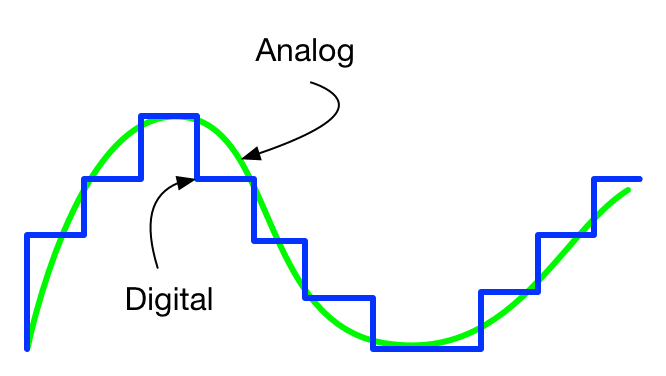
Analog refers to a continuous signal reflecting the true characteristics of the signal.
Digital, on the other hand, is a translation of the analog signal into binary format (1s and 0s). You can think of digital as an approximation of analog.
An analog delay is therefore a “pure” copy of the original signal. As mentioned above, this could be achieved through tape loops. Other technologies such as “oil can” and solid-state delays were also popular in the 60s and 70s.
With digital delays, the incoming signal is translated into a digital format. It is then recorded, stored, and played back based on parameters decided by the user.
Today, modern technology is pretty much entirely “digital”, meaning it is based on a binary format. Whenever you open up a plugin, you are essentially working with a “digital” effect.
However, modern delay plugins will often have an option to simulate the effect of analog gear:

With the sophistication of digital units, can people still tell the difference between analog and digital gear? I’ll leave that question to the purists.
In the meantime, let’s move on to the common parameters of a delay unit.
The Most Important Parameters of a Delay
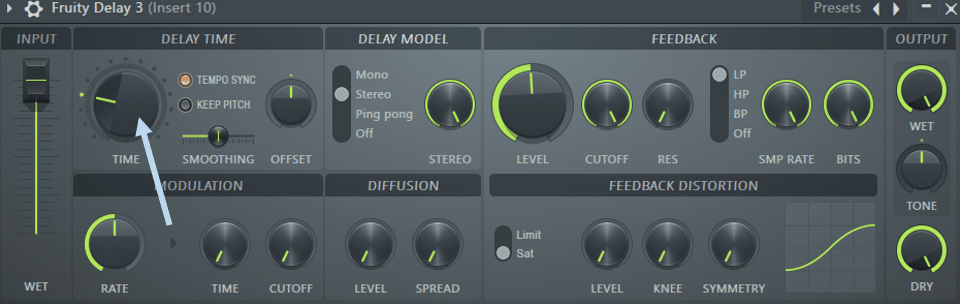
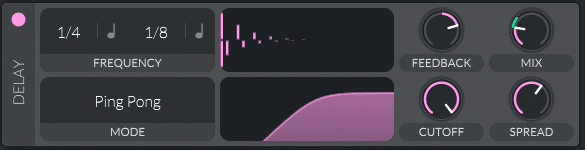
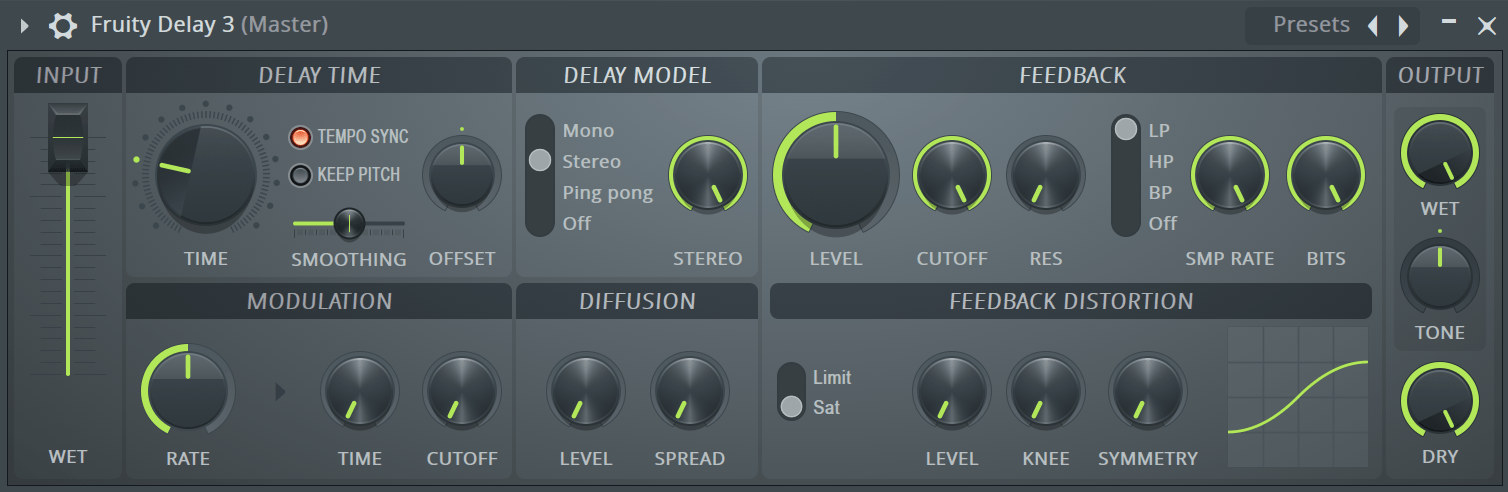
I will be using FL Studio‘s stock plugin going forward, but most delay effect units have the same basic settings.
1. Time
This is arguably the most important setting of any delay effect plugin. The “Time” knob will set the frequency at which your sound repeats.
Set a short “Time” and your sound will repeat at short intervals, and vice-versa:
Here’s a quick example of different “Time” settings:
Depending on the plugin, the “Time” scale might change. In Fruity Delay 3, a “Time” of 16.0 corresponds to 1/1 note, i.e. 1 delay per bar. A “Time” setting of 4.0 would therefore be 4 delays per bar or 1/4 note. Most delay effects will have their “Time” settings in notes.
Many plugins will also have an option in seconds. This allows you to fine-tune in milliseconds at what interval the delays will come.
Depending on the plugin, this option might be called “Disable tempo sync”, “Time” or “Free”.
2. Delay mode/model
The “mode” or “model” determines the stereo characteristics of the delay effect. The most common ones are “Mono” or “Single”, “Stereo” or “Dual” and “Ping Pong”.
Let’s go over the differences between each of them:
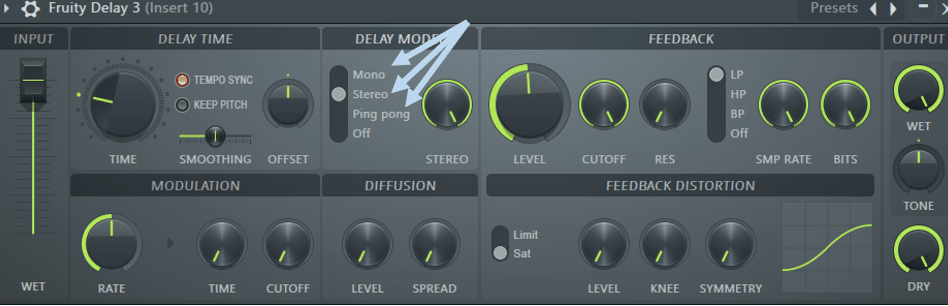
“Mono” mode gives you a single echo signal to work with. This echo signal is identical in both left and right channels. However, in Fruity Delay 3, the “Offset” knob allows you to offset the left or right channel. This creates a “fake” stereo signal.
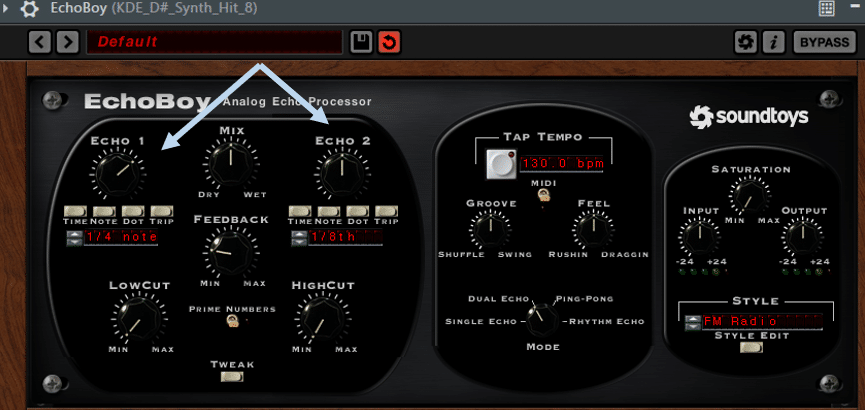
“Stereo” mode allows you to control the left and right channels independently. In Fruity Delay 3, you are limited to the “Offset and “Stereo” knobs to shape your stereo. In most paid plugins, however, you have the option to set a precise “Time” setting for each channel:
Finally, “Ping Pong” is a producer favorite that will (literally) ping-pong the delay from left to right channel:
This mode is commonly used because it creates a sense of width without crowding the mix.
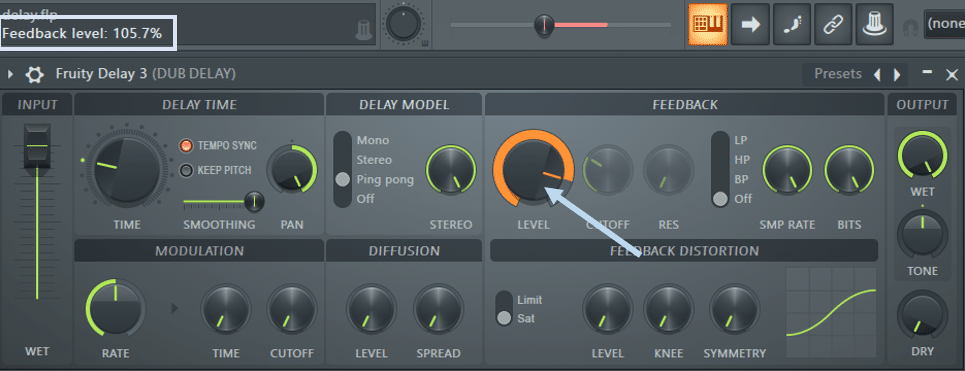
3. Feedback level
(No – not the type you get from other producers to improve your music.)
Sometimes simply called “feedback” or “level”, this setting controls the decay time after the first delay. At its minimum value, there will be only one instance of the delay. As you increase the feedback, more instances can be heard slowly decaying over time:
4. Cutoff filter
Filtering is possibly my favorite setting within a delay effect. This allows you to create completely different tones and moods just by removing certain frequencies.
(If you need a refresher on all things filters, check out our latest guide!)
Depending on your plugin, you might have to choose between a low-pass or high-pass filter, or you might be able to apply two filters simultaneously.
Here are some examples with Fruity Delay 3:
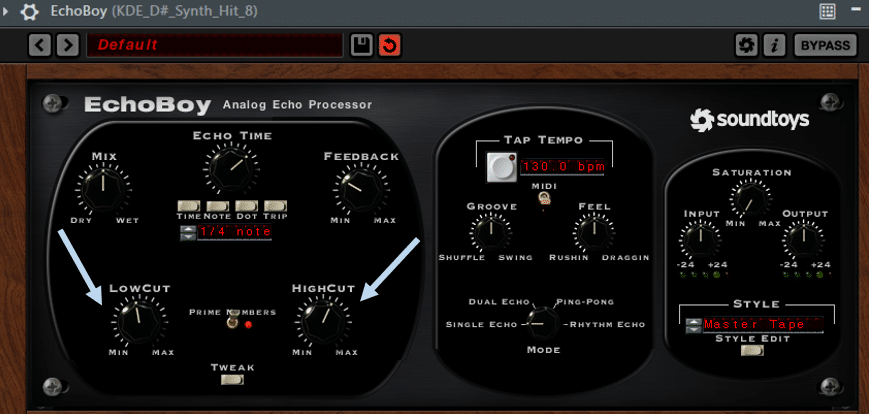
And an example with EchoBoy, creating a band-pass with two filters:
5. Mix / Output
All delay plugins will have control over the amount of dry vs. wet signal.
In mixing, “wet” refers to a signal that has been processed by an effect (delay, saturation, reverb, etc.). “Dry” refers to the original “unprocessed” signal.
With delay effects, you will often want to control precisely the level of your delays. With Fruity Delay 3, this is done via the “Wet” and “Dry” knobs:

Other plugins such as EchoBoy or Ableton Live’s Delay might have a combined ‘Dry/Wet’ or ‘Mix’ knob.
6. Saturation, Modulation, and other effects
Finally, each delay effect plugin will have its own additional FX to process your sounds further.
One common FX is a saturation of the wet signal:
Modulation is another common FX that allows modulating the pitch of the delay:
Finally, Diffusion is a cool FX that will “smear” the echo, creating a reverb-like effect:
Feel free to experiment with different delay devices to see how they differ!
Now let’s see how you can use these controls in the real world.
5 Ways to Use Delay Effects
You could use a delay effect in an infinite number of ways, so this is where you can really let your creativity loose.
Let’s look at some of the most common (and one unconventional) ways to apply delay.
1. Add width & space to a melody
Most melodies will sound a bit dull without some delay. One of the most common applications of a delay effect is to add some subtle ping-pong to your melody.
This will add width and variation to your loop. Here’s an example of a basic melody with no delay:
And here’s that same loop with some ping-pong delay:
In this example, I used a quarter-note on the left channel and an eight-note on the right channel. This creates some additional stereo widening:
2. Parallel delay on vocals
Delay is a must for pretty much any vocal track. Even if you don’t notice it, almost every vocal will have some delayed effect on it.
However, just slapping a delay on your vocal track isn’t the way to go.
A better approach is to use parallel processing (if you need a refresher, we explore the concept in this article here).
Basically, the idea is to have two copies of your vocals in your mixer. One track will be the dry signal, and one will be the processed one. You can then dial in just the right amount of effect you want:
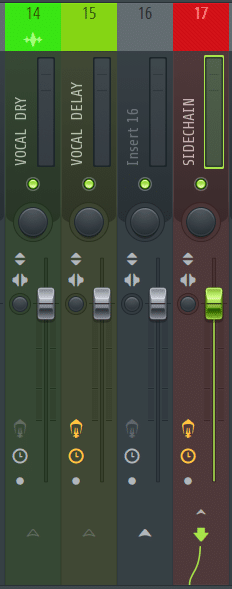
The reason you want to do this with vocals is that you can then use sidechaining! This way, your delayed vocal won’t be playing at full volume all the time. Instead, it will come in and out to fill the gaps of the dry vocal signal.
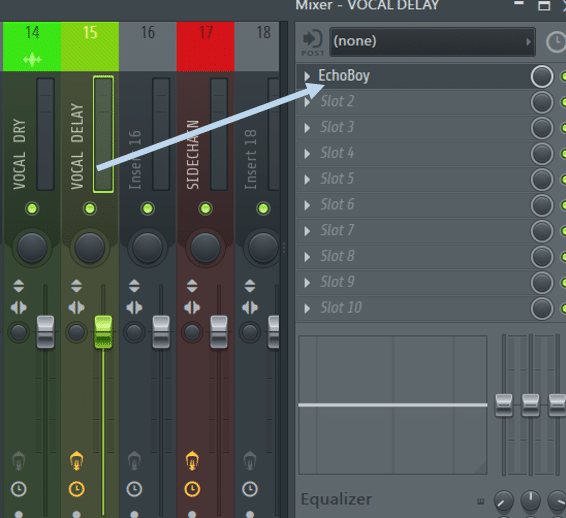
To do this, route your dry vocal to an empty insert in your mixer. Then create a copy of that vocal, and route it to another empty insert. This is where you will add your delay effect:
Make sure your delay is set to 100% wet!
Your dry signal is already playing from the first mixer track, so this one should be 100% effect:

Finally, use sidechain compression to duck the delayed vocal when the main vocal is playing.
Practically, this is the difference:
You can hear how the second version is much cleaner and less crowded.
3. Create turnarounds and anticipation
Delay effects are one of the best ways to create cool turnarounds.
A turnaround is simply a passage at the end of one section that leads into the next.
Usually, you want your turnaround to create some tension and release. Using delay on your drum track is a great way to achieve this.
Here’s what it sounds like in context:
You can hear the delay in the drums between the two sections. In practice, here is what it would look like:
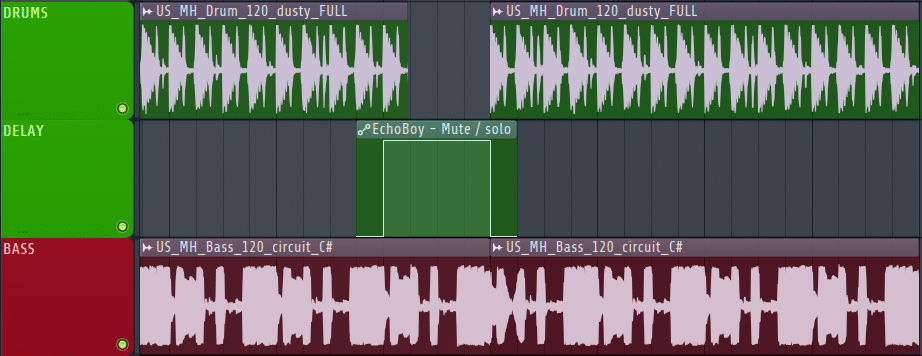
As your section ends, remove the drums and turn on the delay. Experiment by turning on the delay on the last two or three drum hits.
Then, as the new section begins, make sure to turn off the delay so it cuts out.
Now you can experiment with different settings and filters to see what works!
Here’s what it sounds like without the bass:
4. Create textures with dub delays
Although they are called dub delays, this effect can be used in many different genres.
First, create a basic chord sequence, without any reverb or delay. This is the loop I will be working with:
Next, add a delay set to ping-pong mode, with a short time response. The key is to set your feedback level slightly above 100%. This will make the output of the delay unit feed back into itself, creating cool artifacts:
Make sure your delay is set to 100% wet and no dry. Next, set a band-pass filter and automate the cutoff frequency. You want to slowly comb through the frequencies over time. Finally, set a limiter at the end of your FX chain so you don’t blow your speakers out.
Next, simply press play and record your audio over a long enough period of time. You will slowly hear the sound distorting:
Now you can delete all your effects, and import the texture you just created. By slicing up and automating the volume, you will add depth behind your main stab hits:
5. Record unique FX
One of my favorite ways to create cool effects is to mess with the delay settings while recording. In FL Studio, simply open Edison and press record. Choose any sound, add a delay unit and play with the settings.
Here’s the sound I’ll work with:
Experiment with the “tempo sync” and “keep pitch” enabled or disabled, and play with the “Time” as the sound plays. Here are some results I came up with:
And some pretty insane results playing with the modulation and saturation settings:
Now that your creative juices are flowing, let’s take a look at some great plugin options for a delay.
The Best Delay Effect Plugins (Free & Paid)
Finally, let’s go over some of the most popular delay plugins on the market.
1. FL Studio Fruity Delay 3 (Free)
I’ve explained most of Fruity Delay 3 already so I won’t go into too much detail.
Some cool features worth mentioning:
- Smoothing – allows for a smoother change in pitch when “Keep Pitch” is disabled
- SMP Rate – reduce it to create cool artifacts
- Bits – reduce to create a granular effect
Example:
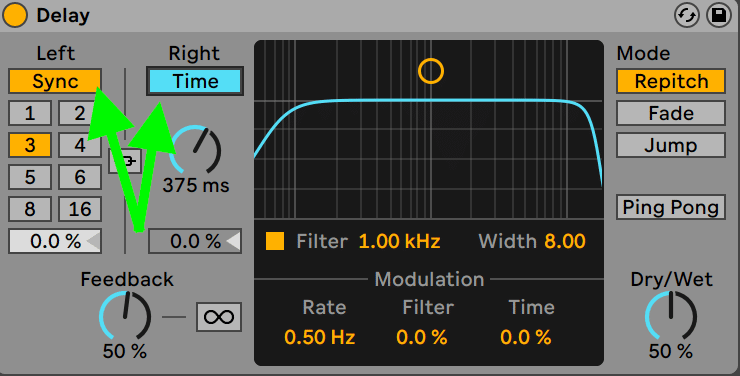
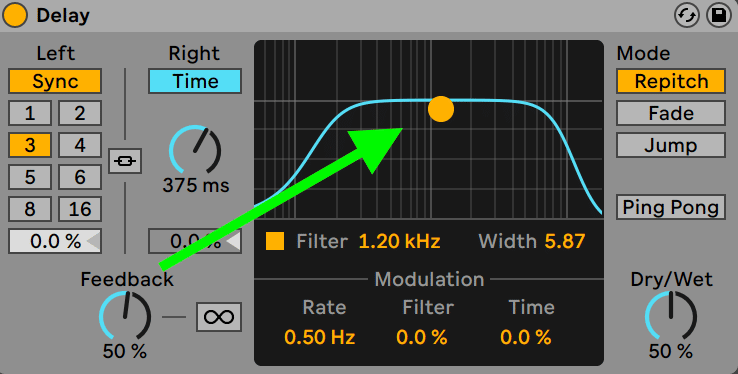
2. Ableton Live Delay (Free)
Ableton Live’s stock Delay provides 2 independent stereo channels by default. These can be adjusted separately by clicking on the “Stereo Link” button:
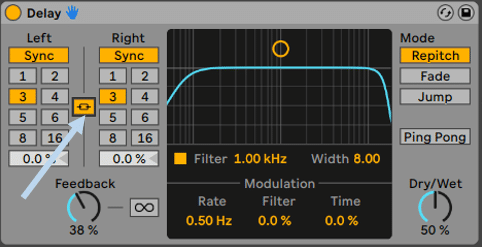
Here you have the choice between 3 different modes:
- Repitch – this will cause the delay to change pitch when the time of the delay is changed
- Fade – creates a crossfade between the old and new delay time
- Jump – immediately switches to the new delay time
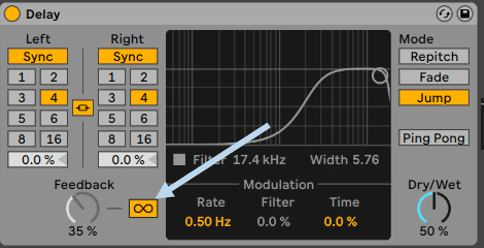
The Freeze mode is another cool feature that lets you loop infinitely the delay. By enabling and disabling it at different times you can isolate cool little melodic sequences:
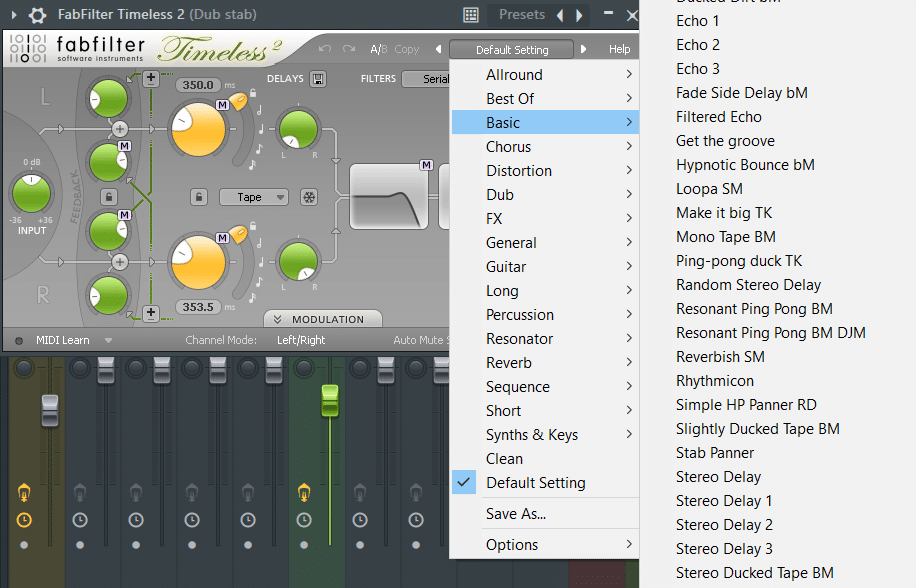
3. FabFilter Timeless 2 (Paid)
The interface of FabFilter might not be my favorite. But the sheer amount of presets available still make it a go-to delay plugin:
The scope of sound you can achieve here is pretty crazy. Here are some quick examples:
Timeless 2 is quite a complex plugin and would deserve its full guide one day. For now, let’s go over some of its most popular features:
Both left and right channels have their own feedback level knobs:
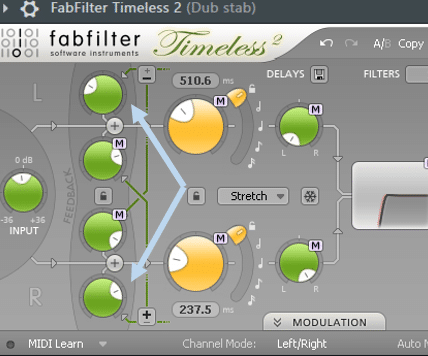
Two additional knobs called cross-feedback delays are also available for both channels. This allows to “feedback” the delay from the left channel to right and vice-versa, creating cool stereo effects. Don’t set them too high though, or the sound will feedback and amplify forever.
The Delay Time lets you choose the interval between delays for both channels:
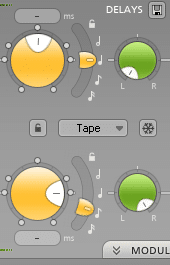
Two delay modes are available: Tape and Stretch. Tape mode acts as an analog delay unit. This means the pitch will be shifted up or down while you change the delay time. When Stretch mode is activated, the pitch always stays the same.
Finally, the Freeze option lets you loop infinitely the delay stored in memory. With the delay times and filters, you can warp the sound in crazy ways. Check this out:
Finally, you have different configurations for your filters:
- Serial: both filters are applied one after the other
- Parallel: the signal is fed to both filters separately, then added
- Channel: each filter applies to only the left or right channel
There are a ton of other amazing features here, so let us know if you’d like a full breakdown!
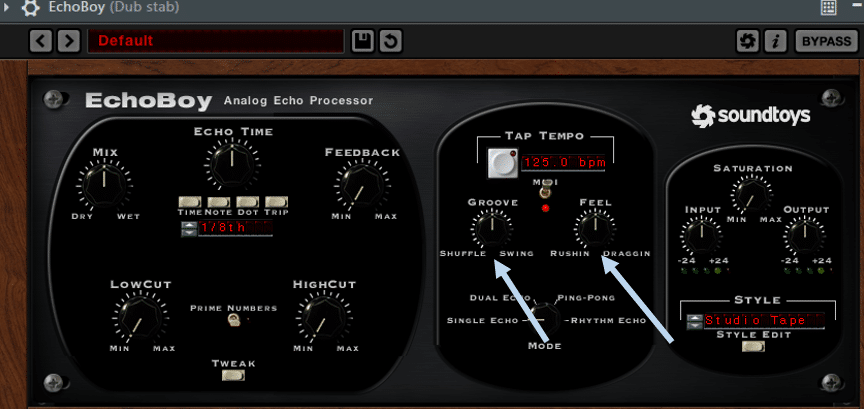
4. Soundtoys EchoBoy (Paid)
EchoBoy is probably my favorite delay plugin. Let’s look at some of my favorite features.
In the Tempo section, two knobs let you fine-tune the Groove and Feel of the delays:
Here’s a loop with Groove and Feel set to zero. The delay feels a bit mechanical:
Let’s compare with the Groove set at 0.103 and Feel set at 0.175:
Groovy!
On top of the multitude of presets, you also get some 30 different delay styles to choose from:
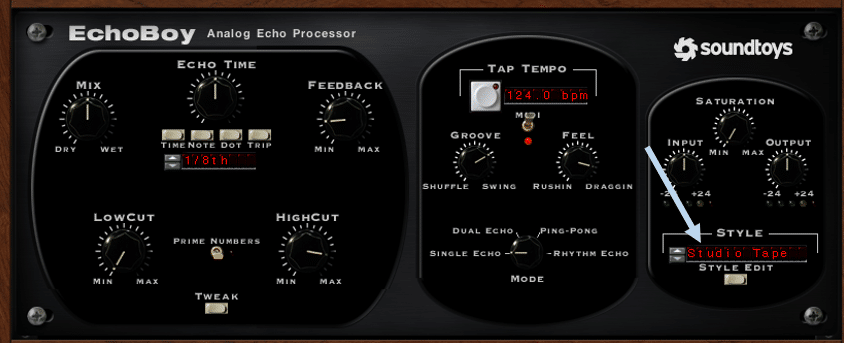
These styles are independent of the time and feedback settings you choose. However, each style has its own sound in terms of saturation, diffusion, and other parameters.
One thing I like to do is set the Wet to 100% so I only hear the delay. I can then browse and fine-tune until I get the sound I like and blend it in.
A quick mention also about the Diffusion setting which quickly creates reverb-like effects. Check this out:
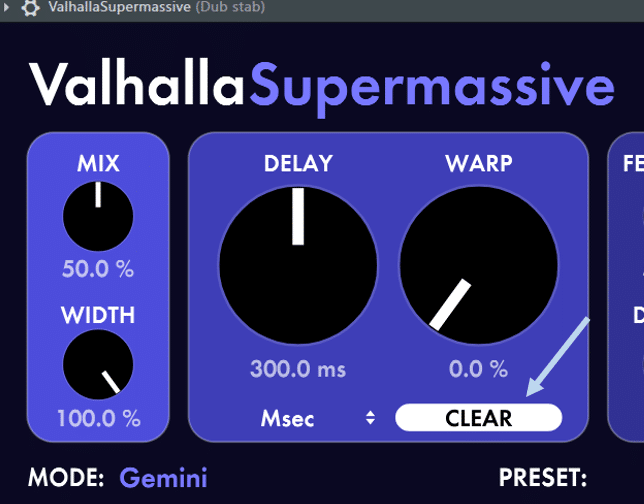
5. Valhalla Supermassive (Free)
Finally, let’s wrap up this guide with one of my all-time favorite free plugins: Valhalla Supermassive.
To this day I’m still amazed that this plugin is free. It has quickly become my favorite tool to create pads of any sort:

This plugin functions both as a delay and a reverb unit. Under Preset, navigate to the SFX section and try some of the presets out. You quickly get other-worldly sounds. Here’s a quick demo:
You can feed pretty much any sound into this plugin and it will sound amazing!
Because a lot of the presets have very long decays, use the Clear button to reset:
After some more free plugins? Check out our huge roundup here.
Last Words
That’s it for this guide on all things delay! I hope you found it useful and were inspired to create some amazing sounds! Did I miss out on anything? Let me know at [email protected].
