Genres have come and gone over the years, but drum and bass has always held its ground.
And there’s a reason – it’s distinctive and energetic sound is infectious, and it’s consistently kept going by labels like Hospital, Shogun and Metalheadz.
So if you’re here, you probably want to learn how to make this sound for yourself.
So in this complete guide on how to make DNB, we’ll get into:
- Common drum patterns and how to construct them
- The different genres and how they differ in production and arrangement
- Where your basslines should sit in the mix for maximum impact
- How to fill out the spectrum with sounds and instruments
- Mastering for that loud, club-ready sound
Lastly, this is applicable across all DAWs, whether you use Ableton Live, FL Studio, Logic Pro X or anything else.
Let’s go.
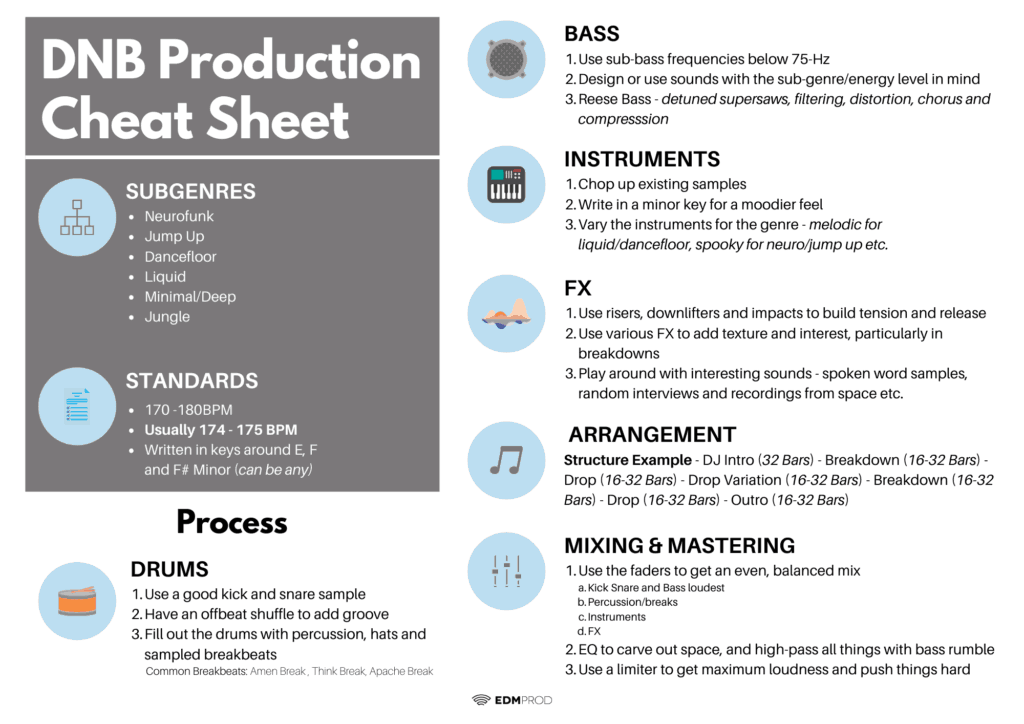
But first, in order to follow along with this guide, make sure to grab our free DNB Starter Kit! It includes:
- A DNB Sample Pack with over 40 high-quality samples
- A DNB Preset Pack for Xfer Serum
- A cheat sheet for DNB production
General Considerations
As eager as you may be to get into the nitty-gritty of producing DNB, there are a few important points to consider that are essential for any sort of success.
This Is Not A Silver Bullet
You might expect to read this article and walk away as a master of drum and bass production. Let me disappoint you – that will not happen.
While this article aims to be as comprehensive as possible, you must dedicate time and effort into your craft in order to become a good producer.
What this article will do is provide you with a solid framework for making DNB.
No more short YouTube videos showing you how to make a particular bass (as much as they can be helpful). This article will give you the knowledge necessary to make a drum and bass track from start to finish.
So my recommendation would be to follow along in your DAW as you walk through the article. That way, you will maximize your potential for improving as a music producer.
And if you need an introduction to music production in general, check out EDM Foundations.
The Many Faces of Drum & Bass
One of the beauties of DnB is that it’s such a multi-faceted genre.
You can have both heaving basslines and soothing pads across the spectrum of subgenres. So it’s important to have a particular style in mind when producing (or you could combine some). Here are the main:
- Neurofunk
- Black Sun Empire, Noisia, Mefjus
- Jump Up
- Macky Gee, Heist, Original Sin
- Dancefloor
- Dimension, Sub Focus, Camo & Krooked
- Liquid
- Netsky (old), High Contrast, Nu:Tone
- Minimal/Deep
- Alix Perez, dBridge, Icicle
- Jungle
- Goldie, Roni Size, Shy FX
Across this guide, we will provide alternative paths that you could go on depending on the subgenre you are planning on making (and we may also do a dedicated guide for each in the future).
Standards
Most drum and bass tends to be written between 170-180bpm, with the majority falling at 174-175bpm, as it seems to have a fast enough pace without being too fast.
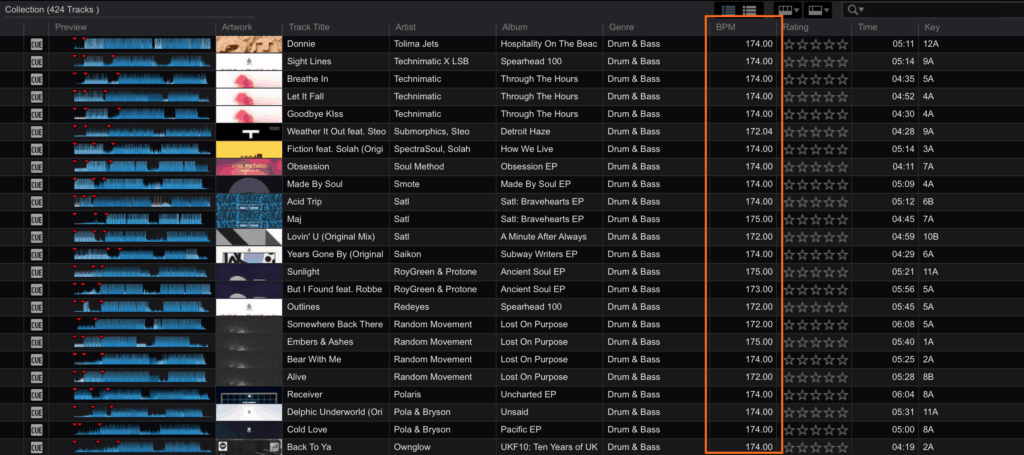
Many tracks will also be written in a minor key to give the genre a ‘moodier’ and ‘driving’ feel. More on this later.
Let’s get into the real stuff.
Step 1: Drums
Because it wouldn’t be drum and bass without, well, drums.
Subgenres aside, the drum patterns in drum and bass tend to stay very similar in terms of rhythm.
Kick & Snare
The core drum and bass drum pattern is a kick drum-snare pattern that sounds as follows:
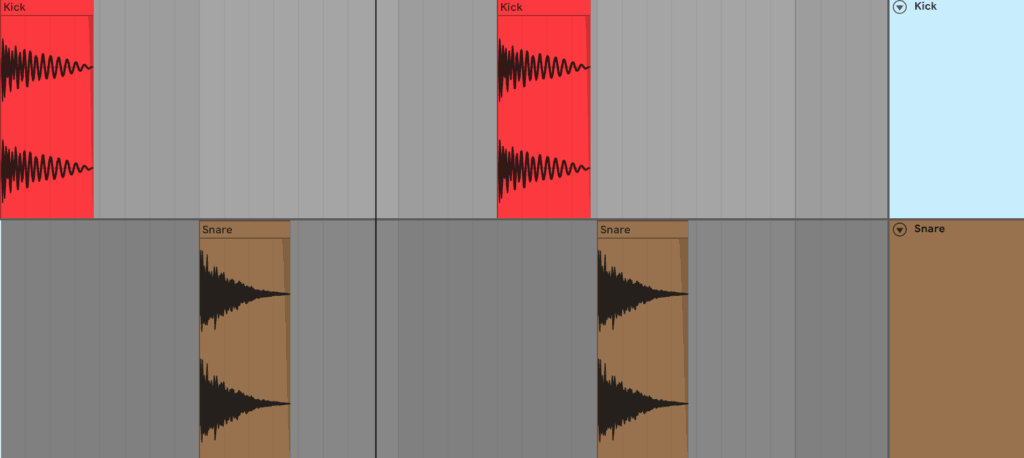
This kick-snare pattern can have many other variations too, such as the extra snare or one less kick, etc:
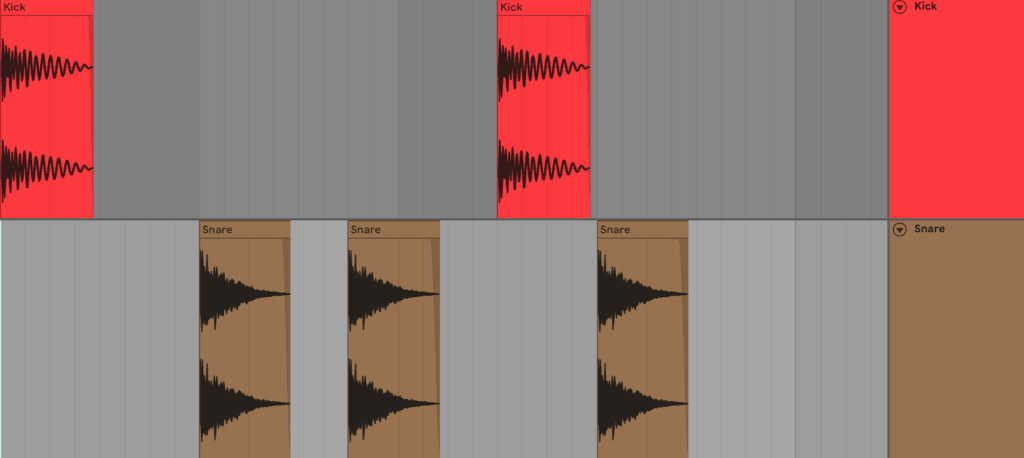
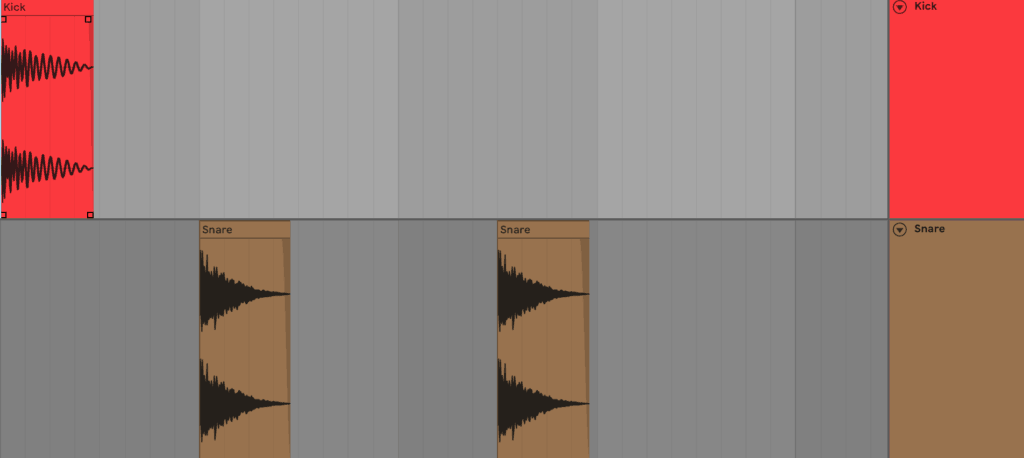
The possibilities are endless, but these are a few common options.
The sound of the kick and snare are crucial to the energy level of the track and therefore the genre you are making.
For example, if you are making Dancefloor DnB, then you’ll want a really punchy kick with weight and a very heavy and bright snare, both of which should fill out the bottom end.
Whereas if you were making liquid or minimal, you would have snappier, softer samples that perhaps sit a bit higher in the frequency spectrum.
The Shuffle
A major feature of a DnB drum pattern is the ‘shuffle’. This percussive element consists of a series of 1/16 notes after the first snare of each bar.
This technique is borrowed from funk and soul drummers, where the emphasis on the offbeat was used to add a feeling of groove to the drums, rather than having a boring, stale and straight kick/snare.
You can program a basic shuffle with some hats, percussion and or ghost snares. Or, there are many samples out there that can be used as pre-made shuffles.
Tip: Ghost snares are just normal snares, traditionally played by a drummer to vary up the rhythm and velocity of a drum pattern. In production, this may be emulated through the use of different snare samples.
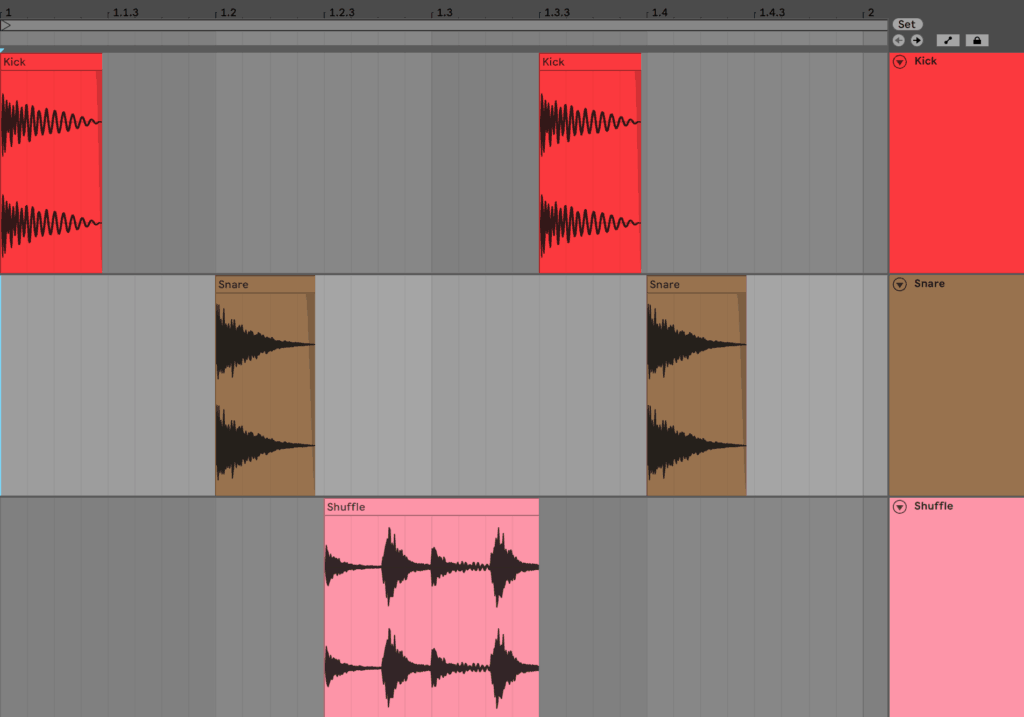
If you’re using sampled breakbeats, many of these will have shuffles in them already, so be aware when layering extra samples that you don’t overcomplicate the drums.
Hats, Percussion & Breaks
Apart from the shuffle, the other factor that can dramatically change the feel of the track is the hats, percussion and use of sampled breaks.
Percussion Samples
You can add any number of hats, shakers, tambourines to fill out the rest of the percussion.
Generally speaking, faster rhythmic patterns add more energy.
General Percussion
Once again, consider the rhythm when layering in percussion and hats. It’s fine to have elements that are fairly consistent throughout, but make sure to balance that with other elements with offbeat emphasis.
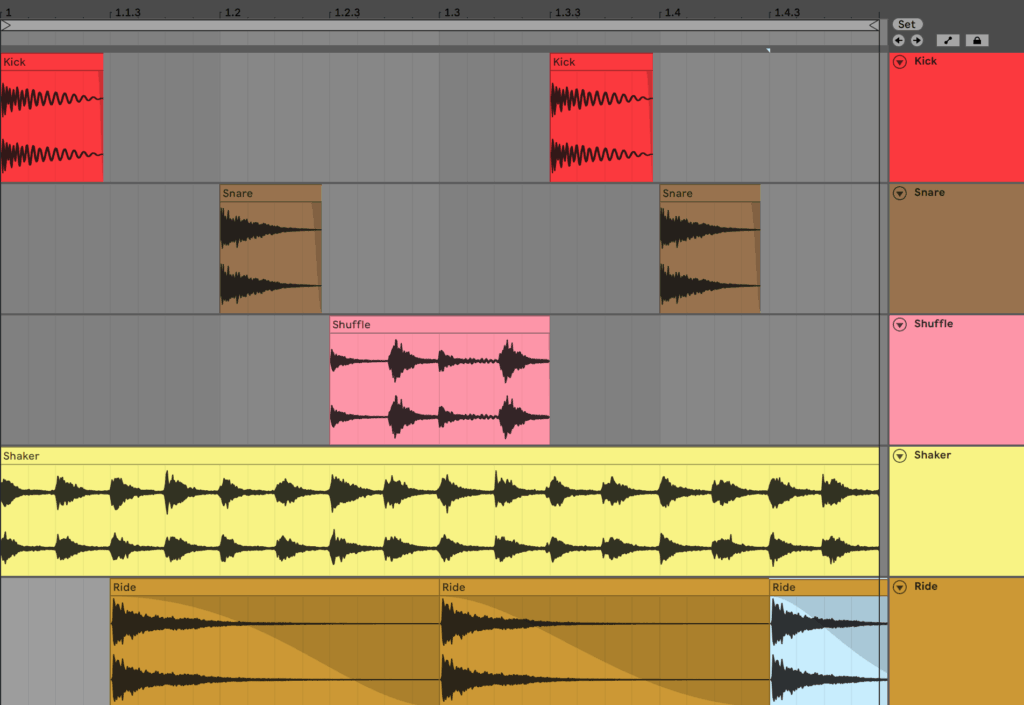
For example, you might have a shaker loop in the background for every 1/16 note, along with a kick and snare:
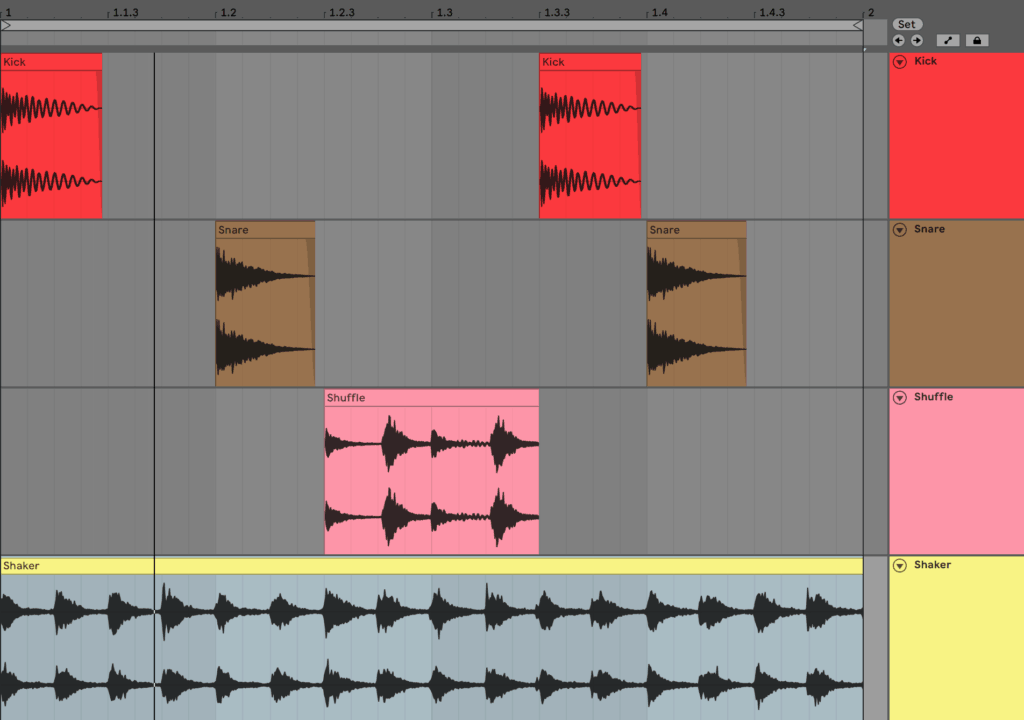
But to add more interest, you could add a ride on the offbeats that pokes out a little more in the mix, giving the loop a human feel.
Sampled Breakbeats
Depending on the style, you may also want to consider layering in some classic breakbeats, which are particularly utilized in Jungle (many jungle tracks just use a sampled breakbeat).
Not only do these add extra rhythmic interest, but also textural interest, due to the age of the recordings and the technology used at the time.
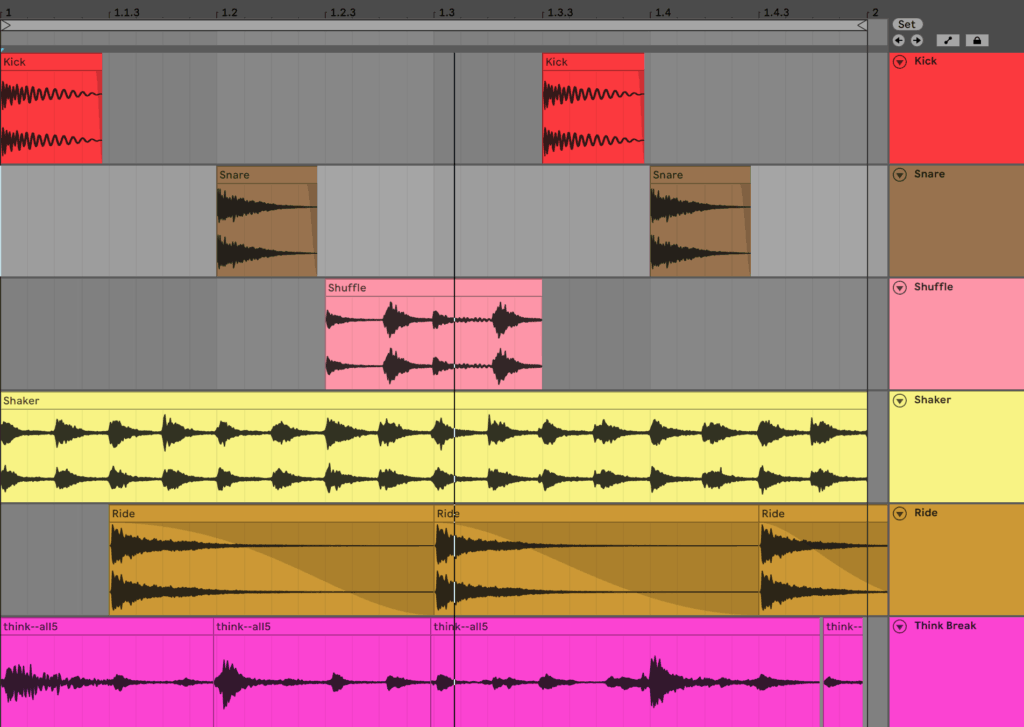
When layering these with other percussion elements, it’s important to consider the role of the sound, and whether it improves or takes away from the drums as a whole. This is especially true when using multiple sampled breakbeats, where things can get messy if you’re not careful.
Here are a few considerations:
- Many of these samples are originally recorded at a much slower tempo and are sped up to work at a DNB tempo. The time-stretching algorithm here is very important, as it can drastically alter the sound.
- For an old school feel, using a standard repitch mode works well to preserve the punchiness and flow, but you lose the original texture.
- These drum samples were likely played by humans, meaning you might need to make them work on the grid through warping and time-correction.
- Sometimes you might need to manually adjust the audio and line up the drum hits on time, as warping might destroy the integrity of the sample.
- If using another kick and snare, consider how layering these breakbeats affect the sound of your other samples. You might like it, or you might need to process one to make space for the other.
- Generally, you might like to add a high-pass to your breakbeat to solve bass clash.
- Old breakbeats may have strange tonalities and textures that may need to be resolved with EQ. Don’t be afraid to get a bit surgical to make them work in your mix.
Names of some classic/popular breaks you can sample. Don’t be afraid to find other ones to use though:
- Amen Break
- Think Break
- Apache Break
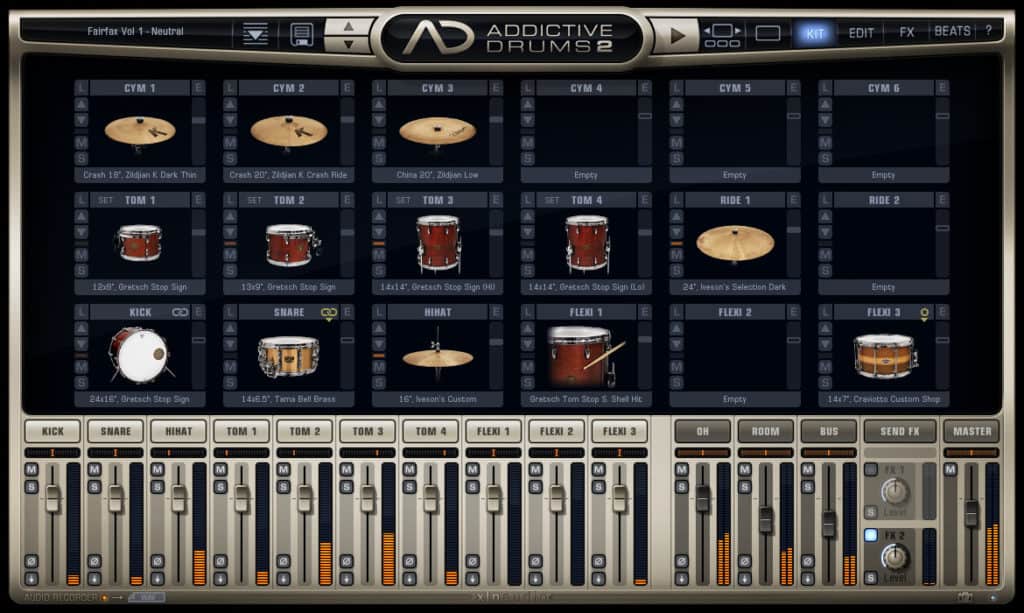
If you want to get creative, you can get a drum instrument plugin (e.g. Addictive Drums) and program your own human drum patterns, and then process them to taste to add your own textures. This is not necessary but can give you greater control.
Finding Good Samples
Traditionally, many of the drum sounds in DNB have come from short snippets of chopped breaks, giving the genre it’s organic yet rolling feel.
Today, a lot of drum and bass tracks combine these techniques with synthesized and processed drums to give you more control and power.
Apart from our free sample pack, using a service like Splice Sounds (sponsored link) or Loopcloud can help you find the particular sounds you are looking for. A few pointers:
- Don’t be afraid to use samples from your favourite artists’ sample packs – use whatever helps you get the sound you’re after
- Use random sorting to find lesser-known sounds
- Get a few options to see what you like best in the context of a track
- Think of the bigger picture when choosing a sample – it might sound good on its own, but not with the rest of your drums
Remember this: there’s no point making the drums from scratch if they already exist. Use high-quality samples and your life will be much easier.
As for sampled breaks, you’ll have to do some digging of your own to find these. Many producers have chopped and recorded these drum loops for you to use and download, so a quick Google search should suffice.
Recommended: Free Sample Packs
Step 2: Bass
As with drums, the bass is an extremely important part of DNB (obviously).
But in this case, there are a few best practices to consider when writing basslines for DNB.
Notes & Frequency Range
Most DNB basses occupy the sub-bass frequency range, which is typically from about 75-100Hz downwards. This is the frequency range that is well-reproduced by a subwoofer and that vibrates the human body.

This range is different because it often isn’t reproduced very well by traditional speakers and earphones, making it better suited to bigger systems.
Because this range can be very temperamental and important to get write, a lot of drum and bass tends to be written in keys like E Minor, F Minor and F# Minor.
This is because bass tends to be low enough to be felt well, but high enough to still be heard.
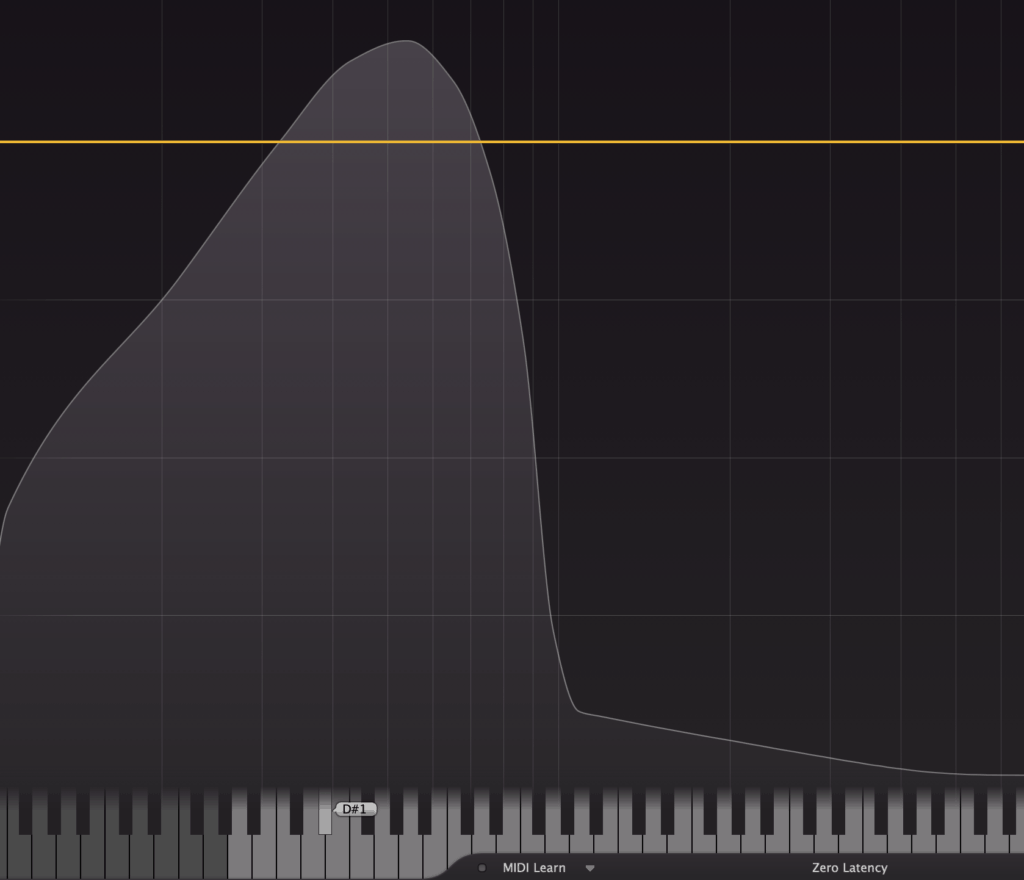
The sweet spot tends to be between D#1 and G#1, in terms of striking a balance between ‘feel’ and ‘listenability’.
Frequencies under D#1 (38.89Hz) tend to be poorly heard by the human ear, and they take up a lot of headroom in the mix.
However, frequencies about G#1 (51.91Hz) tend to still be heard well but start to become less and less ‘felt’ when played on a system with dedicated subwoofers, which is most clubs.
This is fine for less bass-dependant subgenres like liquid, and it’s not a crime to jump into this range (as that can stifle creativity), but try to stick to lower notes where you can.
Of course, don’t get too caught up in what notes your playing, and definitely don’t sacrifice musicality for engineering.
Recommended: EQ: The Ultimate Guide
Sound Design
With the ideal notes in mind, the sound of the bass itself can vary quite a lot.
In deeper subgenres like Liquid and Minimal, the basses tend to utilize less distortion and upper harmonics (through softer distortion and/or filtering), and in many cases are comprised of just a single sine wave.
A sine wave (used above) works well as it clearly reproduces the dedicated frequency, which is once again ideal for club use and clean bass.
The problem is, that it isn’t reproduced well on high speakers. So to compensate, you can add a subtle amount of saturation to warm up the sound.

But in more intense genres, more distortion and FX can be used to add energy, colour and interest. One of the more common of these sounds is the ‘Reese Bass’.
A Brief Guide to ‘Reese’ Basses
Reese basses are a staple in drum & bass and have been for a very long time.
The use of them varies between subgenres, but typically they feature longer, drawn-out bass notes with subtle movement over time. In higher-energy genres, the basses can have a lot more variation and quicker movements.
Reese basses tend to be made of the following:
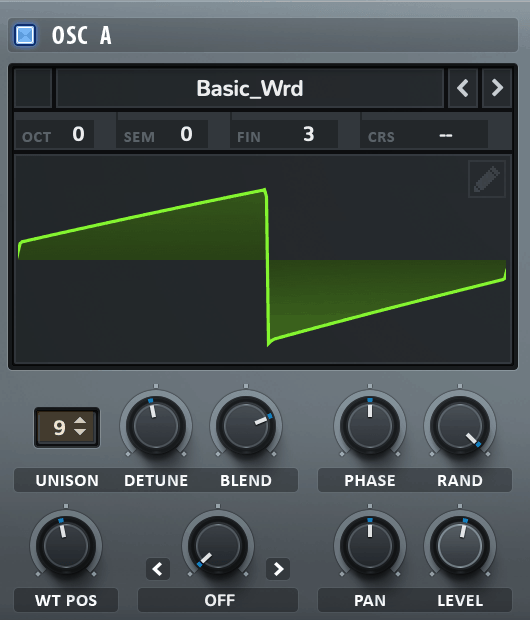
- A supersaw (detuned saw with many unison voices) playing a low note
- As many supersaws spread across the stereo field, this adds a lot of ‘width’ to the bass, giving it a large feeling.
- Using multiple oscillators can help to achieve a thicker sound
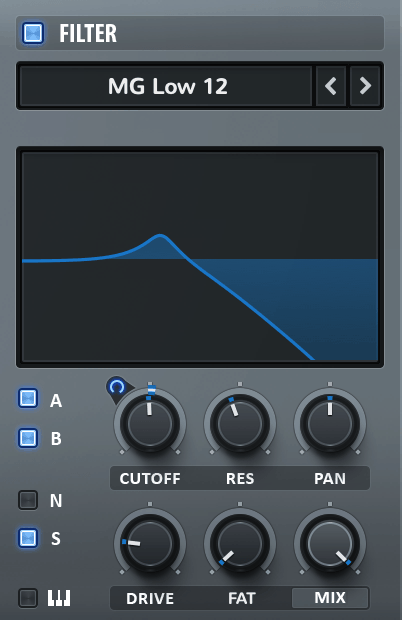
- Filtering
- A filter’s cutoff can be automated to move the bass during the track in certain parts (or for the whole track).
- Set the resonance to taste, but it’s easy to overdo it.
- The distortion can come after filtering to add colour, but this is optional.
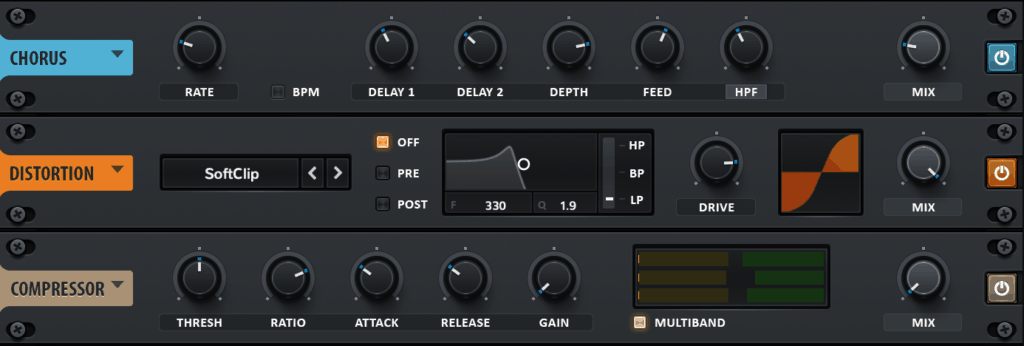
- Chorus, phaser and/or flanger modulation to add movement
- These time-based effects can add motion to the bass, which is important in subgenres where the bass occupies a lot of the spectrum. Chorus, in particular, can also add nice width to the sound.
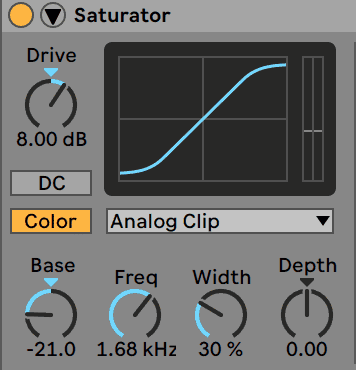
- Saturation and distortion
- Distortion is key to adding grit to basses, especially in genres like Neurofunk and Jump Up. Usually, a tube or clipping distortion sounds pleasant, but you can get creative here.
- Compression or multiband compression
- A more recent technique is to use subtle amounts of OTT compression in order to control the dynamics of the sound, especially where movement is present.
A lot of the time, producers opt to layer this with a clean sine layer to still get that deep bass feeling.
Recommended: 100 Sound Design Tips
Step 3: Instruments & Samples
So we’ve made the drums and the bass, so why not stop there?
Even if it’s all about the drums and basses, people still remember the melody.
Truth be told, all genres of DnB make use of some sort of melodic or harmonic idea, even if very vague and through the use of samples.
Sampling
In fact, DnB borrowed a lot of sampling techniques from hip-hop in its heyday. But as technology progressed, it’s now possible to use synths, recordings and samples as part of the composition.
Sampling is still a major part, and traditionally this was done by sampling a lot of funk, soul and jazz records (a lot of the time done without clearance too, which is harder these days).
There are lots of royalty-free samples you can use on platforms like Splice to find musical loops and samples to chop, mangle and process into your own DNB productions.
Here’s an example of a sample I downloaded of Splice and how I reworked it by chopping it into my loop.

Composition
While genres like liquid tend to utilize more ‘traditional’ forms of composition (melodies and chords), it’s still important to consider the tonality of sounds in other subgenres. In the majority of DNB, tracks are written in a minor key. Here’s a quick breakdown:
Liquid
- Soulful and emotional chord progressions, can be written in a major or minor key.
Neurofunk/Jump Up
- Usually one-note basslines in a minor key (often uses a Phyrigian or Locrian mode), tending to utilize repetition of the same root note and playing with the rhythm.
- Minor chords in the breakdown can be used to add atmosphere.
- Lots of atonality across the board.
Dancefloor
- More pop-friendly chord progressions, catchy melodies and bright sounds.
- Lots of layering sounds to get a thicker, fuller mix.
Minimal
- Written almost always in a standard minor key, using the pentatonic scale for bass notes.
- Short, stabby synths are used to give an urgent feel.
Jungle
- Tends to utilize sampled soul/jazz chords and sampled basslines.
- Features vocals sampled from reggae/dub tunes.
Step 4: FX
FX play a massive role in drum & bass, as they are key in building energy and transitioning between sections.
Building Tension with Risers, Downlifters and Impacts
Tension is the name of the game with DnB, and FX contribute a lot to that.
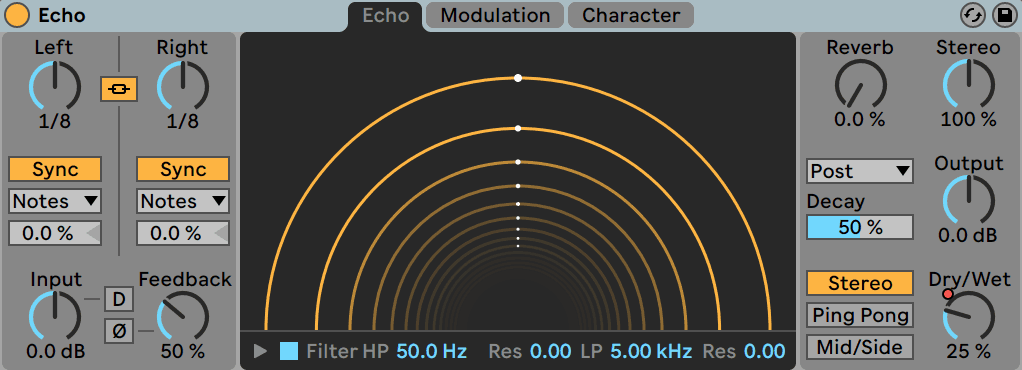
The most simple FX used are sweeps of white noise and crashes, which are standard for electronic music across the board.
Riser:
Downlifter:
Impact:
But they can also vary a lot more than that, with pitching oscillators, moving filters and raging distortion.
As always, more subtle, less aggressive sounds can be used in genres like liquid and minimal, whereas intense FX would be used in neuro, jump up and dancefloor.
You can find different risers, downlifters and impacts from sample packs, or you can synthesize them on your own.
If creating your own, consider the following:
- The length of the FX sample is important and is often dictated by the length of the section in which it’s being used
- Use volume and filters to bring sounds in and out, creating crescendo/decrescendo effects
- Utilize FX processing to add creative interest
- Make use of organic samples as a source if you want more interesting sounds
Other FX
Like with many genres, you can use all sorts of creative FX – because drum and bass is not limited to just tension-building sounds.
You can use speeches, foley and any manner of crazy sounds to spice up your productions.
In fact, some producers use spoken-word vocals as the main hook in their tracks.
I’m not going to provide any examples here as the possibilities are too broad. The key here is to think outside the box.
Step 5: Arrangement
Now that you’ve got a bunch of elements, you need to bring everything together.
Structure
Like many forms of electronic and dance music, drum & bass is made primarily for a club environment. This means it’s made for DJs.
When writing for DJs, you’ll normally need to include some sort of intro for at least 16-32 bars, otherwise, the core idea will come in too quickly and you won’t be able to create a good transition.
Same goes for the outro, as the DJ will likely be blending in the next track.
Normally, the overall track structure is as follows:
DJ Intro (32 Bars) – Breakdown (16-32 Bars) – Drop (16-32 Bars) – Drop Variation (16-32 Bars) – Breakdown (16-32 Bars) – Drop (16-32 Bars) – Outro (16-32 Bars)
An example:
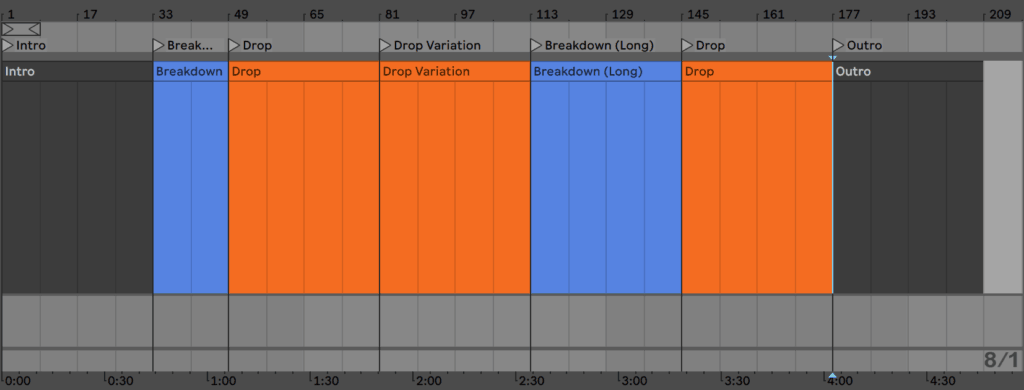
Therefore, it’s uncommon to see DnB tracks that are under 4 minutes, and some can go as long as 7-8.
Note: If you’re also trying to make your music stream-friendly, consider opting for the 4-5 minute mark as a maximum, or even creating a separate edit for the platform that sits at 3-4 minutes (without the DJ intro/outro), as Spotify and the like prefers shorter music.
Instrumentation & Layering
Drum and bass is a loop-heavy genre and therefore has a lot of repetition with subtle addition, subtraction and manipulation over time.
Most of the time, you’ll have a drum break with a bassline as a standard, with a melody/hook on top for interest, while FX will be scattered around to move the energy level of the track.
Apart from that, DNB doesn’t tend to be a very ‘dense’ genre, except maybe when layering pads in genres like liquid, or in atmospheric breakdowns in other subgenres.
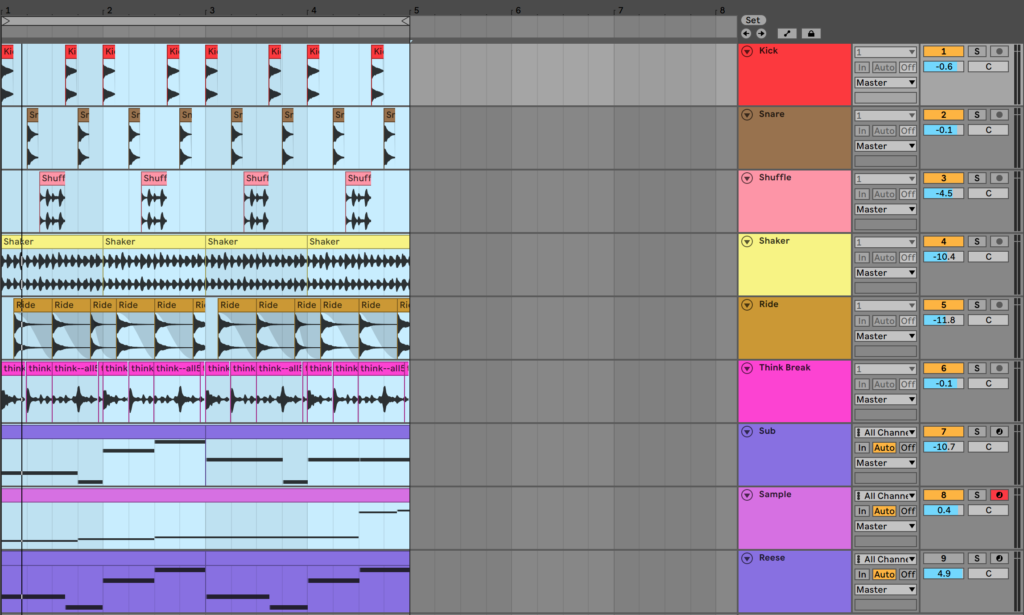
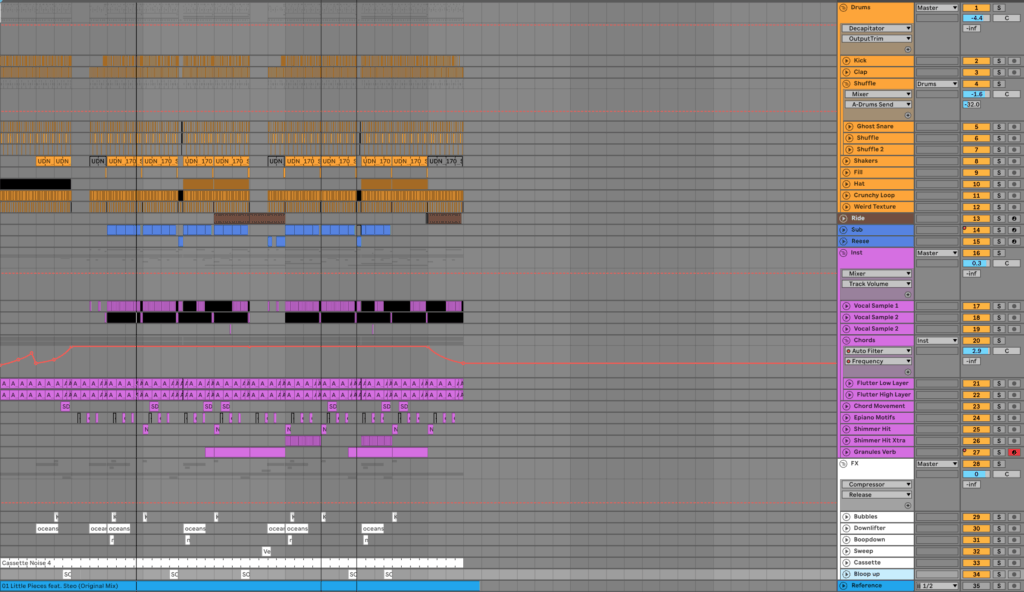
While the number of channels used in a project can be very workflow-dependant, generally you could get away with anywhere between 10-30 channels for most tracks, going beyond that for more complex bass-oriented genres (Neurofunk etc.), sometimes up to around 100.
This is due to the number of different bass sounds used in those genres, and even if they only occur once in the track, they may need their own channel.
My last liquid drum & bass track that I personally finished had 35 channels in total:
Step 6: Mixing & Mastering
The process of mixing DnB has to be done in a very particular way, otherwise, you can end up with a weak and messy track.
Mixing
The aim when mixing DNB is to have a very balanced mix while not compromising musicality. Heavy amounts of compression and distortion may be used for a lot of the bass sounds, but often there is still movement in the dynamics.
Volume
In terms of volume, you want the drums to poke through fairly well, generally with the kick and snare sitting slightly above the rest of the drums.
Heavier genres may have a much louder kick and snare to get that dancefloor energy.
Secondly, the level of the bass should be fairly on par with the drums. Usually, the kick will have a bit more room the punch through over the bass, but there won’t be a huge difference (this can also be achieved with sidechain compression, but basic mixing should solve the majority of kick-bass problems).
Any melodies, hook elements and instruments usually sit just under the drums and bass, creating a nice bed for the rest of the track, and FX are usually pushed a bit more towards the background, maybe coming in louder during builds and energy changes.
Example
On my most recent liquid track, I spent a lot of work on the mixdown, even changing things by 0.1dB to get them to sit in the right place.
Although (of course) there are things I’m still unhappy about, overall I think the mix came out nicely, and most of it was achieved through volume changes, big and small.
EQ
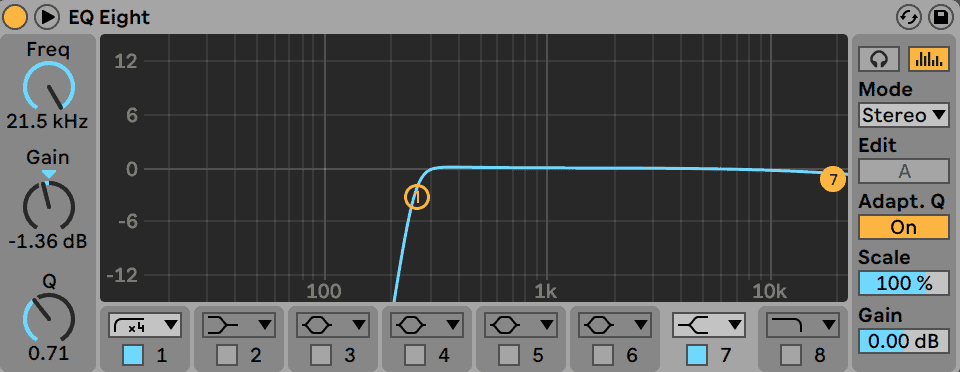
EQ is very important in drum & bass, as you want to carve out maximum space for the kick, snare and bass to poke through well. This is typically achieved by using high-pass filters to roll off and unnecessary low end.
It’s ok to get away with more aggressive filtering in drum & bass, as a clean sound is ideal for a club-ready track. Where you cut is also a very important consideration, as you can easily ‘thin’ out the track too much by putting the cutoff too high. Make sure to EQ in the context of other sounds to hear things relatively.
Make sure to use reductive EQ to take out problem frequencies. These problem frequencies can build up anywhere on the spectrum (depending on genre), but normally too much 200-500Hz can make a track sound muddy, and too much 1k-3k can start to sound sharp and too resonant, as our ears are very sensitive to this area.
How much gain to reduce is simply a matter of context. Err on the side of less, otherwise, you may affect the sound too much and therefore it will lose its character.
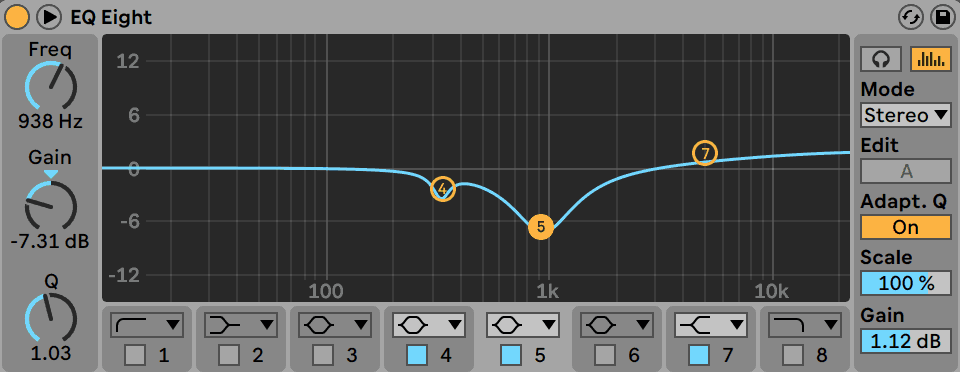
Of course, boosting is also fine, but use it sparingly. Otherwise, you’ll end up with a nightmare of frequency buildups.
Always cut, then boost.
Compression
In order to get a well-rounded track, you’ll find yourself using compression to balance out overly-punchy dynamics and weird volume inconsistencies.
Fast compression can be used to tame overly-punchy drums and slower compression can be used to even out groups and other sounds.
It’s also not uncommon to see multiband compression being used either, as you can control the energy of certain elements by just compressing the lows and highs. Just be careful when using it on the mids as it can make a mix sound overly processed.
Recommended: Mixing EDM
Other Mixing Tools
Saturation, reverb, delay and other effects are also great tools to use when you need to use them. There are no specific use cases, so feel free to use them subtly to add interest and warmth to your channels and groups.
Mastering
As with any music, if you’re not familiar with mastering, you can hire a mastering engineer to do it for you. Many labels will get their own mastering done as well.
But let’s run through a general chain of plugins you might have on. These aren’t all necessary in all cases but can be helpful to achieve a loud, standardized master.
Buss Compression
You might like to use a bit of compression to ‘glue’ the mix together before applying further processing.
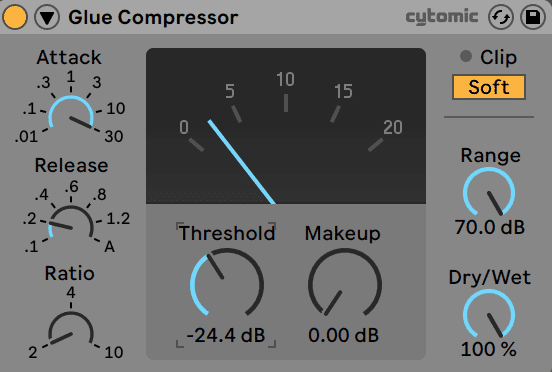
I like to use Ableton Live’s Glue Compressor to dial in some analogue-style compression. Normally on the default settings with no more than 1-2dB of gain reduction after adjusting the threshold. I then bring up the gain to compensate, making sure ‘soft clipping’ is on incase.
Multiband Compression
As with the mixing stage, multiband compression can help balance out certain areas of your mix’s frequency spectrum. If the highs are too piercing, you might want to control them with some fast yet subtle compression above 10kHz.
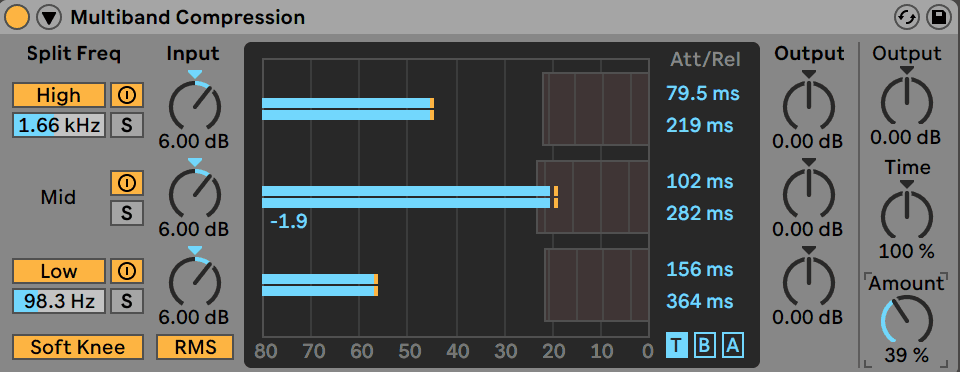
As you can customize the settings for each band, you can get a much more transparent form of compression than the standard variety.
Limiting
If there’s one essential thing you need to do in the mastering phase, it’s limiting.
It’s the thing that takes your mixes from good to great and gets that final polish all-round.
Generally, you’ll want to pull out a third-party plugin, as most DAWs don’t have great limiters built-in.
I recommend something like FabFilter Pro-L 2 (a personal favourite) or iZotope Ozone’s Maximizer.
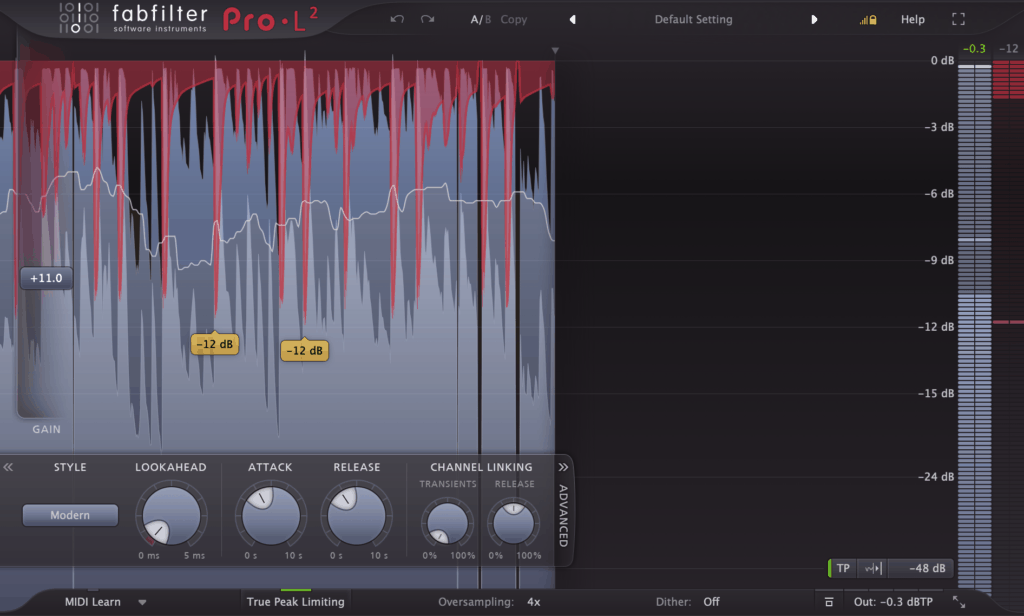
Once this is loaded up, I’ll add some gain until I can hear the limiter working too hard. Then I’ll change the settings – I’ll use fairly aggressive style (either Transparent, Modern or Aggressive in Pro-L 2 or IRC IV in Ozone) with a short lookahead and short to medium attack and release.
Once this is set, I’ll play with the gain to see if the new settings allow for more loudness. When it’s at the max possible, I’ll compare it to a reference track.
If mine doesn’t hold up, normally something in the mix will be causing the issue and I’ll have to backtrack. I repeat this process until I get the desired result.
And there you have it – that’s the basic process of writing a drum & bass track!
Need Some Samples?
So you’ve followed the article, but maybe you haven’t put things into practice yet.
Well, make sure to grab our FREE DNB Starter Kit, which includes a sample pack of over 50 drums, FX and sounds, as well as some presets for Xfer Serum.
Any questions? Hit me up at [email protected].

